Instruction Example 1.2. Ceiling Formwork Making
This example serves to practise making of a ceiling formwork in
a room of given dimensions.
Material
Formwork boards 25 mm thick
squared timbers 120 mm x 100
mm
round timbers of 150 mm diameter
various wooden wedges
nails of
different sizes
Figure
Hand tools and machines
Circular saw, hand saw, hammer, wrecking bar with claw, nail
pincers
Measuring and testing means
Folding rule, try square, water level, measuring rod
Auxiliary accessories
Paper, pencil
Necessary previous knowledge
Manual sawing, working with the circular saw, measuring ,
scribing, nailing, sketching
Explanations to the working drawing
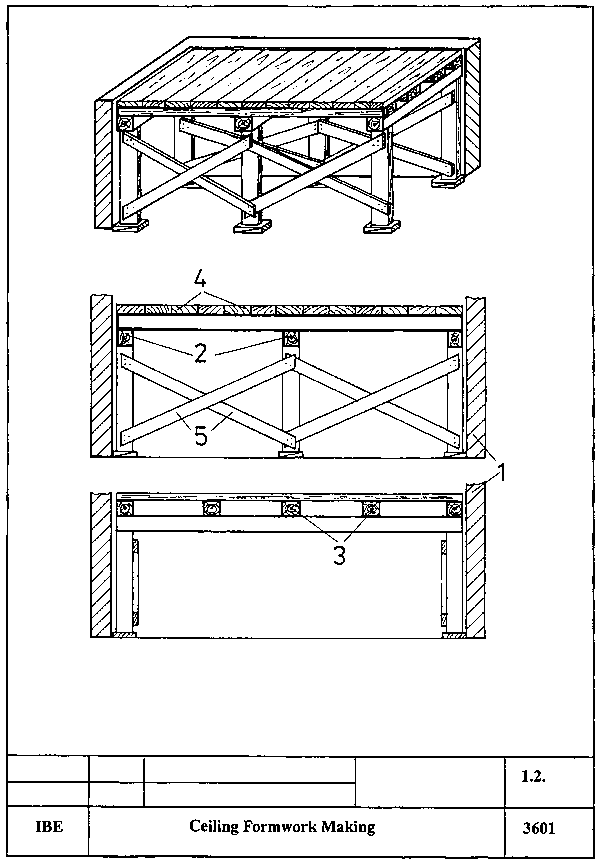
1 walling, 2 trestle timber, 3 formwork bearer, 4 sheeting
boards, 5 diagonal (cross) bracing
|
Sequence of operations |
Comments |
|
1. Study the formwork project and/or prepare a formwork sketch.
|
Dimensions in the instruction example are guidelines only! |
|
2. Make available the required tools and materials. |
Use sharpened sawing tools only! |
|
3. Determine the column height and cut up the column. |
Six columns are to be produced; the height depends on the height
of the room (see Trainees' Handbook)! Cleats for fixing are to be provided at
the sides of the columns! |
|
4. Cut the trestle timbers to length. |
For an assumed narrow side of the room of 3.5 m three trestle
timbers are to be produced! |
|
5. Fix the trestle timbers, cut up and nail diagonal bracing and
erect the trestle. |
Fix the trestle timbers through the cleats to the columns. Lean
the right and left trestles and one side of the centre trestle against the wall!
The trestles are to be put to the floor for nailing. |
|
6. Secure the trestles provisionally. |
Erect the trestles and drive wedges between the wall and end
face of the trestle timbers. 3 persons are required for this work! |
|
7. Level the trestles. |
Use water level and levelling board for levelling. Adjust the
height of the columns by means of packing wedges. Columns must be exactly
perpendicular. |
|
8. Fix the formwork bearers on the trestles. |
Cut formwork bearers to length and put them on the trestles at
certain intervals (60 to 70 cm). Ensure parallelism! Use nail pins for fixing.
|
|
9. Nail on the sheeting boards. |
Cut sheeting boards to length and nail them onto formwork
bearers. In view of later stripping, do not use nails which are longer than 50
mm! |
|
10. Check the formwork for accuracy to size and for strength.
|
Make corrections in case of deviations. For bigger rooms place
more columns under the trestles. |