
| Preserving Food by Drying: a Math-Science Teaching Manual (Peace Corps, 1980, 218 p.) | ||||
| Part 1. Weather | ||||
| (introduction...) | ||||
| Chapter 1. Water | ||||
| Chapter 2. Sun and air | ||||
|
| |||||||||||||||||||||||||
The activity lessons in this part provide the basis for an understanding of weather. This is done by looking at some interactions of water and air with energy from the sun. Important concepts are learned during the study of these interactions which provide a basis for designing and operating food dryers effectively.
Part I is presented in two chapters. The first chapter includes activities about water and its relation to weather. The second chapter is concerned with the sun and its energy, and includes activities relating to conduction and convection. In the final activities of this chapter, students build and test small devices that are, in fact, simple models of food dryers. The concepts learned in the activities in this part are expanded in Part II and applied to the construction and testing of large food dryers. Part III supplies the rationale for preserving perishable foods by showing that good nutrition is possible throughout the year.

Figure
The number of weather ideas to include or emphasize is dependent on the science skill level of the students and on what they have studied previously. This part concentrates on what could be called the "microscopic view" of weather, with emphasis on developing a familiarity with evaporation and condensation, and how the presence of the sun's energy affects these processes in nature. The "macroscopic view'', concerned with the influence of oceans and mountain ranges on regional weather patterns, is something that you can introduce i£ the students are unfamiliar with it.
At the conclusion of Part I, the students will be able to:
1. name the three variables affecting the evaporation of water.
2. vary the factors affecting evaporation to increase or decrease the rate of evaporation.
3. make predictions about a system of evaporation when one or more variables are changed.
4. use controls in experimenting, testing only one variable at a time.
After reading through Part I, you may see some areas that need special attention because your students lack appropriate preparation. One approach is to proceed slowly through these areas, including additional activities from other sources whenever you find that your students need additional work. Another approach is to precede this part with lessons on weighing, heat, displacement, etc.
To help you plan for materials, in the Appendices there is a chart showing everything needed in Part I. The chart lists all the activities where each item is used. From this chart, you can quickly see which materials are often used, and which materials are only needed for a few activities. Alternatives for many materials are also shown.
Alternate activities for students with particular interests and abilities are offered throughout the unit. Some of the activities involve expanding studies of solar devices such as a solar still. The distilled water produced could be used later in the food preservation and preparation activities in Part III.
A number of the activities in Part I could be conducted at various times during the year as the seasons change. This would be useful if weather studies are to be emphasized. Also, if some students are interested in weather, they could independently conduct the activities each season.
BACKGROUND INFORMATION ON EVAPORATION
The sun's energy is useful to us in many ways. One of them is in the evaporation, transportation and condensation of water. This is known as the water cycle.
As water absorbs the sun's energy, it is warmed and evaporates; it changes from liquid to gaseous water vapor. The rate of evaporation depends on:
1. the temperature of the water.
2. the area of water exposed to air.
3. the ability of the air to hold more water vapor.
When other substances such as salt or dirt particles are dissolved or mixed with water, they are left behind when the water evaporates. Distillation is one process of purifying water whereby water is caused to evaporate, leaving behind impurities, and then cooled to condense the pure water. Rain is essentially pure water that has evaporated from lakes, oceans, soil, leaves of plants, etc. and has condensed in the air high above the earth.
These concepts are developed in the activities. Some of the devices used in these activities can be enlarged and used later during the food preservation and preparation activities. You may want to expand the activities to develop weather studies or follow the suggested sequence to lead more directly to the development of food dryers. If the science students have studied weather previously, you can ask them to summarize their knowledge during discussions.
Activity I-1 EVAPORATION OF WATER
This activity begins the study of evaporation. Students explore what happens when water is allowed to stand exposed to air under different conditions. The students discover or reaffirm that water evaporates at a rate that can be varied by changing the conditions in which the water is stored. Surface area, purity of the water, and temperature are each varied separately. Each of four groups sets up a different evaporation experiment. (You may want to alter this arrangement.) Containers of water are allowed to stand over a period of several days. The students observe them each day to determine how much water has evaporated. Throughout questioning and the discussions of the process, encourage record keeping as well as writing descriptions of experiments. The records can be used during discussions and for future reference. Secondarily, they provide practice in communication skills.
Measuring the volume of water is required in this activity. Students who do not have much experience with the manipulation of measuring vessels may need an extra class period to develop a concept of the hierarchy of measuring units. For example, they could pour water from one container to another, using a variety of containers, until they find relationships such as:
15 bottle caps full = 1 small tomato tin
3 small tomato tins = 1 large tin
Measuring units developed by the students may be more immediately understandable than standard metric or English units. Also, it may be more practical if the supply of standard measuring devices is limited. Developing a system of measurement using available containers and other materials assures that each group of students can have a set of equipment for the activities. Conversion tables for the student-developed system to metric units and to English units can be developed and posted for use.
For these experiments, the class should adopt a unit of volume for water that is an appropriate size to evaporate during a few class periods, You should practice the activity for "Group One" ahead of time so you can find out about how much water to use. It varies a lot in different localities, depending on the humidity and on whether or not there is much movement of the air near the surface of the water.
Many tins are needed for this activity. Ask your students to begin collecting tins now. Every size of tin will be useful, including very small tins. The tins will also be used in many other activities. If each student brings three tins, there will be enough.

Materials
Divide the students into four groups. However, if your class is large and your groups contain many students, make subgroups within each group. The recommended size of each subgroup is shown on the first line of the materials list. Each sub-group should have between two and four members because small sub-groups are better than large sub-groups. The quantities of materials listed are what one sub-group needs. Multiply by the number of sub-groups you have.
Items shown with an "X" can be shared by everyone or by several sub-groups.
Procedure for Croup One Choose several tins of different diameters, and some dishes or trays. On a piece of paper, trace around the top of each container. Save these tracings because they will be used in Activity I-2. Into each container, pour one measure of water. With a ruler, measure the diameter of the container and write it down. Measure how many centimeters deep the water is in each container.
Is the water the same depth in each container?
Which container has the deepest water?
Which container has the shallowest water?
Does each container have the same amount of water?
Which container has the largest area inside the tracing on the paper?
Do you think there will be any change in the amounts of water in these containers tomorrow?
Put the containers in a shady place where they will not be disturbed.
Day 2
How deep is the water in each container today? Write down the measurements.
Which container do you think will have the most water after another day?
Which container do you think will have the least water after another day?
Procedure for Group Two Choose four tins of the same size. On a piece of paper, trace around the top of one of them and save it for Activity I-2. In the first tin, put one measure of water. In the second tin, put one measure of water and a quarter (1/4) measure of salt. Stir. In the third, put one measure of water and a quarter measure of sugar. Stir. In the fourth, put one measure of water and a quarter measure of cooking oil. Stir. Label the tins. Measure how many centimeters deep the liquid is in each tin. Write these measurements down.
Do all the tins contain the same amount?
Which tin has the deepest liquid?
Do any of the tins have the same depth of liquid?
Do you think there will be any change in the amounts of liquid in these tins when we measure them tomorrow?
Put the tins in a shady place where they will not be disturbed.
Day 2
How deep is the liquid in each tin today? Write down the measurements.
Which tin do you think will have the most liquid after another day?
Which tin do you think will have the least liquid after another day?
Is there any difference in the appearance of the tin that has salt dissolved in it and the tin with sugar dissolved in it?
Procedure for Group Three Choose four tins of the same size. On a piece of paper, trace the open top of one of them to use in Activity I-2. With a smoky flame, cover the outside of two of the tins with soot. Then pour one measure of water in each of the four tins. Measure how many centimeters deep the liquid is in each tin, Write these measurements down.
Do all the tins contain the same amount?
What do you expect will happen to the water in the tins?
Place one black and one shiny tin in sunlight and one black and one shiny tin in the shade. Place the tins so they will not be disturbed. If they are likely to be disturbed outdoors during the night, bring in all the tins that are kept in sunlight indoors each night and put them in sunlight again each morning.
Day 2
How deep is the liquid in each tin today? Write down the measurements.
Which tin do you think will have the most liquid after another day?
Which tin do you think will have the least liquid after another day?
Do any of the tins have the same depth of liquid?
Procedure [or Group Four Choose two tins of the same size. Trace the top of one of them on paper to use in Activity I-2. Cut two round pieces of cloth about three times the height of the tin from the same piece of cloth. They need not be exactly round. Each sub-group in Group Four should use a different kind of cloth for its pair of tins if possible. Make a hole in the center of each cloth large enough so the open end of a tin can fit into it. Next, choose two trays or wide bowls that are several centimeters deep. As support, put three small stones, or a small short tin with a hole punched in its bottom, into each bowl. A tin will stand on this support. Put one cloth over each tin so the open end of the tin comes out of the hole. With string, tie the cloth onto the tin near the open top of the tin.
Into one bowl, pour almost enough water to cover the support. Leave the other bowl dry. Put each tin, with its cloth, into a bowl so it stands on the three stones or on the short tin. The cloth should drape into the bottom of the bowl. Pour one measure of water into each tin.

DIAGRAM 1
Measure how many centimeters deep the water is in each tin. Write these measurements down.
Does each tin have the same amount of water?
Do you think there will be any change in the amounts of water in these tins when we measure them tomorrow?
Does the cloth with its lower edge in the water become wet all over?
Place both bowls and tins in a sunny location. Carry them carefully indoors each night and put them in sunlight again each morning if they are likely to be disturbed outdoors during the night. Pour extra water into the wet bowl as it is needed to keep the edge of the cloth in water. Do not add water to the tins.
How deep is the water in each tin today? Write down the measurements.
Is anything else different between the water in the two tins?
Have you any theories about how the water in the bowl changes the rate of water loss?
Teaching Method Alternatives
The first day, the students will be occupied setting up the equipment. On the last day, there will be comparison and discussion of results. During the intermediate days only enough time will be needed for the students to observe the liquid in each container and write down their measurements and any other observations. They will do this until all the water is evaporated from most of the containers. During these days, there will be time available to do something else with the students. Here are two suggestions of what to do:
1. Have each group show the others their experiments each day. This will give everyone a chance to know what each group is doing, and to make their own guesses about the results of each group's experiments. If your class is already used to comparing and discussing their results, this alternative will work out well. If the students are not ready to exchange information as outlined above, begin Activity I-2 with whatever extra time you may have in these intermediate days.
2. Begin Activity I-2. In this activity, the students make use of the tracings they make the first day of the sizes of the tins or other containers. They find the area of these tracings, and they also find the area of other things.
Note: The discussion after Activity I-2 uses the results gotten by Group One, I-1, and some of the results from the other groups. Therefore, the discussion of I-2 should not be begun before the students have finished Activity I-1.
Discussion of Activity I-1
At the end of the activity, have each group report their findings to the class. These should include:
1. Amounts of liquid in each container or tin each day.2. Comments about which predictions were correct or not, and ideas that led to these predictions.
3. Each group's conclusions resulting from their measurements and other observations.
During the discussion, introduce the term 'evaporation' after the students have described the concept.
The rest of the class should have a chance to consider the conclusions of each group, and to form a tentative opinion concerning whether each experimental situation is satisfactorily understood. You should allow groups or individuals to do any of these experiments again if they express interest. Tell the students that the next experiments will help them become more familiar with evaporation.
Ask the students if they are aware of situations in nature where evaporation occurs. If some situations are mentioned, ask if these vary with the time of year.
Activity I-2A AREA
This activity provides a brief look at the concept of area which is needed to understand that evaporation of a given volume of water will be more rapid if it is spread out more. The concept of area provides a measurable way of talking about how much of a liquid is exposed to air. If the students have demonstrated an understanding of area previously, such as in discussions during Activity I-1, you can proceed directly to the next discussion after doing Activity I-2A.
Materials
Sub-group size: This activity can be done by each student individually. However, you may decide to have the students work cooperatively in the same subgroups formed for Activity I1.
Grid paper with 1 centimeter squares. You can have students make this, or you can produce it with a hectograph or cyclostyle or other copying device.
Samples of the tins, trays and dishes used in the first activity.
Tracings of tins, trays, dishes from the first activity.
Rulers marked in centimeters.
Scissors or razor blades.
Pencils.
The squares on the grid paper are 1 centimeter on a side. The area each square covers is 1 square centimeter. Have the students trace around the top of a container used in the first activity, or cut out a tracing from the first activity and draw around it on the grid paper.
How many square centimeters are inside the tracing?
A good approximation can be made by first counting all the squares that are completely inside the tracing line, and then adding an estimate of the area of squares that are partly inside the line. Encourage your students to try different ways of approximating the area accounted for by squares that are only partly inside the tracing.
Find the area of the open tops of all the sizes of tins, trays or dishes used in the first activity. Students who do not have tracings can trace around the containers they used in the first activity. Have the students make a list of these areas, starting with the largest, then the next-to-the-largest, and so on, with the last area on the list being the smallest. Have this list saved because it will be used in a discussion later.
Further Study
1. Estimate the area of a circle. Draw a 10 centimeter radius circle. Its radius is 10 cm, therefore its diameter is 20 cm Make a square around this circle. Its aides each have a length of 20 cm, the same size as the diameter of the circle. The area of the square is 20 = cm by 20 cm, or 400 square cm. A = D². Now make an estimate of the area of the circle. Some possible estimates could be:
|
A0 = (1/2)A |
A0 = (3/4)A |
A0 = (7/8)A |
What is yours?
2. Check your estimate of the area of the circle. Make a grid sheet out of the piece of paper that has the circle and the square drawn on it. Your squares should all be the same size but you can choose any size squares between 1 cm and 4 cm on a side. Count how many are in the circle and how many are in the square.
A0 = (squares in circle / squares in square)A
3. Compare the area of the circle you get with your estimate
A0 = (?/?)A
4. The exact formula for a circle can be written as:
A0 = pr² or A0 = (p/4)D²
Since D² = A , the area of a circle can also be written:
A0 = (p/4)A
Compare your estimate of the area of the circle with the exact formula.
(p is pronounced "pie". Its value is about 3, which is close enough for most practical use).
You can find the percentage difference between your estimate and the exact area this way:
% diff. = [(your area - formula area)/(formula area)]x100
If the answer is positive, your estimate was larger than the exact area; if negative, your estimate was smaller. If your estimate was within 10% of the exact area, it was an accurate enough estimate for most purposes.
Activity I-2B AREA
Finding the area of parts of the human body is a way of developing skills in estimating surface areas.
Materials
Sub-group size: Students can work individually or in sub groups.
Grid paper with 1 centimeter squares.
Pencils
Have the students trace around their hands on 1 centimeter grid paper. Have them find the area enclosed in this outline and use it as a basis for estimating the area of all the skin on their hands.
What is the area enclosed in your tracing?
What is your estimate for the area of all the skin on your hand?
How did you decide on your estimate?
Have the students make a list that shows each student's name and the area of their tracing. Start with the smallest area, then the next-to-the-smallest, so that the last name on the list is the student whose tracing has the largest area. Now have the students add each person's estimate of the area of all the skin on their hand to this table.
Estimating Total Hand Area
|
Name |
Area of tracing |
Estimate of total of hand area |
| | | |
Which estimates seem accurate when compared to the rest of the estimates?
Which estimates are very different from others nearby on the list?
Which is more correct?
Have the class consider each estimate that deviates a lot from surrounding estimates to decide whether it is more accurate or less accurate than the others.
The area of the hand is approximately one hundredth of the total skin area of the body.
Further Study
The body's area can be approximated also by wrapping cylinders of paper around the arms, legs, trunk and head. Then calculate the area of the paper used.
This activity can be tied to health studies by discussing the body's evaporative process: sweating.
Discussion of Activities I-1 and I-2
Direct a discussion in which students compare the area of each container's open top with the number of days it took the water to completely change to vapor. Use all the results for containers that were kept in the shade but not those that were put in sunlight each day. As a way to focus the discussion, the following table could be placed on the blackboard and be filled in by students from each group. Use the list of areas which was prepared in Activity I-2A. This starts with the largest area and ends with the smallest.
Comparison of Area of Open Top to Time Necessary for Complete Evaporation
|
Description of container |
Area of open top |
Number of days to completely evaporate in the shade |
Number of centimeter deep when experiment started |
What was in each container |
Note that in this experiment the number of measures of water put in each container was the same.
Do the results show any relationship between area and time for the water to evaporate?
If so, what is it?
If so, what cases don't seem to fit the relationship?
Does the height of the sides of the container affect the rate of evaporation?
Are there any containers where the area of the open top is larger or smaller than the area of the liquid's surface?
If so, does this have any effect?
If water was not the only thing in the tin, was there any change in the rate of evaporation?
Further Study
1. Make a graph of days to evaporate versus square centimeters of area.
2. Do the Group One experiment again but this time (a) put the same depth of water in each container or (b) use tins of the same diameter but with different heights or (c) use tine of various diameters but with the same height. See how many days it takes for the containers to become empty. Tabulate the results in a similar way and discuss them.
BACKGROUND INFORMATION ON BOILING
One way to increase the rate of evaporation is by heating the liquid. This was illustrated in Activity I-1 where Group Three and Group Four put tins with water in sunlight and found that the water evaporated faster in the tin that was warmed the most by the sun. The rapid disappearance of water when it is heated is part of the everyday experiences of drying clothes, ironing clothes and cooking food.
If enough heat is applied to water, it will reach a temperature where further heating causes it to change to vapor. As the water becomes warm, bubbles of air form on the inside surface of the container. This is air that was dissolved in the cool water. Therefore bubbles form as the water becomes warmer. Knowing that air dissolves in water helps in understanding that water can dissolve in air, which is what has been happening in the evaporation experiments you have been doing. (Realizing that air is able to dissolve in water also helps in understanding how fish can breathe without coming to the surface of the water.) The idea that temperature has an effect on how much of one substance can be dissolved in another will be worked with in future activities.
When the water becomes quite hot, bubbles of water vapor are formed where the water is in contact with the part of the container that is being heated by the fire. At first, they change to water again as they rise through the somewhat cooler water near the surface. Sound comes from the container, but the bubbles of vapor are not reaching the air. If heat continues to be supplied, all the liquid becomes hot enough so the bubbles reach the surface and the vapor in them mixes with the air. This process is called boiling.
Activity I-3A HEATING WATER
In this activity, a tin of water is placed over a fire and heated. The water becomes hot and boils until no liquid is left.
Materials
Sub-group size: Two or three students. All the sub-groups follow the same procedure.
Heat source: Charcoal cooker and charcoal or three stones and firewood, and a metal grating or other support so tins of various sizes can be put over the fire. Two or three sub-groups can use each fire.
Tongs or cloth to lift tins on and off the fire.
Tins of various sizes.
Alternate heat source: Burner and paraffin or gas, and support for tins. One for each sub-group,
Watch or other timer such as a pendulum made from a stone hanging on a piece of wire about two meters long. This swings about forty-two times each minute. All the subgroups can use the same timer.
Matches.
If the heat source has a large hot area like a charcoal burner or a fire, you can assume that the heat is being applied to the entire bottom of the tin. Each sub-group should make a chart like this to collect their results.
Time Required to Heat and Change Water to Vapor in Various Size Tins or Containers
|
Diameter of tin in cm |
Number of seconds or swings until sound comes from tin |
Number of seconds or swings with sound but not yet boiling |
Number of seconds or swings boiling until water is gone |
Choose several tins with different diameters. Measure the diameter of each tin and write it on the chart. Estimate the diameter of the fire or charcoal burner. To be sure the assumption is true, all of the tins should have diameters smaller than the hottest part of the fire.
If the heat source is a small hot flame like a paraffin pressure stove or a Bunsen burner, you can assume that all the heat supplied by the flame is reaching the bottom of the tin. Each sub-group should make a chart like the one shown above to collect their results.
Estimate the diameter of the area heated by the burner. Choose several tins with different diameters. To be sure the assumption is true, all of the tins should have bottoms larger than the area heated by the burner. Measure the diameter of each tin and write it on the chart.
In each tin, put the same amount of water that was used in Activity I-1. Note time or start the pendulum swinging. One person from each sub-group should be watching the watch or pendulum to keep track of how many seconds or swings of the pendulum it takes for the water to heat up and boil until it is gone. Put a tin on the fire.
Do you have any theory to explain the differences in time that you have measured?
Is the same amount of heat reaching the water in each tin?
Do you think the area of the bottom of the tin affects the time it takes for all the water to heat and change to vapor?
Do you think the area of the surface of the water affects the time it takes for all the water to heat and change to vapor?
Can the results of another sub-group help you?
Do you need to do another experiment before you can be sure what affects the boiling time?
At the end of this activity, there should be agreement that water changes to vapor much faster when it is heated and boiled than when it is kept at room temperature. If the students have become involved in this activity, there may be argument as to which makes more difference in how quickly the water boils away: the diameter of the bottom of the tin, or the diameter of the surface of the liquid. You may decide to do the same activity again, using containers with walls that are not vertical. Some possibilities are frying pans, teapots, Ehrlenmeyer flasks, and tins where you have bent the walls inward so that the surface of the liquid is much less than the size of the bottom. Information gained by using these containers will allow the arguments to be resolved.
Further Study
A thermometer is needed with a range that includes 100 centigrade and which has a heat-sensitive part that can be put into water.
Heat some water over a burner or small fire. As the water is heated, measure its temperature very close to the bottom, in the middle, and just below the surface. Take these three measurements every two minutes (about 84 swings of the pendulum). Make a note on your measurements to remember (a) when sound begins to come out of the liquid, and (b) when bubbles begin reaching the surface. Stop taking measurements eight minutes after the water begins boiling.
Make a graph of temperature in degrees centigrade versus time in minutes. Plot the three measurements on the same graph. Also mark the times (a) and (b) on the graph.
Report your results to the rest of the class.
CAUTION: Make sure the heat source does not set you on fire. If you are using a glass thermometer, avoid resting its bulb on the bottom of the container because the heat may crack the glass. If you need something to lean it on while measuring the water temperature very close to the bottom, put a pebble in the container.
Activity I-3B HEATING WATER
In this activity, a tin of water is placed over a small fire and heated. The water becomes hot enough to begin making a sound but not hot enough to boil. The fire or the position of the tin is adjusted to keep the water this way.
Materials
The materials and sub-groups are the same as in Activity I-3A.
Use the same amount of water in the tin as was used before.
The time that it takes for the water to disappear should be measured using a watch or by counting swings of the pendulum. The depth of the water should be measured at regular intervals such as every five minutes so that if all the water has not changed to vapor in the time you have available, an estimate can be made of how much more time it would have taken. (An alternative, if this happens, is to cover the tins tightly to keep the remaining water inside and continue the activity another day.)
As soon as each sub-group has their tin on the fire, have someone in the sub-groups make a chart like this. It will contain the results from this activity as well as some of the results from previous activities. Be sure the students have all their previous results on hand the day you plan to discuss the results of this activity.
Time Required for Water to Change to Vapor in Various Open Tins or Containers
|
Diameter of tin in cm. |
At room temperature |
In the sun during the day |
With water hot but not boiling |
With water boiling |
| |
(Act. I-1) |
(Act. I-1) |
(Act. I-3B) |
(Act. 1-3A) |
|
| | | | |
Do you think that any of your water has changed to vapor?
What evidence do you have that some of your water has changed to vapor?
How much time did it take for half of your water to change to vapor?
How much time did it take for all of your water to change to vapor?
Discussion of Activities I-3A and I-3B
Have the students fill in the parts of their charts that need information from previous activities if they have not already done this. Meanwhile, have a student make a large chart on the blackboard. Then have students from different sub-groups put some of their information onto the chart on the blackboard. When the chart is filled with their results, ask the students questions such as:
Which column refers to water that was kept at the coolest temperature?
Which water was hottest?
Which water was next-to-the-coolest?
Does there seem to be a relationship between temperature and rate of evaporation?
Can you establish a range of time in which you would expect water to change to vapor, for the conditions in each column of the chart?
A lot of discussion may arise if there are large differences of time within a column. For example, some of the tins kept in sunlight may have evaporated in half a day while others took two or three days. When the first activity was being done, the students were not asked to measure the temperature. However, some of the students may have noticed differences of temperature of the various tins kept in sunlight. Now that the students have more understanding of the relationship between temperature and the rate of change of liquid water to water vapor, some results which may have puzzled them should become clear.
By the end of this discussion, the students should agree that increasing surface area tends to speed up evaporation and that. increasing temperature also tends to speed up evaporation. Also, decreasing either of these tends to make evaporation take place more slowly.
The following activities concentrate on changing water vapor to liquid water.
Activity I-4A CONDENSATION OF WATER VAPOR
It is hard to believe that something exists when you cannot see it, feel it or smell it. This problem exists with water vapor when it is completely dissolved in the air. When people see fog, or "steam", coming from the spout of a tea kettle, they are looking at a mixture of tiny droplets of liquid water mixed with air and with water vapor. It is the tiny droplets of liquid water that are visible. As soon as all the tiny droplets are dissolved in the air, nothing is visible.
In this activity, the students heat water to produce water vapor. Then they collect some of the vapor on nearby surfaces.

Materials

Materials (cont. d.)
Divide the students into four groups. Students should stay in the same group for this activity and Activities I-4B and 4C. For each group, these three activities form a series. In discussions, each group will tell the rest of the class what they are doing and the results they have gotten. As was mentioned in Activity I-1, your class is probably large enough so that each group contains two or more sub-groups. For these three activities, most students may find it best to work in pairs. Look at Activities 4A, 4B and 4C now.
You may have to adjust how many sub-groups you have in each group based on the materials needed. For example, if you have many bottles, but only eight heating stands, and you have thirty-six students, you could divide the class as follows:
|
Group |
Number of students |
Number of sub-groups |
|
Group One |
10 |
5 |
|
Group Two |
10 |
5 |
|
Group Three |
8 |
4 |
|
Group Four |
8 |
4 |
In this way, each sub-group in Group Three and Group Four would have a heating stand, yet all of the sub-groups would have only two students each.
The quantities shown in the materials list are what one subgroup needs. Multiply by the number of sub-groups you have Items shown with an "x" can be shared by the class or by several sub-groups.
Procedure for Group One
Choose paper of different color for each bottle used. Each piece of paper will be attached to a bottle with two or three elastic bands. The height of the paper should be about the same as the cylindrical part of the bottle. The width of the paper should be about half the circumference of the bottle.
Put a little water in the bottle and put a lid on it. Shake the bottle, then loosen the lid and let the water drip out. Tighten the lid. There should be some drops of water on the inside of the bottle.
Do you think the air inside the bottle contains a lot of water vapor or very little water vapor?
Dry the outside of the bottle and attach a piece of paper to the bottle. Put the bottle in the sun as shown in Diagram 2. Sunlight should reach both the paper and the part of the bottle that is not covered by the paper. Take note of the time so you can look at the bottle after five minutes, and again after ten and fifteen minutes. Do the same thing for each bottle.

DIAGRAM 2
What do you see inside the bottle after five minutes?
Has it changed any after another five minutes?
After fifteen minutes, take the bottle into the shade and examine the part of the bottle that was not covered by the paper. Then remove the paper and examine the part of the bottle that was covered by the paper.
Is there any difference between what is on the inside of the walls of the bottle in different places?
Can you feel any difference in the temperature of various parts of the bottle?
Procedure for Group Two
Shake water in each bottle as is done for Group One. Then attach two pieces of paper to each bottle. The pieces should be of different colors such as red and green, black and silver, light green and dark green, etc. Each piece of paper covers half the cylindrical part of the bottle, as shown in Diagram 3. Sunlight should strike each piece of paper equally. The paper will have to be partially removed to look inside the bottle after five minutes. The position of each piece of paper on the bottle should not be allowed to change while this is being done.

DIAGRAM 3
Procedure for Group Three
Choose a small tin and a drinking glass that can fit over the end of the tin, as shown in the next diagram. Cut a hole in the top of the tin. Cut a small piece of wood so that it rests on the edges of the tin and supports the glass. Measure a small amount of water and put it into the tin. Heat the water with a small flame so the water is hot but not boiling. If there is a breeze, have the open part of the heating stand face away from the flow of air so the flame is disturbed as little as possible.
Place the glass over the tin. Note the time and look at the glass after five minutes, ten minutes and fifteen minutes.
Do you think the air inside the tin contains a lot of water vapor or very little water vapor?
What do you see inside the glass after five minutes?
Has it changed any after another five minutes?
Do you think there is any difference between the temperature of the glass and the temperature of the tin?
After fifteen minutes, examine the glass again and remove it from the tin. Measure the amount of water in the tin.
Did a measurable amount of water leave the tin?
If so, what percentage of the water changed to vapor and left the tin?

DIAGRAM 4
Procedure for Group Four
Choose a tin that has a height a bit greater than its diameter. Make a small hole in the side of the tin about 1 centimeter below the top. For this activity, the size of the tin is not important, and the hole in the side does not need to be round. However, if you want to be ready for the next activity, use a tin that is large enough for a tea glass or very small tin to fit inside, and make the hole as round as possible, just large enough so the outer tube from a Bic pen can fit tightly in it. (A simple procedure for making a round hole of this size is found in Appendix B.) Cut a strip of paper about 1 centimeter wide and a little Longer than the circumference of the tin. Attach it to the top edge of the tin with an elastic band. The top edge of the paper should be a little higher than the top edge of the tin. Measure a small amount of water and put it into the tin. Then put a piece of transparent plastic over the open top of the tin and hold it in place with an elastic band. The purpose of the strip of paper is to prevent the tin from melting the plastic when the tin is heated.

DIAGRAM 5
Heat the water with a small flame until the water is hot but not boiling. The heat should be adjusted to keep the water hot but not boiling throughout the activity. When the water becomes hot,take note of the time and look at the transparent plastic to see if any change has occurred. Look at the plastic again after five minutes, ten minutes and fifteen minutes.
Do you think the air inside the tin contains a lot of water vapor or very little water vapor?
What do you see inside the plastic after five minutes?
Has it changed any after another five minutes?
Do you think there is any difference between the temperature of the transparent plastic and the temperature of the tin?
After fifteen minutes, look at the plastic again and remove the heat. Take the plastic off the tin. Then measure the amount of water in the tin.
Did a measurable amount of water leave the tin?
If so, what percentage of the water changed to vapor and left the tin?
If there is enough time, each group can show the others their experiment. This will give everyone a change to know what each group has been doing. However, there are two more related activities to be done before the students will have enough information for a discussion in which they compare their results and summarize what they have learned about evaporation and condensation.
Further Study
To the water add some color such as ink or use dark vinegar instead of plain water for all groups in Activity 4A.
Note which water is clear and which water is colored after about ten minutes.
Teaching Method Alternatives
In the last activity, droplets of water formed on surfaces within a few minutes after starting the activity. Perhaps enough water collected on the drinking glass so that some drops fell off the edge of the glass. However, no effort was made to collect the water that condensed. In this activity, the equipment is adapted so the condensed water can be collected.
Depending on your educational objectives, you have a choice of methods in this activity and the next activity.
1. Student Investigation. Tell the students that they have a "design problem" to solve. The design problem is to find ways to collect the water vapor that is being produced. You should provide all of the materials that are on the materials list and anything else you have around that might be useful. This way of managing the class helps the students develop judgement and self-confidence in applying what they are learning. It is a useful approach to use when students are not soon facing external examinations. Some classes enjoy a contest:
Which group can produce the sun-powered device that collects the most water?
Which group can produce the flame-powered device that collects the most water?
Some of the students will not be able to think of anything on their own. You can suggest that they try something similar to what other students are preparing to do. You can also suggest one of the ideas shown in Activities I-4B and 4C, or ideas shown in the "distillation" section of science texts.
2. Guided Learning Continue with Activities I-4B and 4C as they are outlined here. This way of managing the class reaches understanding of the science concepts more quickly than the student investigation method and is best for students who are required to cover all the material in the syllabus because they have to attempt an external examination at the end of the year. However, this method is not as effective in producing people who can put what they have learned to practical use after they have left school. This is because directions for what to do, and the pressure to do it, are being supplied by the teacher and the school. School leavers are left with little practice in deciding on their own projects, and then carrying them through, which are skills valuable in applying knowledge in real situations.
As much flexibility as possible for making decisions has been included in the directions for making equipment used in activities. Exact sizes are rarely specified. Judgement is therefore necessary to make equipment with proportions similar to what is shown in the diagrams, and learning experiences occur by seeing whose equipment works best and thinking about why differences in size may have caused differences in function. In these ways the guided learning method can develop some skills not ordinarily considered necessary while remaining acceptable to students, teachers and administrators.
Activity I-4B CONDENSATION OF WATER VAPOR
If you use Method 1, the students will be occupied building and trying out the alternatives that they think of.
If you use Method 2, it will take only a short time for the students to get their devices working. Then there will be some time when they have nothing to do. During this time, you could have each group describe Activity I-4A to the rest of the students. Another thing you can do is to begin Activity I-5 which is about relative humidity. That activity requires very little equipment. Near the end of the time available, they will see how much water has collected, and will write down their measurements.

Materials

Materials (cont'd.)
In this activity each group uses equipment that is quite similar to what they used in Activity I-4A, but this time the water vapor condenses into droplets that are collected in a separate container.
Procedure for Group One
A tea glass or a very small tin is placed inside a jar. The outside of the tea glass or small tin is coated or painted or covered with paper of whatever color the students have decided works best. A measured amount of water is placed inside the tea glass or small tin. Then a piece of very absorbent paper or cloth is placed so it sticks to the inside wall of the glass or tin. Cloth that makes a good wick works well. One part of the cloth or paper should be in the water. Another part of the cloth or paper should be under the part of the glass or tin that will be heated the most by the sun. The students will place the tea glass or tin inside the jar and cover the jar with its lid or with plastic held by an elastic band. The inside of the jar should be dry when this is done.
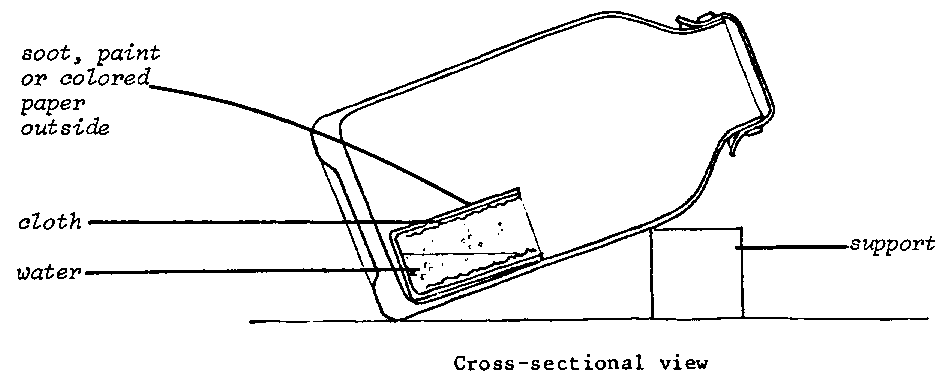
DIAGRAM 6
Without spilling any of the water from the glass or small tin, carefully place the jar in sunlight. Note the time. Near the end of the time available, have the students examine the jar.
Did any droplets of water collect on the inside of the jar?
Did enough water collect to accumulate at-the bottom of the jar?
If so, what percentage of the water changed to vapor and then condensed on the jar?
The students should record the amount of time the jar was in sunlight and the amount of water that collected in the jar, if it was enough to measure. They should also note any other details so they will be able to describe what happened.
Procedure for Group Two
Two jars are placed together so they form one container. Their mouths must be about the same size.
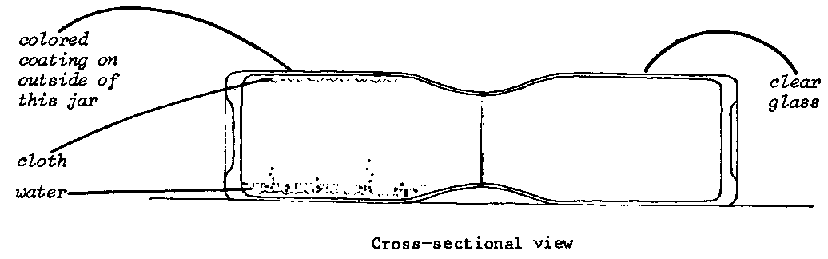
DIAGRAM 7
If the mouths are not quite the same size, something such as clay or cloth can be stuffed into the gap. If only a few jars are available, one jar and one tin can be used.
Prepare one of the jars or the tin the same way that the tea glass or small tin was in the Group One activity, with water and a wick inside, and colored paper or other coating outside.
Place the two jars, or the jar and the tin, in sunlight with their mouths together. Note the time. Near the end of the time available, examine the jars.
The questions to ask and the measurements to make are the same as for Group One.
Procedure for Group Three
A tin with a measured amount of water is heated with a small flame. Inside the tin is a tea glass or a tiny tin, supported by a stand. The stand can be made from the top of another tin. It should have a somewhat smaller diameter than the tin it is placed in. Bend the edge of the tin top in three places as shown in Diagram 8. Three small stones inside the tin can be used as a stand also.

DIAGRAM 8
Make a hole near the top of the tin. It doesn't have to be round. Attach a paper strip and a piece of transparent plastic to the tin, as was done in Group Four in Activity I-4A. At the center of the plastic, put a coin or a small stone so that the plastic is lower at the center than elsewhere.

DIAGRAM 9
Heat the water with a small flame until the water is hot but not boiling. The heat should be adjusted to keep the water hot but not boiling throughout the activity. When the water becomes hot, take note of the time.
Near the end of the time available, the students should record the time that the water has been hot and remove the heat.
Did any water collect in the tea glass?
How did it get there?
What percentage of the water you started with is now in the tea glass?
What percentage of the water you started with remains at the bottom of the tin?
Procedure for Group Four
Some things are added to the equipment that was used by this group in Activity I-4A. The same heating stand and heat source with a small flame is used. If the tin used the last time has a round hole, and you have a tea glass or a very small tin that can fit inside, it is suitable for use in this activity. Make a stand to support the tea glass, or use three small stones. Fit the outer tube of a Bic pen into the hole in the side of the tin. A hollow bamboo branch can also be used, but it is not as good because you can't see inside it. The other end of the tube passes through a hole in a piece of transparent plastic which is attached to the top of another tin with an elastic band. This hole should be a little bit bigger than the tube so that air can escape from the tin as the system is heated and the air inside it expands.
Put a measured amount of water in the tin on the heating stand. Place the tea glass on its support inside the tin. Attach the paper strip around the top edge of the tin with an elastic band. The plastic should be a little loose in the middle so a coin or a small stone will keep the middle lower than the edges.

DIAGRAM 10
Heat the water with a small flame until the water is hot but not boiling. The heat should be adjusted to keep the water hot but not boiling throughout the activity. Note the time when the water becomes hot. Near the end of the time available, note the time and remove the heat.
Did any water collect in the tea glass?
Did any droplets form inside the tube?
Are there any droplets of water in the tin at the other end of the tube?
How much water remains in the bottom of the tin you heated?
How much water is in the tea glass?
Is there a measurable amount of water in the other tin? If so, how much water is there?
Do these amounts add up to what you started with?
Unless the students are eager to have a discussion, continue with Activity I-4C first. Tell the students to keep good records of their results so that comparisons can be made in the discussion after Activity I-4C.
Further Study
1. Add some salt to the water.
Taste the liquid which has condensed after about ten minutes to see whether the salt was transferred together with the water vapor.
2. Use vinegar instead of water.
Taste the liquid which has condensed after about ten minutes to see whether anything was transferred together with the water vapor or not.
Activity I-4C CONDENSATION OF WATER VAPOR
In this activity, Group One and Group Two continue to use sunlight as their source of heat while Group Three and Group Four use somewhat larger flames than before.

Materials
Procedure for Group One Dig a shallow hole almost as large as the piece of transparent plastic you have. The area of the top of the hole should be somewhat smaller than a square meter but preferably more than 1/4 of a square meter. If the plastic you have comes in-a roll only about 1/4 of a meter wide, you can sew two or three strips together to get a piece that is approximately square.
Sprinkle a measured amount of water on the soil at the bottom of the hole. Put a glass or jar at the center of the hole. Place the plastic over the hole. Use stones and soil to hold down the edges so air does not blow under the plastic Put a small stone on the plastic above the glass. The plastic should be loose enough so the center is lower than the edges. Note the time. Near the end of the time available, note the time again.
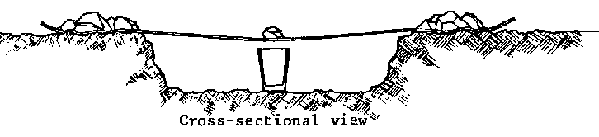
DIAGRAM 11
Did any droplets form on the plastic?
Is there any water in the glass?
If so, how much water is in the glass?
What percentage of the water you sprinkled in the hole is now in the glass?
If possible, put the glass and the plastic back and leave it until the sun is not shining on it anymore. Then measure the amount of water that has collected in the glass again.
Procedure for Group Two
Prepare a hole and plastic the same as used by Group One. Put several trays or dishes into the hole. Use dishes of various colors. Coat one dish with soot if you do not already have a black dish. Measure the same amount of water that Group One sprinkled in their hole. Put this water in the dishes so each dish has an equal portion of the water. Place a glass or jar at the center of the hole. Put the plastic over the hole. Use stones and soil to hold down the edges of the plastic so air is not blown into the hole by the wind. Put a small stone on the plastic above the glass. Be sure the plastic is loose enough so the center is much lower than the edges. Take note of the time. Near the end of the time available, note the time again.

DIAGRAM 12
Did any droplets form on the plastic?
Is there any water in the glass?
If so, how much water is in the glass?
What percentage of the water you put in the dishes is now in the glass?
How much water remains in each dish?
If possible, put the glass and the plastic back and leave it until the sun is not shining on it anymore. Then measure the amount of water in the glass again. Also measure the amount of water, if any, remaining in each dish.
Procedure for Group Three
All the materials are the same used in Activity I-4B, except the flame, which is larger. Heat the water until it begins to boil and note the time. Adjust the flame to keep the water boiling throughout the activity, but be careful the Bic pen tube is not heated so much by heat coming up next to the tin that it melts. Use the same amount of water that you used in Activity I-4B. Near the end of the time available, note the time and remove the heat.
How much water collected in the tea glass?
What percentage is this of what you started with?
How much water collected in the other tin?
What percentage is this of what you started with?
How much water remains in the bottom of the tin that was heated?
What percentage is this of what you started with?
What percentage do the three of these percentages add up to?
What percentage of the water was lost?
Did the temperature of the second tin change while water vapor was condensing in it?
For the discussion that follows, the students will need to use the results they have gotten during these last three activities. They may also need to refer to their results from some of the earlier activities. Remind the students to have all of their records in class for the discussion.
Further Study
1. If you have a room where the windows can be closed so that there is very little breeze, it is recommended that some of the students do this activity and report their results to the rest of the class.
Use the Group Four equipment but with the second tin standing on a dish, and the end of the Bic pen tube almost touching the side of this tin.
Put the tin on the dish after the water is boiling, and keep it there for ten minutes. Do this three times: (a) put cool water in the second tin, (b) put warm water in it, (c) put very hot water in it.

Figure
After each ten minutes, measure the amount of water that has collected in the dish. Have the students discuss possible reasons for different amounts of condensed water.
2. Use the Group Four equipment, but aim the Bic pen tube into various other containers such as a tea kettle. Use each container for ten minutes. Compare the water collected in the different containers tried. Feel the temperature of each container after vapor has been coming into it for a few minutes. In this activity the water should be boiling during the ten minutes that each container is being tried.
SUMMARY
As a result of doing the various activities, and sharing their results in the discussions, the students by now should feel familiar with a number of procedures and concepts.
The procedures include measuring liquids by volume, measuring surfaces using square measure, measuring time, noticing differences in temperature, measuring temperature (if thermometers are available), computing rates of change, keeping records of results, making comparisons where differences in quantitative results are important, and making predictions or decisions using knowledge from previous experimental results.
The concepts include evaporation, water vapor, condensation, rates of change, the sun as a source of heat, and area. Also cool, warm, hot and boiling as they apply to water.
For some students the procedures may also have included looking for suitable equipment and bringing it to class, deciding which items to use from a supply of different sizes and shapes of tins, jars, pieces of plastic, etc., adjusting heat sources to maintain a certain rate of heating, using the sun as a source of heat, improving ways of collecting heat from the sun, approximating the surface area of solid objects, making graphs of results, using a pendulum as a timer, measuring temperature with a thermometer, and considering the flow of heat in a system.
For some students the concepts may also have included evaporation as a way of reclaiming something that is dissolved in water (salt), evaporation as a way of cooling something (burlap refrigerator), condensation as a way of heating something, and distillation as a way of obtaining pure water from water that has things dissolved in it.
Discussion of Activities I-4A, 4B, and 4C
As outlined in the summary, there is a core of procedures and concepts that all the students have been exposed to. Then there are additional procedures and concepts that some students have learned. The discussion should be a time when students in each group strive to explain clearly to the rest of the class what they did and what happened. It is also a time for students who did further activities to tell the class what they did.
You may decide that the students' results can be best compared by using a chart similar to that available during the last discussion. Some of the students may be able to develop the necessary headings for such a chart, or you can develop one or more charts based on your knowledge of what the students have been doing.
If the class understands exactly what happened in each case, questions about similarities and differences in results should come up, and discussion will be lively. However, while a certain group is describing an experiment, in order to clarify the situation for the rest of the class, you may have to ask all the questions that you asked them during the activity. This helps to improve the communications skills of the students.
It is sufficient at this time for most of the students to know what happened in most of the activities. In the discussion at the end of Part I, the students should be able to make generalizations about the major concepts they will have learned.
BACKGROUND INFORMATION ON RELATIVE HUMIDITY
The ability of air to hold water vapor can vary a lot throughout the day and night. This is because the amount of water vapor that a given amount of air can hold is related to the temperature of the air. For each 10 degrees centigrade that air is warmed, its capacity to hold water vapor increases by about 100 percent. Similarly, for each 10 degrees centigrade that air cools, its capacity to hold water vapor is halved. If there is dew at night, the air is being cooled to a temperature where some of the water vapor it holds condenses onto plants and other objects. At that time, the air is saturated with water vapor, and the relative humidity is 100 percent. (when the air is holding all the water vapor it can, its relative humidity is 100 percent. Air containing no water vapor would have a relative humidity of 0 percent.)
Consider a situation where the daytime maximum temperature is 10 degrees centigrade higher than the minimum temperature at night, and where dew forms at night. In this situation, the capacity of the air to hold moisture is doubled when the air is warmest, compared to when it is coolest. If no additional moisture is added to the air as it heats, its relative humidity would now be 50 percent. However, most of the moisture deposited at night as dew changes to vapor again when the air becomes warmer, so part of the capacity of the air to hold water vapor is used up. Therefore, the actual relative humidity at the maximum temperature in this example is somewhat greater than 50 percent.
Now consider another situation. At certain times of year in some desert areas, the temperature goes down to about 5 degrees centigrade at night, and dew forms. The daytime temperature rises to about 45 degrees centigrade. If no additional moisture is added to the air as it heats, its relative humidity as the temperature rises would be as shown in this chart:
Comparison of Temperature to Relative Humidity
|
Temperature |
Relative Humidity (percent) |
|
5 |
100 |
|
15 |
50 |
|
25 |
25 |
|
35 |
12(1/2) |
|
45 |
6(1/4) |
However, most of the moisture deposited on the sand at night
as dew changes to vapor again when heated by the sun, so part of the capacity of
the air to hold water vapor is used up. Therefore the actual relative humidity
in this situation at 45 degrees centigrade is somewhat more than 6(1/4) percent.
In both of these examples, the relative humidity reaches 100 percent when the temperature becomes cool. The evidence that the relative humidity reaches 100 percent is the dew, which forms when the air has more moisture than it can hold. The more the temperature rises in the daytime, the lower the relative humidity.
If dew forms in your locality at night, you can get an idea of what the minimum relative humidity could be in the daytime by measuring the usual high and low temperatures. Early in the morning the temperature is approximately the same as the lowest it may have been during the night. The high temperature can be measured around midday. These temperatures should be measured outdoors in the shade.
Evaporation is slow if the relative humidity is near 100 percent and faster if the relative humidity is low. Air that has gained some extra water vapor by being in contact with the surface of water has higher relative humidity than it had before. If this air is moving away from the water and is being replaced by drier air, evaporation is faster than if the same air stays near the water for a long time.
Activity I-5A EVAPORATION AND TEMPERATURE
In this activity, students investigate what happens when water evaporates without any heat being applied. The human body's ability to sense differences in temperature is used to detect whether any change of temperature takes place.
Materials
Sub-group size: Students can work individually or in sub-groups. All the students follow the same procedure.
A bowl or basin for each six to eight students
Fans
Pendulum or watch for timing
Water to fill the basins
Sunlight or another way of warming the water
Dip your hand in water that has been out in the sunlight. Does it feel warm? Remove your hand from the water. Does your hand feel warm now? Swing your hand around while it is still wet. Does it still feel warm? When your hand dries, swing it as you did before. Does it feel the same as before? If you get both hands wet, hold one still and move the other one around. Which hand feels warmer? If you use a fan to move air to your hand, does it dry faster than when you don't fan it? How much time does each hand take to dry? Which makes your hand dry more quickly: fanning or swinging? Which makes your hand feel cooler?
BACKGROUND INFORMATION ON HEAT FLOW DURING EVAPORATION AND CONDENSATION
After Activity I-3A, there is a Further Study which requires a thermometer. If you were able to do this activity, you saw that the temperature of water does not rise above a certain level (somewhere between 90 degrees centigrade and 100 degrees centigrade) when heat is supplied. Instead, the water boils. Water vapor is produced very rapidly, and it requires a continuous supply of heat. If you take away the heat, the boiling stops. If you put the heat back again, the boiling resumes, but the temperature of the water stays the same. How can the temperature stay the same when heat is being supplied? One way to answer this question is to think of the heat as being removed by something. It is being removed by the process of making water vapor from liquid water.
In Activity I-4C, as done by Group Four, the tin at the end of the Bic pen tube became warm. Some of the water vapor condensed on this tin. Heat was being supplied to the tin by the process of making water from water vapor. This is the opposite of the situation just discussed. When water condenses it adds heat to the materials it is in contact with.
If the relative humidity was close to 100 percent when your students were swinging their wet hands in the air, they would have had difficulty noticing any difference of temperature between their wet hands and their dry hands. Without any evaporation, there is no cooling taking place due to having a wet surface exposed. The lower the relative humidity is, the easier it is to notice the cooling, because more evaporation is taking place. When water evaporates it removes heat from the materials it is in contact with.
In some localities with a hot climate, a small quantity of drinking water is kept in a slightly porous clay pot. Some of the water seeps through the walls of the pot, and evaporates from its surface. The cooling effect of this evaporation keeps the water in the pot noticeably cooler than water kept in an ordinary container. In the same way, the human body cools itself by sweating. Spoiling of fresh foods may be retarded by surrounding them with wet cloths. The water in the cloth evaporates, and cools the food a little bit.
Drying of clothes is usually done in whatever way is most convenient and effective. Thus, they are put in sunlight in clear weather, and often hung near a fire in damp, rainy weather. If there are dry seasons and humid seasons in your locality, it would be interesting to compare the time it takes clothes to dry, if you keep all other conditions the same. For example, hang the clothes away from sunlight or fire, and where there is no breeze. The only remaining difference is the relative humidity of the air.
Activity I-5B EVAPORATION AND TEMPERATURE
If you have a thermometer, or if you can make a device that responds to fairly small changes in temperature and which is not destroyed by getting wet, do this activity. (See Appendix E for suggestions on developing these devices.) It enlarges upon Activity I-5A, and provides interesting results to compare if you can do it in dry weather and in wet weather.
Materials
Thermometers or homemade temperature sensing devices
Water
Cloth
Fans
This can be done as a demonstration if you have only one thermometer or by sub-groups if you have many thermometers or temperature sensing devices. Everyone follows the same procedure.
Hang the thermometer in the shade or indoors and let it adjust to the correct temperature for a few minutes. What is the reading? With a fan, wave air towards the thermometer for a couple of minutes. Does the temperature change? Now wrap a small piece of wet cloth around the bulb of the thermometer. Leave it alone for a few minutes. Is the temperature different from when there was no cloth? If there is a difference, is the wet temperature higher or lower than the dry temperature? What is the reading? Fan the wet cloth for the same amount of time you fanned the dry thermometer before. Does the temperature change? What does it read now? If it changed, fan the wet thermometer again, until its reading stops changing. Compare the differences in temperature.
Discussion of Activities I-5A and I-5B
After Activity I-5B has been completed, have the students discuss their findings. They should compare these results with what they found when they moved and fanned their wet and dry hands in Activity I-5A. Also, Group Four should remind the other students of Activity I-1 where tins containing water and covered with cloth were placed in sunlight. Some pieces of cloth were wet, and some were dry. It should now be possible to understand what took place in that activity.
Further Study
If a wet-dry bulb humidity table is available, some study of humidity can be done. Relative humidity should be measured at various times of the day. It would also be useful to measure it at various times of the year: during dry months and during wet months.
Discussion should correlate humidity with how people feel, as well as with what plants are growing during different periods. This study could be part of an expanded weather studies program.
Activity I-6 COMPARISON OF WEIGHT AND VOLUME OF FRESH AND DRIED FOOD
This activity uses concepts from previous activities to study how food dries. Equal arm balances or other means for weighing are needed. Weighing is also done in Activities II-1 and 2, and in measuring sulfur in Part III. Also, when the results of full size dryers are evaluated, the wet weights and dry weights of the food dried will be required.
The students may not be familiar with weighing. They could obtain practice by building equal arm balances, making a set of weights, and weighing various small objects. If you decide to have the students build equal arm balances, the instructions in Appendix F can be used. Appendix G shows ways of making improvised sets of weights.
This activity also involves determining volume by displacement of water. If some students do not know this method of finding volume, this activity can serve as an introduction.
Materials
Piece of a large firm vegetable such as potato or cassava
Straight sided jar at least 6 cm in diameter
Equal arm balance or other device for comparing weights
Cloth which air can circulate through
Tray, dish, or piece of pasteboard
Knife to cut potato

DIAGRAM 13
Razor blade or scissors to cut paper
String
1 cm grid sheets
Water
Pencils
Ruler
Each sub-group should have one set of materials. Weighing equipment can be shared. Direct the students as follows, or hand out work sheets.
Cut three pieces of potato in cubes, 4 cm on a side. Weigh each cube. Do they weigh about the same? If not, cut them so that all three are the same size, 4 cm on a side with equal weights.
Cut one piece in half so that you have two equal pieces. How big is each piece? Measure the half pieces. How big is each edge?

DIAGRAM 14
Cut one 4x4x4 piece into 4 equal pieces so that each piece measures 1x4x4.
DIAGRAM 15
Weight
Weigh each piece of potato on a balance. Does one 4x4x4 piece equal two 2x4x4 pieces? Does one 4x4x4 piece weigh the same as four 1x4x4 pieces?
Volume
Fill a jar half full of water and mark the water level with string. Then put one 4x4x4 piece of potato in the water, and mark the water level. Remove the potato. How many cm and mm did the water rise?
Put one 2x4x4 piece of potato in the jar. How many cm and mm did the water rise? Put the other 2x4x4 piece in the water. Did the water rise to the same level as with the 4x4x4 piece? Remove the pieces from the water. Now put one 1x4x4 piece in the water and measure the water rise. Then add another 1x4x4. Does the water rise the same amount? Add the third 1x4x4 and measure the rise. Add the fourth piece of 1x4x4. Do four of the small pieces of potato change the water level the same as one big piece (4x4x4)?
Area
Wipe all the potato pieces dry. How many sides does the 4x4x4 cube have? Put the cube on a grid sheet and trace around each side. When you have traced around all of the sides, count the squares you have traced around. This is how many sq cm the cube of potato has on its surface. If you put the cube down on the table how many surfaces can you see without lifting the cube? How many sq cm of the surface can you see?
Now count the sides on a 2x4x4 piece of potato. Trace around each surface of the piece on the grid paper. Count the number of sq cm the surfaces of the piece covered. How many sq cm are there on the surface? What is its area? When the 2x4x4 piece is sitting on the table, with the large surface upward, how many surfaces can you see without lifting the piece?
Put the 4x4x4 piece and the two 2x4x4 pieces on the table with the large surfaces upward. Which has more area that you are able to see? One 4x4x4 or two 2x4x4 pieces?
In the same way as with the larger pieces, count the surfaces of the 1x4x4 pieces and trace around each surface of each of the four 1x4x4 pieces. Count the number of sq cm of surface on all four 1x4x4 pieces. Also calculate the number of sq cm that are exposed to the air if the four pieces are put separately on the table.*
*Note: If the students have trouble conceptualizing the connection between area of grid paper and area of potato pieces, cut the grid paper out and pin it on the faces of the potato cubes.
Stack the 1x4x4 pieces. What is the surface area exposed? Remove one piece from the stack and put it on the table. How much more area is exposed than when all four were stacked? Remove another piece from the stack and put it separately on the table. How much more area is exposed now?
How can a 4x4x4 piece be cut to give more surface area than by cutting four 1x4x4 pieces?

DIAGRAM 16
Drying and Surface Area
on a large tray or dish or piece of pasteboard, place one 4x4x4 piece of potato one 2x4x4, one 1x4x4, and any others you have decided to try. Measure these new pieces so you know their sizes and weights. Put the tray in a place where it will not be disturbed, and cover with cloth. Leave it a few days. What do you think will happen to the pieces of potato? Will they all be the same? How will the size and surface area affect the changes?
Teaching Method Alternatives
While waiting for the pieces of potato to dry, begin the next activities. Activities I-7, I-8A, I-8B, and I-8C are written as if everyone in the class will be doing the same thing on a particular day. However, you may decide to have certain students build the devices to be used in Activities I-8A and I-8B right away. These devices are for measuring angles. If you decide to do this, consider now whether or not you want the class to do Activity I-9. In Activity I-9, the students make a device to condense water using the heat of the sun so that pure water can be obtained from contaminated water. It is then operated at various angles to find the angle at which the most water is produced. However, it requires woodworking skill to build this device, so you should select students with this in mind. Students who are not building any devices should begin with Activity I-7A, and should then do the other activities as soon as the devices are finished.
Discussion of Activity I-6
When the pieces of potato have dried, have the students report on their findings. This should include the weight of each piece wet and dry, how much time each piece took to dry, which pieces dried and which pieces if any spoiled. The volume of each dried piece should be approximated and compared with the volume of the piece before drying.
During the reporting of findings, you should note the extent to which the students apply any of the concepts they have been exposed to so far.
At the end of the discussion, encourage the students to think of suggestions about how food drying may be done best. Tell them that after they do some more activities, they will have a chance to try out their suggestions. Have the students make a list of the suggestions they make now so they can be used in later discussions.
The activities in this section emphasize the use of the sun's heat energy. They begin with observations of surfaces heated by radiation from the sun. Attention to the use of black surfaces to absorb radiant heat is continued. The activities also explore the angle of a surface relative to the sun, and the effect of this angle on heat absorption. A familiarity with the measurement of angles is needed. This offers an opportunity to collaborate with a math teacher.
The students will construct a box for condensing water, and maximize the amount collected by controlling the angle between the sun and the black material at the back of the box. Finally, activities studying how air moves when it is heated lead to the construction of food dryers in Part II.
BACKGROUND INFORMATION ON ENERGY FROM THE SUN
The sun continuously gives off large amounts of energy which travel through empty space as radiant energy. A small amount of this energy reaches the earth, and some is absorbed by the atmosphere. The sun's energy exists as a continuous spectrum of different kinds of energy from radio waves to light, heat, ultraviolet and x-rays.
On a clear day, most of the sun's heat energy passes through the atmosphere and is absorbed by the surface of the earth. Dark colored materials absorb most of the heat energy that strikes them, while light colored materials reflect much of the heat and light energy that strikes them. Energy that strikes materials directly, perpendicular to their surface, is the most concentrated as it is spread over only a small area. Energy striking a surface obliquely is spread over a larger area and therefore less energy is absorbed per unit of area. The greatest absorption of radiant energy then is by a dark colored surface that is at a right angle to the source of energy (sun).
These principles are used in devices which collect solar energy to make that energy usable to people. These devices can be used to gather heat energy from the sun to cook, bake, dry, heat water, distill water, produce electricity, produce steam and do other useful things.
Because the earth is tilted, it receives more energy on one half than on the other. During the months of September through March, the half of the earth south of the equator receives the sun's energy more directly and is heated more than the Northern Hemisphere, From March to September, the northern half of the earth receives energy more directly and is heated more than the Southern Hemisphere. This unequal heating of the earth's surface leads to some areas becoming warmer. Air above these regions is heated by touching warm land and oceans.
This air expands due to warming and is pushed upward by heavier, cooler air. This rushing of cool air to replace lighter warm air is the wind. The energy in the wind comes from the sun, and can be used to do work.
Heat, a kind of energy, moves from something of higher temperature to something of lower temperature in three ways:
1. Conduction - heat moves from one substance to another substance that is touching the first substance.
2. Convection - one fluid material heats and expands, causing it to rise and carry heat to other areas.
3. Radiation - heat energy moving through space that is absorbed finally by a material.
At the conclusion of Part I, the students will be able to:
1. name the three ways that heat moves from something of higher temperature to something of lower temperature.
2. vary the factors affecting absorption of heat to increase or decrease the amount being absorbed in a system they have built.
3. describe what happens in a convection box heated by the sun, including radiation, conduction, and convection in their description.
Activity I- 7 RADIATION
Some materials that have sat in the sun absorb more heat and feel hotter than other materials. Which materials collect the sun's heat efficiently?
Materials
Sub-group size: Two or three students. All the sub-groups follow the same procedure.
1 Smoky flame for coating tiles and tins with soot, such as a candle or a paraffin burner
3 Clay tiles, bricks, or blocks molded from soil taken from termite mounds
Thermometer or other method of measuring temperature (see Appendix E)
Flat glass or clear plastic sheet
2 Tins of the same size
Matches
Water
White paint, cassava paste, or whitewash
Watch or other timer
If you have only one thermometer, one person can circulate among the sub-groups to make the temperature measurements. Soil from termite mounds can be mixed with water and molded into blocks if other clay tiles or bricks are not available. Each sub-group should have three tiles: one that is coated on one surface with soot from a candle flame; one that is coated with whitewash, white paint or paste made from cassava or a similar food starch; and one that is left uncoated. These tiles should be kept in a shady place for a few hours before the activity, where their temperature will not have been raised by exposure to sunlight.
Procedure for All Sub-Groups
Set the three tiles out in the sun with the colored surfaces upwards. Take the temperature of the tiles when you first put them out. After thirty minutes, take their temperature again. Which tile became the warmest? While measuring the temperature, stand so the thermometer and the tile are in the shade of your body. If the thermometer receives heat directly from the sun, it gives a false reading. Thermometers should be stored in the shade because it is possible for them to become too hot and break if the temperature reading goes beyond the maximum.
Further Study
Take the temperature of each block at ten minute intervals. Make a time vs. temperature graph for heating of the blocks.
While the blocks of clay are lying exposed to the sun, each sub-group should gather two tins of the same size. One tin should be covered with soot from a candle, one should be left shiny. Fill each tin to the top with water and take the temperature of the water. Place the tins in the sun, after five minutes take the temperature. Record the temperature in a table like this:
|
Water Temperature at Five Minute Intervals | |||||||
| |
0 |
5 |
10 |
15 |
20 |
25 |
30 |
|
Shiny Tin | |
| | | | | |
|
Black Tin | |
| | | | | |
Record the temperatures every five minutes and write them in the table. Continue recording the temperature for thirty minutes. Leave the tins in the sun and measure the temperature again after two hours and, if possible, after four hours. What is the highest temperature reached? Draw a graph from the temperature recorded on the table.
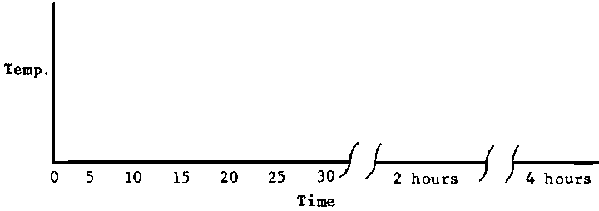
Water Temperature vs. Time in
Sunlight
Which tin absorbs the most heat? Which tile absorbs the most heat?
Further Study
1. Lay several pieces of cloth out in the sun. Some dark colors, some light colors, After a few minutes feel them.
2. Put a band of dark cloth around one arm or leg. Put a band of light cloth around the other arm or leg. Lie town in the sunlight for a short time.
Which colors absorb the most heat?
Which colors are not good absorbers?
Which colors reflect the most sunlight? The least sunlight?
(The reflection is judged by the brightness of the cloth when you look at it in sunlight).
Sometime during the class period, put your hand in sunlight, then put your hand behind a piece of glass or clear plastic so that the sun shines through the clear material onto your hand. Does your hand feel warmer or cooler behind the clear material? Does the clear material stop all the sun's heat? Part of it? None of it? The air also is mostly clear on a sunny day. Do you think the air stops much of the sun's heat from coming to you? Do clouds stop the sun's heat from reaching you?
Discuss your results with the other sub-groups.
Activity I-8A MEASURING THE ANGLE OF SUNLIGHT
Discuss: At what time of the day is the sun highest in the sky? How high does the sun get? Does the sun get higher in some seasons than in others? How can we measure how high the sun gets in the sky?
Caution You can damage your eyes by looking at the Bun. you can use the following device to measure the angle of elevation of the sun without looking at it directly.
Materials
6 pieces of wood, bamboo or reed
Newspaper or other large paper
Hammer
Nails or pegs and a drill
Heavy paper or cardboard for making a protractor
Stone, bolt or similar for weight
2 tins with both ends cut out
String
Saw or knife
Protractor
Heavier stones, bricks or logs
Activity I-8A BUILDING AN ANGLE MEASURING TUBE FOR SUNLIGHT
Make a roll of newspaper by rolling the paper around two tins from which both ends have been cut out. You should be able to see down the center of the roll. Tie the roll with string to keep it from unrolling. Cut six pieces of wood 10 cm longer than the roll of paper. Hammer a thin nail or peg into one piece of wood 2 cm from the end, then drive the nail into a second piece U of wood, also 2 cm from the end. The pieces of wood should be able to rotate. Nail a third piece of wood to the other end of the first piece in the same way. Nail the other three pieces of wood together in the same manner. Make a copy of a protractor on a piece of cardboard. Nail the cardboard protractor to the middle of one of these, as shown in Diagram 17. Make the straight edge run at right angles to the piece of wood, with the 90° mark centered on the piece of wood. Hammer a small nail into the protractor at the center of the straight edge of the protractor. It should stick out about one centimeter because a string with a weight will be tied to it as shown in Diagram 19.
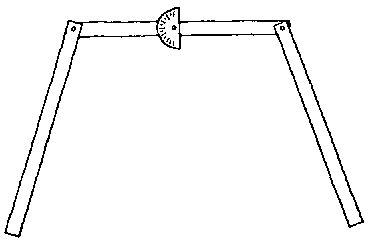
DIAGRAM 17
Tie the roll of paper onto the two center pieces of wood with string as shown in Diagram 18. Cut another piece of string as long as the distance from the protractor to the end of the center piece of wood. Tie a weight to the string, and tie the other end onto the nail.

DIAGRAM 18
Weight the lower legs down with stones, bricks or logs. Move the front legs in and out, aiming the tube toward the sun until sunlight can be seen when your hand is held at the bottom of the tube. Measure the angle of elevation above the horizon by reading where the weighted string crosses the protractor.

DIAGRAM 19
Using this device, measure the angle of the sun throughout the day. Each sub-group should use this device until everyone is familiar with the measurement of angles. Alternately, each sub-group could build one device. The device can be used at different times of the year - seasons - for weather studies.
Further Study
Mount a mirror at the bottom of the tube between the pieces of wood for viewing the moon and stars as part of a unit on studying the skies. The device can be used to measure the elevation of heavenly bodies.
Activity I-8B MEASURING THE ANGLE OF SUNLIGHT
What angle is the best for heating?
Materials
Tiles or bricks used in Activity I-7
A smoky flame
Matches
Thermometers
Square pieces of cardboard for making protractors
String
Washers or bottletops for weights
Small nails
Pieces of wood a little longer than one side of the square cardboard
Protractors
How to Make on Elevation Angle Measuring Device
Draw a protractor on a square piece of cardboard. Attach a piece of wood to the cardboard as shown in Diagram 20. The nail at the center of the straight side of the protractor should stick out, so the string with a weight at the end can swing freely from it. If a bottletop is being used as a weight, hammer a small hole in it using a nail. Adjust the length of the string so the weight does not reach the edge of the cardboard in any position.
To use this device, hold a straight edge of the cardboard against the surface whose angle is to be measured. The string crosses the edge of the protractor to show the number of degrees away from the horizontal the surface is.
This is the elevation angle of the surface. For example, if held under a table, the reading should be 0 degrees. If held against a wall, the reading should be 90 degrees.
After everyone is familiar with measuring the elevation of the sun, the way the sun heats surfaces which are set at different angles to the sunlight can be investigated. The results of Activity I-7 show that dark surfaces absorb more heat than light surfaces. Now, blacken one surface of each tile with soot from a smoky flame. Before putting the tiles in sunlight, measure and record their temperatures. Bring the tiles out in the sunlight and tilt one so that it faces the sun directly. With an elevation angle measuring device, measure the angle of the tilt. It should be at right angles to the sunlight. The elevation angle measuring device should show an angle 90 degrees different than the angle measuring tube for sunlight shows on its protractor.
Another tile can be laid flat on the ground. How many degrees from the horizontal is it? Stand one tile straight up. Use rocks to hold it upright. How many degrees from the horizontal is this tile? Put another tile with its edge facing the sun. How many degrees is it from the tile which faces the sun?
Which tile do you expect to heat best? Which one do you expect to be heated least? After several minutes, measure the temperature of the tiles with a thermometer or feel them with your hand. Which tile is heated the most? Almost as much? The least? Is this what you expected? How would you explain this to another student?
Activity I-8C MEASURING THE ANGLE OF SUNLIGHT
Why do surfaces facing the sun directly heat better than surfaces at an angle to the direct rays?
Materials
1 cm grid paper
Angle measuring tube
Protractor
Flat cardboard rectangular pieces
Tape
Angle measuring devices

DIAGRAM 21
Procedure for All Sub-Groups
Tape a sheet of 1 cm grid paper to a board, book or other flat rigid object. Tilt the grid paper to face the sun directly at the angle measured by the angle measuring tube. Place a rectangular piece of cardboard smaller than the grid paper over the grid paper. Tape the cardboard along one edge so that the edge lines up with one grid line. Trace the cardboard outline onto the grid paper. Count the number of square cm the cardboard covered. Measuring with a protractor, lift the cardboard rectangle 20° from the grid paper and trace the edge of the shadow. Count the squares that are inside this line. Did the shadow of the cardboard cover more or less grid paper than when the cardboard was flat? Did the cardboard tilted at 20° catch more or less sunlight than when it was flat? Measuring with a protractor, tilt the cardboard up at a 40° angle from the paper. Trace around the shadow's edge. Is the area covered by this shadow more or less than at a 20° angle? Tilt the cardboard at a 60° angle and trace the shadow. How many square cm of sunlight does the cardboard catch at a 60° angle? Do the same for 80°, then 90°. Refer back to the tiles in Activity I8B. Which tile was heated most in the sunlight? Why did one heat more than the other? Discuss the results with the other groups. How would you explain this to other students?
Further Study
Stand in front of the cardboard and grid paper so that the shadow of your head is on the cardboard. You are looking now at the cardboard from the same way the sun does. Put the cardboard flat on the grid paper. Have somebody else lift it up by a free edge. Which way do you see more cardboard? Which way do you see less cardboard? How can you tilt the cardboard so that you do not see any of the surface? At which angle would the cardboard heat best from the sun? Why? Report your findings to the class.
Activity I-9 USING THE SUN TO PURIFY WATER
The preceding activities have shown the relationship between the angle at which the sun strikes a surface, the color of the surface, and the heating of the surface by the sun's rays.
The following device uses the sun's heat to evaporate water. The water condenses on a flat piece of glass that is heated less than the dark surface below it. Water runs down the glass surface, which is sloped, and is collected in a trough. Water is fed into the box by a tube leading from a container of contaminated water. This device calls for a greater degree of woodworking skill than previous activities. Some of the construction could be done in the woodworking class, collaborating with the woodworking teacher. The basic design presented can be modified to fit the local materials, tools and woodworking skills. The box may be made as large as desired, limited by the size of glass or clear plastic available to cover the top surface.
Materials
4 pieces of wood, making the sides of the box, planed and sanded, sealed if possible.
Boards, making the bottom.
Bamboo tube, about 2 cm diameter, 5 cm longer than the width of the box.
Nails
Hammer
Metal shears or chisel
Clear plastic or glass, making the top.
Crack sealer: use what is available.
Black cloth, covering the bottom
Large tin and a piece of a large tin
Saw
Drill
Tape
The bottom of the box may be made with tightly fitted and sealed boards or it may be covered with plastic sheeting nailed tightly to seal the bottom. Over this some dark cloth is nailed. A hole is bored in one side at the upper end for the bamboo trough. The tube is cut in half to serve as a trough for water to enter the still. Small holes are bored in the bamboo trough so the water will drip down onto the cloth. Water in the supply tin drips through a tiny hole into the trough. Small blocks nailed to the inside of the box hold the bamboo trough in place. The collector trough for fresh water at the lower end is made from metal from a large tin. It is cut with metal shears and bent to form a V - shaped channel. It is nailed to the lower end of the box with the metal set tightly against the wood so that no leakage will occur between metal and wood. The end of the metal trough may be set tightly against the wood, or it may have a piece of metal soldered over the end to form a water-tight end.
The other end is open for pure water to drip into a container for collection. The metal trough passes through a hole bored in the side of the box. A small hole is bored in the lower end of the box, below the metal trough, for extra contaminated water to run out. When all the parts are installed, glass cut to size or clear plastic sheeting slightly larger than the top of the box is fastened onto the box. The plastic can be nailed over the edges. Glass can be set on top with small blocks of wood nailed on the sides of the box, projecting up to keep the glass from sliding off. Then the glass may be taped to keep it sealed. See additional Diagram 23.

DIAGRAM 22
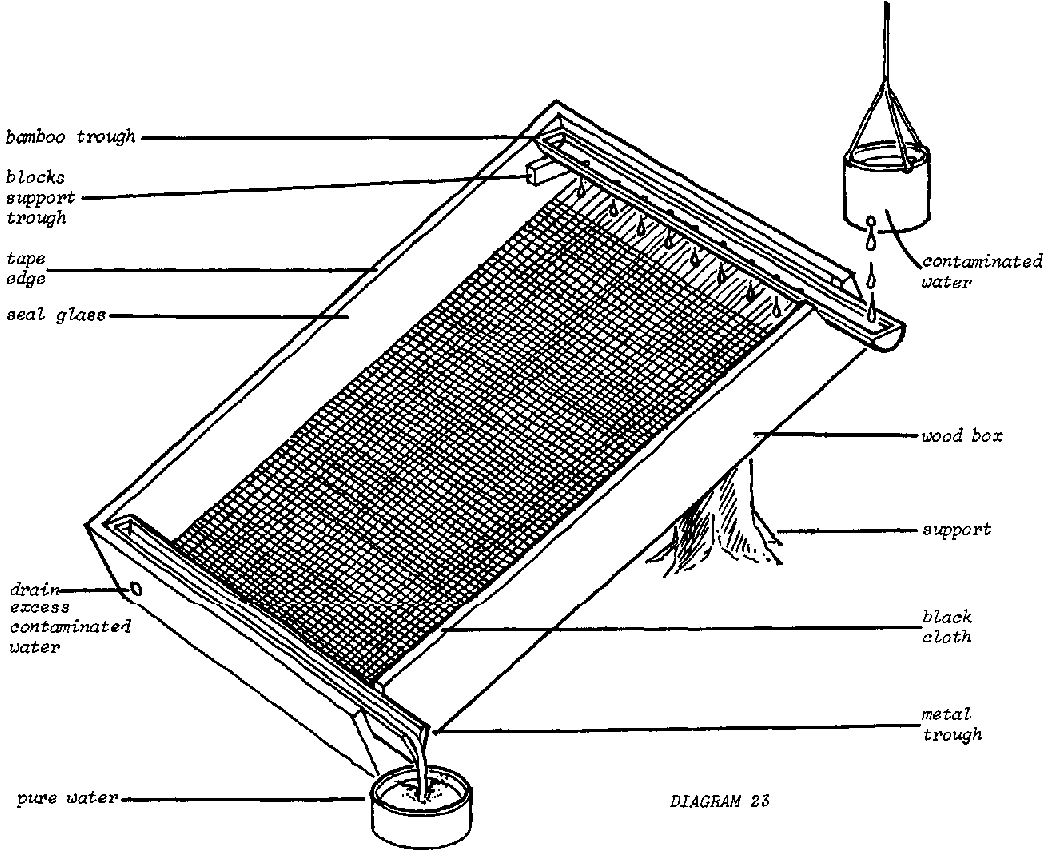
DIAGRAM 23
BACKGROUND INFORMATION ON CONDUCTION AND CONVECTION
Energy reaches us from the sun by radiation. By now, the students have used this source of heat energy a number of times. In the last several activities, the students learned that to collect radiant heat energy effectively, its direction has to be taken into account. They also found that dark colored surfaces absorb radiated heat better than light colored surfaces.
Heat energy is often transferred from one substance to another by conduction. If the two substances are touching each other and have different temperatures, the cooler substance will become warmer as it receives heat from the hotter substance. A table becoming warm beneath a teacup is an example of heat being transferred because substances are in contact with each other. The tea warms the cup by touching it. The cup warms the table by touching it. Movement of heat by conduction is studied in Activity I-10.
If one of the substances involved in transfer of heat is a liquid or a gas, movement within the liquid or gas takes place while its temperature changes. This movement, which is called convection, is studied using air as the gas that moves, in Activities I-llA and I-llB.
Activity I-10 CONDUCTION
In this activity, the students use the body's ability to sense differences in temperature to study conduction.
Materials
Tins
Sources of heat such as charcoal burner or flame.
Table or floor not in sunlight.
Stones
Watch or other timer
Heat the stones on the charcoal burner or flame. While this is being done, everyone should note if the tins and table feel warm or cool. One or two hot stones are put in each tin, and the tins are placed on the table or floor, and not moved. After about 5 minutes, feel the tins and the table underneath it. Are they warmer or cooler than before? Are the stones warmer or cooler than before? Where has heat moved in this activity?
Teaching Method Alternatives
Experiments are provided for each of the four groups in this activity concerning convection.
Depending on how your class is working, you have a choice of two alternatives for teaching convection.
1. Have the sub-groups in each group do the experiment outlined for them here. If by now the students are able to communicate effectively with each other when each group explains to the rest of the class what they have been doing, this procedure will work well.
2. If you feel that communication between groups has not been effective, it is suggested instead that each experiment should be done by all the groups. The equipment required to do this would not be much more than would otherwise be needed, since the same equipment can be used by different groups on successive days.
Activity I-11A CONVECTION
In this activity, how heat is transferred by convection is studied, and a device is built that could function as a small food dryer using air heated by the sun.

Materials

Materials (cont'd.)
Procedure for Croup One
Make a tube from paper about 6 to 8 centimeters in diameter and about 20 centimeters in length. The wall of the tube should have a thickness of not more than 2 or 3 layers of paper because in this activity the students will feel the temperature of the air inside the tube. Tie the tube together with several elastic bands or pieces of string. A small stone that has been heated in a fire will hang from the roof of the tube by a thin wire. Make the roof strong enough to support the wire, but thin enough so the temperature of the air inside can be felt through the paper. Folding a piece of paper twice is one way to make a suitable roof.
Attach a thin piece of wire to the small stone. Measure enough additional length of wire so that the stone will hang about half way down the tube. Put the stone with the wire attached on the fire. It should become as hot as possible. Place the tube in as little breeze as possible. Attach the end of the wire to the center of the roof. Lower the stone into the tube until the roof rests on the end of the tube. The roof must be flat and rest on the end of the tube so that there are no holes for air to pass out of the tube.
After about two minutes, feel the tube at the bottom, the middle, the top, and on the roof. Write down whether the tube feels cool, warm, or hot in each of these places. Were you surprised by the temperature of the tube in any of these places? Repeat the any or activity if everyone did not have a chance to feel the tube, or if there are any disputes about what parts of the tube were cooler or warmer.
Now cut a small opening at the top and bottom of the tube. Each opening should be about 1 square centimeter. Heat the stone. Light one end of a piece of string or braided cotton so that it glows and produces smoke but not a great amount of hot air.

DIAGRAM 24

DIAGRAM 25
Put the stone in the tube. Hold the smoking end of the string at the bottom opening in the tube, and then at the top opening in the tube. Try putting it just inside each opening, and just outside each opening. Watch what the smoke does. The way the smoke moves shows how the air is moving. In what direction is the air moving? Make a diagram showing how the air flows. Note: If you are doing this in a breeze, it may be impossible to see the smoke. Try using a larger source of smoke and replacing the hot stone with a piece of hot charcoal. Take precautions for fire because the charcoal may burn the tube.
Procedure for Group Two Do the same experiment as is done by Group One, except use a box. If it poses a difficulty to make boxes, you can make tubes from paper and flatten one side as in Diagram 26. Have the tube lying horizontally, and close off both ends of the tube similar to the way the roof is used by Group One. Make two holes, one directly above the heat source, the second near the other end of the box or tube. Use a hot stone, hot charcoal, or a candle as source of heat. Test the flow of air by holding a piece of smoking string near each hole. Which way does the air flow? Make a diagram showing how the air flows.

DIAGRAM 26
DIAGRAM 27
Procedure for Group Three
Put about five hot stones on the ground, and place a paper enclosure over them as shown in Diagram 28. Feel which parts of the paper get warm. Make several holes about 4 square centimeters each along the bottom edges of the enclosure Test for flow of air using a smoking string. Then make several similar holes near the top of the enclosure. Test for air flow again. Which way does the air flow? Make a diagram showing how the air flows.

DIAGRAM 28
Procedure for Group Four
Use a box with one hole at each end, near the bottom of the box, as shown in Diagram 29. Coat the bottom of the box with black ink or paint. Attach transparent plastic with pins to make the top of the box. Leave this in the sunlight a few minutes, and test for air flow using a smoking string. Test it when the box is horizontal, and when one end is propped up, as shown in Diagram 30. This should be done where there is as little breeze as possible. Then put the box. horizontal again, and make a hole at the top edge of one of the sides. Test the flow again. If a thermometer is available, measure the difference in temperature between the air entering the box and the air leaving the box.
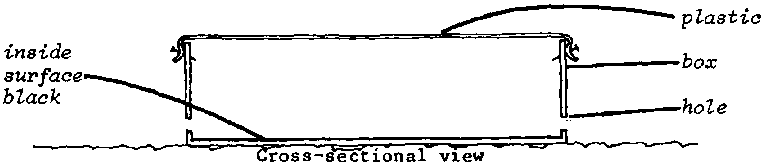
DIAGRAM 29

DIAGRAM 30

DIAGRAM 31
After each group has reported its results to the rest of the students, continue with the next activity which concludes Part I.
Activity I-11B CONVECTION
In this activity all sub-groups need the same materials that were used by Group Four in Activity I-llA. The students have learned that air warmed by a source of heat inside a box tends to flow out of the box if there are two holes in the box, and one hole is higher up than the other hole. They have also learned that a surface absorbs the most energy from the sun if it is at an angle of 90° with the sunlight. In addition, they have been told that for each 10 degree centigrade raise in temperature, the relative humidity of air is halved.
In this activity, the students build boxes that have transparent tops. You should encourage them to produce what they think are the most desirable conditions inside the box for food drying. They should design their boxes with following questions in mind:
How can this box make the most effective use of the sun?
How much temperature rise is best?
How much air flow is best?
How can ways to adjust these be built into the design of the box?
These boxes can be used to dry pieces of food in Activity II-1 which concerns finding the percentage of water in various kinds of food.
SUMMARY
These procedures include using smoke to detect air flow, measuring the direction of light, measuring elevation angles of surfaces, computing ratios of weight, and estimating ratios of volume.
These concepts include relative humidity, surface-to-volume ratio, radiation, conduction, convection, measuring volume by displacement, evaporation as a means of cooling, and radiation being directional.
For some students, the procedures may also have included measuring relative humidity and designing a system where everything cannot be maximized and an effective balance must be sought.
For some students, the concepts may also have included reflection contrasted with absorption, and consideration of a situation where two or more variables must be taken into account simultaneously.
The students have now been exposed to all the concepts necessary to participate knowledgeably in building and operating food dryers.
If you are teaching a class which will eventually face an external examination, it will be worthwhile to look at the Syllabus to see how questions are framed that relate to each concept the students have learned in Part I. If there are gaps in the students' knowledge, you can teach lessons interspersed in Part II, so that there will be no confusion about the terminology or calculations your particular Syllabus requires.
There are several ways by which you can assess how much and what your students have learned. One or more of the following methods may be appropriate for you situation:
1. Listen to the way students describe their work and otherwise participate in discussion.
2. Observe the way they have designed their boxes and their food dryers in Part II.
3. Note their answers to specific problems and questions that you pose.
If your teaching is designed for practical outcomes only, these informal methods may be sufficient. If, however, written examinations of knowledge acquired is a requirement, then those exams can serve to help you identify areas in which students will need additional instruction.
 |
 |