Formulae and Tables - Wood / textbooks for vocational training (GTZ, 122 p.)
Contents — 16 sections
- Section 1
- Section 2
- Preface
- Formulae and Tables - Wood / textbooks for vocational training (GTZ, 122 p.)
- Formulae and Tables - Wood / textbooks for vocational training (GTZ, 122 p.)
- Formulae and Tables - Wood / textbooks for vocational training (GTZ, 122 p.)
- Formulae and Tables - Wood / textbooks for vocational training (GTZ, 122 p.)
- Formulae and Tables - Wood / textbooks for vocational training (GTZ, 122 p.)
- Formulae and Tables - Wood / textbooks for vocational training (GTZ, 122 p.)
- Formulae and Tables - Wood / textbooks for vocational training (GTZ, 122 p.)
- Formulae and Tables - Wood / textbooks for vocational training (GTZ, 122 p.)
- Formulae and Tables - Wood / textbooks for vocational training (GTZ, 122 p.)
- Formulae and Tables - Wood / textbooks for vocational training (GTZ, 122 p.)
- Formulae and Tables - Wood / textbooks for vocational training (GTZ, 122 p.)
- Formulae and Tables - Wood / textbooks for vocational training (GTZ, 122 p.)
- List of Symbols Used
 | | | Formulae and Tables - Wood / textbooks for vocational training (GTZ, 122 p.) | | | (introduction...) | | | Preface | | | 1. Wood | | | (introduction...) | | | 1.1. Structure of Wood | | | 1.2. Chemical Composition of Wood | | | (introduction...) | | | 1.2.1. Cell Wall Components of Wood | | | 1.2.2. Wood Constituents | | | 1.3. Physical Properties of Wood | | | (introduction...) | | | 1.3.1 Wood Density | | | 1.3.2. Moisture Content of Wood | | | 1.3.3. Swelling and Shrinking of Wood | | | 1.3.4. Thermal Properties of Wood | | | 1.3.5. Acoustic and Electric Properties of Wood | | | 1.3.6. Friction Properties of Wood | | | 1.3.7. Strength of Wood | | | 1.4. Important Wood Species | | | 1.5. Wood Defects Caused by Growth Influences | | | 2. Materials Made of Wood | | | 2.1. Solid Wood | | | (introduction...) | | | 2.1.1. Not Improved Solid Wood | | | 2.1.2. Improved Solid Wood | | | 2.2. Laminated Wood | | | 2.3. Sandwich Boards | | | 2.4. Fibreboards | | | 2.5. Particle Boards | | | 3. Plastic materials | | | (introduction...) | | | 3.1. Classification of Plastic Materials | | | 3.2. Properties of Important Plastic Materials | | | 3.3. Applications of Important Plastic Materials | | | 4. Glass Materials | | | (introduction...) | | | 4.1. Classification of Glass Materials | | | 4.2. Properties of Glass Materials | | | 4.3. Applications of Glass Materials | | | 5. Steel | | | (introduction...) | | | 5.1. Classification of Steels | | | 5.2. Properties of Important Steels | | | 5.3. Applications of Important Steels | | | 5.4. Screws and Nails | | | 6. Basic Terms of Cutting | | | (introduction...) | | | 6.1. Faces and Angles on the Tool | | | 6.2. Directions of Cutting | | | 6.3. Cutting Speeds | | | 6.4. Cutting-Edge Dulling and Cutting-Edge Wear | | | 7. Hand Tools | | | (introduction...) | | | 7.1. Measuring and Marking Tools | | | 7.2. Sawing Tools | | | 7.3. Planing Tools | | | 7.4. Mortising and Ripping Tools | | | 7.5. Drilling and Boring Tools | | | 7.6. Rasps and Files | | | 7.7. Other Tools | | | 8. Wood Working Machines | | | 8.1. Sawing Machines | | | (introduction...) | | | 8.1.1. Circular Saw Benches | | | 8.1.2. Parallel Rocking Circular Sawing Machine | | | 8.1.3. Table Band Sawing Machine | | | 8.2. Milling Machines | | | (introduction...) | | | 8.2.1. Smooth Miller | | | 8.2.2. Thicknessing Miller | | | 8.2.3. Shaping Machine | | | 8.2.4. Slot Milling Machine | | | 8.3. Lathe | | | 8.4. Drilling Machines | | | (introduction...) | | | 8.4.1. Box-Column Drilling Machine | | | 8.4.2. Hand Drilling Machine | | | 8.5. Sanding Machines | | | (introduction...) | | | 8.5.1. Horizontal Belt Sanding Machine | | | 8.5.2. Column-Type Disk Sanding Machine | | | 8.6. Presses | | | 8.7. Sharpening Machines | | | 8.7.1. Ripping Chisel and Plate Iron Sharpening Machine | | | 8.7.2 Sharpening Machine for Circular and Band Saw Blades | | | 8.7.3 Milling Cutter Sharpening Machine | | | 8.7.4. Blade Sharpening Machine | | | 9. Tools | | | (introduction...) | | | 9.1. Tools for Circular Sawing Machines | | | 9.2. Tools for Table Band Sawing Machines | | | 9.3. Tools for Smooth and Thicknessing Millers | | | 9.4. Tools for Shaping Machines | | | 9.5. Tools for Slot Milling Machines | | | 9.6. Tools for Drilling Machines | | | 9.7. Tools for Sanding Machines | | | 9.8. Tools for Sharpening Machines | | | 10. Setting-up of Tools | | | 10.1. Setting-up of Hand Tools | | | 10.2. Setting-up of Machine Tools | | | 11. Gluing of Wood | | | (introduction...) | | | 11.1. Important Terms of the Gluing Techniques | | | 11.2. Kinds, Properties and Processing of Important Glues | | | 11.3. Gluing Mistakes and Their Causes | | | 12. Surface Treatment of Wood | | | (introduction...) | | | 12.1. Substances for Surface Treatment | | | 12.2. Use of the Coating Compositions | | | 12.3. Examples of Wood Coating Systems | | | List of Symbols Used |
|
| | | Formulae and Tables - Wood / textbooks for vocational training (GTZ, 122 p.) | | | 1. Wood | | | (introduction...) | | | 1.1. Structure of Wood | | | 1.2. Chemical Composition of Wood | | | (introduction...) | | | 1.2.1. Cell Wall Components of Wood | | | 1.2.2. Wood Constituents | | | 1.3. Physical Properties of Wood | | | (introduction...) | | | 1.3.1 Wood Density | | | 1.3.2. Moisture Content of Wood | | | 1.3.3. Swelling and Shrinking of Wood | | | 1.3.4. Thermal Properties of Wood | | | 1.3.5. Acoustic and Electric Properties of Wood | | | 1.3.6. Friction Properties of Wood | | | 1.3.7. Strength of Wood | | | 1.4. Important Wood Species | | | 1.5. Wood Defects Caused by Growth Influences |
|
Formulae and Tables - Wood / textbooks for vocational training (GTZ, 122 p.)
1. Wood
Wood is a tissue which is formed under the bark of the trunk by
the meristem, the cambium. It consists of different
cells.
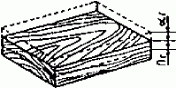
1.1. Structure of Wood
The structure of the wood can be seen with the naked eye on the
cut surfaces (see Fig. 1).

Figure 1 Sectional view
Fine Structure of Wood
The fine structure of wood is visible only under the microscope.
|
Tissue |
Types of cells |
Structure |
Function |
Occurrence |
|
conducting tissue |
tracheas |
cells of different size and structure which are united into
tubes; inside width:
0.02 - 0.5 mm
length: a few cm to several m |
water and nutrient conduction |
deciduous wood |
|
tracheids |
similar to the tracheas, but universally closed and
dotted;
inside width: 0.001 - 0.4 mm
length: 0.3 -11 mm |
water and nutrient conduction |
all wood species |
|
strengthening tissue and storage tissue |
sclerenchymas |
thick-walled, air-filled structures of small cross-section |
strengthening of the wood |
deciduous wood |
|
storage tissue |
parenchymas |
mostly tape-shaped cells |
metabolism and |
all wood |
|
|
- axial parenchymas |
strung together |
storage of reserve substances |
species |
|
|
- cross parenchymas |
mostly square cells; containing many dots |
nutrient storage and conduction in radial direction |
all wood species |
|
|
longitudinal and cross parenchymae mostly form a
multiple-branched network |
|
|
1.2. Chemical Composition of Wood
Wood is composed of many chemical substances. The wood
properties are considerably influenced by the composition.
Percentage in dry substance of wood
|
Carbon (C) |
Oxygen (O) |
Hydrogen (H) |
Nitrogen (N) |
Mineral substances |
|
48...51 |
43...46 |
5...6 |
0.04...0.26 |
0.1...1.2 |
The percentages vary with the wood
species.
1.2.1. Cell Wall Components of Wood
Percentage in dry substance of wood
|
Cellulose |
Pantosanes |
Lignin |
Constituents |
|
25...62 |
15.27 |
25...45 |
approx. 1.0 |
|
Composition of the cell components |
|
44.4 % C |
45.4 % C |
62...69 % C |
see under 1.2.2. |
|
49.4 % O |
49.4 % O |
26...33.5 % O |
|
|
6.2 % H |
5.2 % H |
6... 6.5 % H |
|
1.2.2. Wood Constituents
|
Constituent |
Description of the substance |
Percentage in dry substance of wood |
Importance of the constituent |
|
alkaloids |
metabolic product |
|
protection against animal pests of wood |
|
inorganic acid and salts |
products of deposition |
|
makes woodworking possibly more difficult |
|
bitter substances |
metabolic products |
|
|
|
protein |
ditto |
|
|
|
colouring substances |
excretion products of the cells or constituent of the cell sap
|
|
|
|
fats |
reserve substances |
up to 0.12...1.3 % |
|
|
tannin |
product of deposition |
up to 17 % |
protection against pests of wood, tannin extract recovery |
|
glucosides |
reserve substance |
|
|
|
gum |
protective substance |
|
use for colouring and adhesive substances |
|
resins |
metabolic product |
|
makes woodworking more difficult, serves for the manufacture of
lacquers and adhesive substances |
|
camphor |
protective substance |
up to 3 % and 1.5 % camphor oil |
as distillation product for the recovery of essential oils |
|
mineral substances |
product of deposition |
|
makes woodworking more difficult |
|
oils |
decomposition products |
up to 1.6 % |
protective agent |
|
organic acids and salts |
metabolic products |
|
makes woodworking more difficult |
|
odoriferous, toxic and curative substances |
protective substance for the wood |
|
may result in damage to the health during woodworking (see 1.4.
under the various wood species) |
|
starch |
reserve substance |
0.27...7.0 % sago palm up to 400 kg/tree |
for food production and for gluten, thickeners and others |
|
waxes |
excretion products of the cell walls and the protoplasma |
occurs seldom |
makes surfaces treatment of the wood more difficult |
|
sugar |
conversion product of the starch |
up to 3.5 % in the sap of Norway and sugar maple |
saccharification of wood |
1.3. Physical Properties of Wood
The physical properties of wood depend on the chemical
composition and the biological
structure.
1.3.1 Wood Density
The wood density is the ratio of the wood mass to the wood
volume at a certain moisture content.
|
Designation |
Definition |
Calculation |
|
density r |
ratio of mass to volume of a substance |

m = mass in g
V = volume
in cm
|
|
oven-dry density ro
|
density of absolutely dry wood |

mo = mass
in g at a moisture content of 0 %
Vo = volume in cm3 at
a moisture content of 0 %
|
|
gross density ru
the following are usual: |
density of wood at a specific moisture content |

mu = mass in g
at a specific moisture
Vu = volume in cm3 at a specific
moisture content
|
|
r 12...15
(12...15 % moisture
content of wood)
and
r green
(freshly
felled timber) |
|
|
Ratio of moisture content of wood to gross density (see Fig. 2).

Figure 2 Plot of gross density
and moisture
content
1.3.2. Moisture Content of Wood
The moisture of wood is the liquid content of wood.
|
Designation |
Definition |
Calculation |
|
moisture content of wood u |
water content of wood in % or in kg of water per kg of wood
|

|
|
oven-dryness |
wood in absolutely dry condition |

|
|
air-dryness |
wood in air-dried condition (moisture content of wood 12 to 15
%) |
u = moisture content of wood in % or in kg · kg-1
mu = mass of the
damp wood sample in kg
mo = mass of the oven-dry wood sample in kg
|
|
fibre saturation |
cell walls completely saturated with water (moisture content of
wood 22 ... 36 % depending on the wood species) |
|
|
water saturation |
all voids filled with water (maximum moisture content) |
|
1.3.3. Swelling and Shrinking of Wood
Swelling and shrinking is the change of dimensions of wood as a
result of moisture take-up by the incorporation of water into cell wall or by
the extraction of water from the cell wall.
|
Behavior of the wood |
Definition |
Amount of the change in dimension |
Schematic Representation |
|
longitudinal swelling a1 and longitudinal shrinkage b1 |
change in dimension of the wood in grain direction as a result
of take-up or liberation of water |
0.05...0.07 % |

|
|
radial swelling ar and
radial shrinkage br |
change in dimension of the wood vertically to the annual rings
as a result of take-up or liberation of water |
1.2...8.5 % |
|
|
tangential swelling ar and tangential shrinkage bt |
change in dimension of the wood in the direction of a tangent to
the annual rings as a result of take-up or liberation of water |
3.0...16.0 % |
|
1.3.4. Thermal Properties of Wood
Wood has good heat-insulating properties, but is a bad heat
conductor.
|
Quantity |
Definition |
Amount |
Remarks |
|
heat transfer coefficient a in kJ
m-2 h-1 K-1 |
amount of heat which within a certain period of time is
transferred at an interface from one material to another |
for wood in calm air
a =
20...32, in a breeze of 1...5 m s-1
a = 32...80 |
|
|
thermal resistance h in
m2 h K kJ-1 |
resistance of a material to the heat transfer |

d = wood thickness in
mm
l = coefficient of thermal conductivity in
kJ m-1 h-1 k-1
|
|
|
flash point tF in ºC |
temperature at which the wood starts to bum upon ignition |
tF for wood 200...275 ºC |
|
|
calorific value H in kJ kg-1 |
quantity of heat released during burning |
calorific value for wood at uo
H » 19000 kJ kg-1
at u = 12 %
H » 13500 to 17000 kJ kg-1 |
H is increasing with the content of carbon, hydrogen,
combustible constituents, lignin and with rising density |
1.3.5. Acoustic and Electric Properties of Wood
The acoustic properties of wood result from its ability to
vibrate.
The electric properties are based on the fact that wood acts as
an insulator when oven-dry.
|
Quantity |
Definition |
Amount |
Remarks |
|
sound velocity C in m s-1 |
velocity at which sound waves propagate in a body |
in grain direction 3000...5000 ms-1 |
the ratio of the sound velocity in wood in grain direction to
that across the grain is 1.3...1.5 |
|
sound damping b in phones or
decibels; sound absorption S in % |
assimilation of sound energy by the body exposed to sound waves;
ratio of the sound energy absorbed by a body to the sound energy arrived at the
body |

ks = absorbed
sound energy
ka = sound energy arrived
|
|
|
specific electrical resistance r
in W cm |
electrical resistance of a cube with an edge length of 1 m |
|
is getting smaller with increasing density and moisture |
Sound absorption S of some sound-absorbing materials in
% at a frequency of 512 Hz
|
Material |
Thickness in mm |
Application |
S in % |
|
wood-wool boards |
25 |
directly on the wall |
35 |
|
wood particle boards |
13 |
at a distance of 50 mm to the wall, surface untreated |
19 |
|
felt |
5 |
directly on the wall |
18 |
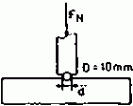
1.3.6. Friction Properties of Wood
Friction is defined as the action of forces which at two
contacting surfaces resist motion.
|
Quantity |
Definition |
Amount resp. Calculation |
|
force of static friction FRmax in kp |
force necessary to make two surfaces slide against each other
|
Frmax = f0 *FN
fo
= coefficient of static friction
FN = normal
force
fo || »
0.6
fo ^ » 0.55 |
|
force of sliding friction FR in kp |
force to overcome the resistance to motion when one surface is
moving on other surface |
FR = f * FN
f = coefficient of sliding
friction
f || » 0.5
f ^ » 0.35 |
|
force of rolling friction FRmin in kp |
force to overcome the resistance which counteracts the rolling
off of a cylinder |
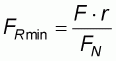
F = force acting in the
centre of the circle
r = radius of the circle
|
1.3.7. Strength of Wood
Strength is defined as the resistance of a body put up to the
indentation by another object.
|
Quantity Schematic representation |
Definition |
Amount |
|
hardness H in MPa
|
resistance of a body to the action of external forces |
|
|
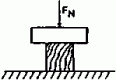
compressive strength d dB in MPa
|
resistance of a body to a compressive force acting from outside
|
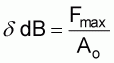
Fmax =
compressive force
Ao = cross-section
|
|

tensile strength d zB in MPa
|
maximum resistance of a body to tensile stress |
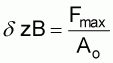
Fmax = tensile
force
Ao = cross-section
|
|
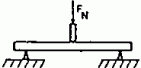
bending strength 6 dB in MPa
|
maximum load occurring under a bending stress |
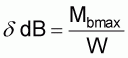
Mbmax = bending
moment
W = moment of resistance
|
|

shear strength t aB in MPa
|
resistance to destruction by shearing forces |
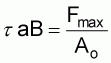
Fmax = shearing
force
Ao = shear surface
|
|

torsional strength t tB in MPa
|
highest tension occurring under torsional stress |
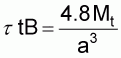
Mt = torque a = length of a
side of the cross-section
|
The torsional strength increases with density and with rising
latewood and heartwood percentage and with decreasing moisture content.
|
Brinell hardness species in MPa of various wood |
Mean shear strength of species in MPa various wood
|
|
Wood species |
HB|| |
HB^ |
Wood species |
t aB |
|
Albura |
48 |
28 |
Albura |
7.6 |
|
Ail� |
37 |
17 |
Ail� |
7.0 |
|
B�t� |
85 |
33 |
B�t� |
8.0 |
|
Boss� |
58 |
25 |
Boss� |
10.6 |
|
Iroko |
60 |
33 |
Ioroko |
11.0 |
|
Tali |
85 |
55 |
Tali |
9.0 |
|
Calculation: |

|
1.4. Important Wood Species
|
Trade name |
Other names |
Occurrence |
Wood colour |
|
|
|
Heartwood |
Sapwood |
|
Abura |
Bahia, Elilom, Subaha, Vuku |
West and East Africa |
greyish brown, brown to grey |
yellowish red |
|
African Mahogany |
Khaya, Ndola, N’Gollom, Acajou d’Afrique |
West Africa |
light red, quickly darkening |
light reddish grey |
|
African Padouk |
Barwood, Ndimbo, Epion, Takula, Ebeu |
West Africa |
coral-red, to reddish brown, darkening |
whitish to cream-coloured |
|
Aiel� |
Atu�, Elimi, Abeui, M’bili, Bidinkala |
West Central and East Africa |
yellowish grey, yellowish brown |
yellowish white to pale pink |
|
Avodir� |
Apaya, Engan, Agb�, Lusamba |
tropic West Africa |
pale yellow to cream-yellow, darkening |
|
|
B�t� |
Aprono, Ofun, Mansonia |
West Africa |
brownish to olive, often darkening |
whitish |
|
Bilinga |
Aloma, Badi, Kusia, Opepe, Akondoc |
West and East Africa |
salmon-coloured, rose-pink, darkening |
pale pink |
|
Bintangor |
Koila, Calophyllum |
South-East Asia |
reddish brown |
yellowish grey |
|
Boss� |
Divuiti, Ibotou, Ebang-bemva, Akuraten |
West Africa |
salmon-coloured, rose-pink, darkening |
pale pink |
|
Bubinga |
Oveng, Okweni, Kevazingo, Essingang |
West Africa |
reddish brown to purple red veined |
greyish white to pale yellow |
|
Dab�ma |
Agboin, Atui, Toum, Dahoma, Bokundu |
West and East Africa |
yellowish brown to greyish brown |
whitish grey to light brown |
|
Dark red meranti |
Adamui, Tanguile Nemesu, Meranti merah |
South-East Asia |
reddish brown |
yellowish grey |
|
Dib�tou |
Apop, Bibolo, Bombolu, Alop |
tropic West Africa |
light to dark brown darkening |
pale yellow to pale brown |
|
Douka |
Okola, Bavili, N’duka |
West Africa |
light red to reddish brown |
reddish white |
|
Doussi� |
Afzelia, Bolengu, Papao, Uvala, M’bango |
West and East Africa |
light brown, often dark-veined |
whitish to light yellow |
|
Ebiara |
Abem, Berlinia, Melegba, Obolo, Ekpogoi |
West Africa |
light reddish brown to reddish brown |
yellowish white to reddish grey |
|
Framir� |
Lidia, Idigbo, Black afara |
West Africa |
greenish yellow, darkening |
yellowish |
|
Ilomba |
Akomu, Lolako, Otie, Wal�l� |
tropic West, Central and East Africa |
pink to yellowish brown |
|
|
Iroko |
Abang, Odum, Kambala |
West, Central and East Africa |
greyish yellow to light brown, darkening |
yellowish white to grey |
|
Kosipo |
Omu, Penkawa, Mpempe, Atomassi� |
West and Central Africa |
reddish brown |
grey |
|
Krabak |
Sanai, Ven ven, bac, Palosapis |
South-East Asia |
yellowish to yellowish brown, darkening |
pale yellow |
|
Limba |
Afara, Akom, Frak�, Ofram |
West and Central Africa |
pale yellow with a touch of olive, also greenish grey |
|
|
Makor� |
Baku, Aganope, Butusu |
West Africa |
pink to reddish brown, darkening |
cream-coloured to reddish darkening |
|
Merawan |
Thong, Koki, Thingan, Kien kien |
South-East Asia |
yellowish, quickly darkening |
pale yellow |
|
Moabi |
Njabi, Adza, Dimpampi |
West Africa |
dark red to reddish brown, darkening |
light pink to dark grey |
|
Movingui |
Eyen, Barr� Ayan Bonsamdua |
West Africa |
lemon yellow to greenish yellow, darkening |
yellowish grey |
|
Mukulungu |
Elang, Anzala, Fino, Autracon |
West Africa |
reddish brown, often dark-veined |
yellowish grey to greyish brown |
|
Naga |
Okwen, Tebako, Meblo |
West Africa |
copper-coloured to reddish brown, light and dark stripes |
light brown |
|
Niangon |
Ogou�, Kekosi, Yawi, Wishmore |
West Africa |
light to dark reddish brown, orange tinted |
whitish to reddish grey |
|
Okoum� |
Caboon, Zonga, Angouma |
West Africa |
pale pink to reddish brown |
light grey |
|
East Indian jacaranda |
East Indian rosewood, Sono keling, Eravadi |
South Asia East India |
yellowish brown to purple brown, darkening |
yellowish |
|
Ozigo |
Assia |
West Africa |
grey yellowish to pale pink |
pale grey, yellowish or reddish tinted |
|
Sapelli |
Lifaki, Sapele, Dilolo, Aboudikro |
West, Central and East Africa |
pale pink to light brown, darkening |
cream-coloured, darkening |
|
Sipo |
Assi�, Utile, Timbi, Ogipopo |
West, Central and East Africa |
reddish brown, darkening |
reddish grey to light brown |
|
Tali |
Alui, Eloun, Erum, Kassa, Muave |
West, Central and East Africa |
yellowish to reddish brown, veined |
greyish white to yellowish |
|
Teak |
Kyun, Giathi, Tek Sak |
South and South-East Asia |
golden to yellowish brown, partly veined |
whitish to grey l |
|
Tiama |
Edinam, Kalungi, Timbi, Gedu nohor |
West and Central Africa |
light red to reddish brown, darkening |
whitish to reddish grey |
|
Weng� |
Awong, Mboto, Nson-so |
West Africa |
light brown, veined, darkening |
whitish to greyish white |
|
Yang |
Dau, Gurjun, Keruing, Dzao long |
South and South-East Asia |
greyish pink to reddish brown |
greyish red |
|
Zingana |
Amouk, Zebrano, Izingana |
West Africa |
light brown to greyish brown, veined |
whitish to grey |
|
Trade name |
Gross density
r
12...15 in g · cm-3 |
Compressive strength d dB
in MPa |
Bending strength d bB in
MPa |
Tensile strength d zB in
MPa |
|
Abura |
0.45 to 0.64 |
32...53 |
56...95 |
d zB^ 1.7...3.0 |
|
African Mahonany |
0.45 to 0.62 |
36...58 |
36...126 |
d zB || 33...101
d zB ^ 1.7...2.3 |
|
African Padouk |
0.65 to 0.85 |
65...81 |
110...149 |
d zB ^ 1.9...5.7 |
|
Ail� |
0.36 to 0.57 |
33...49 |
27. ..84 |
d zB || 21...72
d zB ^ 1.6...2.6 |
|
Avodir� |
0.50 to 0.60 |
40...57 |
52...113 |
d zB || 84...113
d zB ^ 2.1....2.9 |
|
B�t� |
0.58 to 0.68 |
48...97 |
62...187 |
d zB || 52...173
d zB ^ 4.5...7.4 |
|
Bilinga |
0.70 to 0.90 |
47...73 |
85...130 |
d zB ^ » 2.2 |
|
Bintangor |
0.48 to 0.66 |
43...60 |
48...107 |
d zB || 34...140 |
|
Boss� |
0.55 to 0.65 |
45...61 |
74...110 |
d zB || 42...99
d zB ^ 2.0...2.4 |
|
Bubinga |
0.80 to 0.95 |
65...76 |
125...160 |
d zB ^ 3.6...4.8 |
|
Dabema |
0.65 to 0.80 |
47. ..75 |
75...125 |
d zB ^ 1.9...3.7 |
|
Dark red meranti |
0.59 to 0.89 |
53...74 |
77...158 |
d zB || 66...222
d zB ^ » 2.7 |
|
Dib�tou |
0.43 to 0.65 |
33...47 |
56...89 |
d zB || 15...99
d zB ^ 1.6...2.1 |
|
Douka |
0.65 to 0.75 |
40...71 |
41...146 |
d zB || 30...127
d zB ^ 1.9...2.3 |
|
Doussi� |
0.70 to 0.90 |
65...79 |
90...120 |
d zB ^ 1.8...2.3 |
|
Ebiaia |
0.60 to 0.80 |
42...60 |
83...110 |
d zB ^ 2.7...4.0 |
|
Framir� |
0.45 to 0.60 |
35...53 |
37...115 |
d zB ^ 1.2...2.3 |
|
Ilomba |
0.35 to 0.53 |
31...45 |
41...74 |
d zB || 45...76
d zB ^ 1.7...2.9 |
|
Iroko |
0.55 to 0.85 |
52...81 |
70...158 |
d zB || 55...140
d zB ^ 2.1...3.0 |
|
Kosipo |
0.59 to 0.65 |
49...63 |
88...121 |
d zB || 32...155
d zB ^ 1.9...3.5 |
|
Krabak |
0.64 to 0.69 |
40...69 |
72...132 |
d zB || 72...83
d zB ^ 3.8...5.6 |
|
Limba |
0.48 to 0.78 |
35...48 |
58..94 |
d zB || 26...165
d zB ^ 1.5.-2.8 |
|
Makor� |
0.53 to 0.72 |
40...71 |
41...146 |
d zB || 30...127
d zB ^ 1.9...2.3 |
|
Merawan |
0.63 to 0.86 |
46...65 |
120...130 |
d zB ^ 2.4...3.0 |
|
Moabi |
0.73 to 0.90 |
57...86 |
130...180 |
d zB ^ 3.2...4.4 |
|
Movingui |
0.65 to 0.90 |
54...71 |
66...155 |
d zB || 27...96
d zB ^ 2.5...2.9 |
|
Mukulungu |
0.78 to 1.04 |
73...107 |
100...178 |
d zB || 100...166 |
|
Naga |
0.53 to 0.73 |
43...64 |
100...150 |
|
|
Niangon |
0.58 to 0.72 |
56...68 |
87...140 |
d zB ^ 1.09...2.7 |
|
Okoum� |
0.37 to 0.56 |
33...66 |
27...107 |
d zB || 23...125
d zB ^ 1.5...2.1 |
|
East Indian jacaranda |
0.70 to 0.95 |
57...65 |
119...132 |
d zB ^ 3.4...6.5 |
|
Ozigo |
0.50 to 0.75 |
58...71 |
110...130 |
d zB ^ 2.6...4.0 |
|
Sapelli |
0.51 to 0.75 |
37...78 |
60...164 |
d zB || 53...154
d zB ^ 2.2....2.9 |
|
Sipo |
0.55 to 0.75 |
43...73 |
47...155 |
d zB || 57...164
d zB ^ 2.0...2.6 |
|
Tali |
0.85 to 1.07 |
75...86 |
120...150 |
d zB ^ 2.7...4.0 |
|
Teak |
0.52 to 0.70 |
42...59 |
58...109 |
d zB || 95...155
d zB ^ 2.3...5.4 |
|
Tiama |
0.51 to 0.63 |
38...59 |
61...92 |
d zB ^ 1.6...2.6 |
|
Weng� |
0.75 to 0.95 |
68...90 |
115...170 |
d zB ^ 2.5...2.8 |
|
Yang |
0.70 to 0.90 |
64...79 |
98...127 |
d zB || 97...127
d zB ^ 3.8...5.6 |
|
Zingana |
0.70 to 0.85 |
35...66 |
84...120 |
d zB ^ 2.8...4.3 |
|
Trade name |
General properties |
Effects detrimental to health |
Applications |
|
Abura |
moderately hard, well workable, well cleavable, can well be
stained, dyed, varnished and impregnated; susceptible to wood pests, not
weather-proof |
causes occasionally dermatitis*) |
for peeled veneers, doors, windows, interior work, for furniture
and model making |
|
African mahogany |
well workable, can well be glued, stained and varnished,
relatively resistant to wood pests, not weather-proof |
causes dermatitis |
for sliced veneers and peeled veneers, for furniture
construction, interior work, for parquet, doors and windows |
|
African Padouk |
easily workable, can well be glued and especially well be
varnished, resistant to wood pests and weather influence |
causes dermatitis, grinding dust must well be sucked off |
especially for sliced veneers, for building doors and windows,
for parquet and furniture construction and interior work |
|
Aiel� |
well cuttable, can well be nailed, screwed, glued, but is
difficult to cleave; can well be stained and varnished; susceptible to wood
pests, not weather-proof |
|
for sliced and peeled veneers, in model making, for panelling
and for packing |
|
Avodir� |
well cuttable and cleavable, can well be nailed, screwed and
glued as well as stained and varnished, hard to impregnate, susceptible to wood
pests, especially to blue stain, not weather-proof |
causes occasionally irritations of the mucosa |
preferably for making sliced veneer, but also for parquet,
panelling and in furniture construction |
|
B�t� |
well workable, tools quickly get dull, well cleavable, can be
stained and varnished, susceptible to animal wood pests, resistant to plant wood
pests, weather-proof |
causes dermatitis and irritations of the mucosa, nausea, vertigo
|
especially for sliced veneer, for windows and doors, panelling,
parquet, in furniture construction and interior work |
|
Bilinga |
well cuttable, tools quickly get dull, can well be glued,
stained, but is difficult to varnish, resistant to wood pests and weather
influences |
wood dust causes dermatitis |
for sliced veneers, for building windows and doors, furniture,
panelling, parquet and for interior work |
|
Bintangor |
easily workable, tools quickly get dull, can well be nailed and
screwed, hard to cleave, susceptible to wood pests, weather-proof |
skin irritations and disturbances of the general state of health
possible |
for veneer and plywood production, for furniture construction,
for panelling and parquet, in boat building |
|
Boss� |
well cuttable, tools quickly get dull, can well be glued and
stained, but is difficult to varnish, resistant to wood pests and weather
influences |
wood dust causes dermatitis |
for veneer production, in furniture production, for panelling
and parquet, for building doors and windows |
|
Bubinga |
workable with difficulty, tools quickly get dull, hard to
cleave, can well be glued, stained and varnished, resistant to wood pests and
weather influences |
|
for veneer production, for furniture construction, for parquet
and panelling, in waggon and vehicle construction |
|
Dab�ma |
workable with difficulty, tools quickly get dull, tends to
splintering, predrilling is suitable for nailing and screwing, can well be
stained and varnished, resistant to wood pests and weather influences |
causes occasionally irritations of the mucosa |
for manufacture of veneers, in furniture construction, for
parquet and panelling, for interior work |
|
Dark red meranti |
easily workable, tools quickly get dull, can well be nailed and
screwed, hard to cleave, susceptible to wood pests, weather-proof |
|
for manufacture of veneers and plywood for furniture, parquet,
windows and doors, for interior work and for boat building and vehicle
construction |
|
Dib�tou |
easily workable, predrilling required for nailing and screwing,
can well be glued, stained and varnished, hard to impregnate, susceptible to
wood pests, not weather-proof |
causes occasionally dermatitis |
for sliced veneer, for furniture construction, for panelling and
parquet, for interior work, vehicle construction and boat building |
|
Douka |
well workable, predrilling required for nailing and screwing,
can well be glued, stained and varnished, relatively resistant to wood pests and
weather influences |
causes dermatitis, irritations of the mucosa and conjunctiva
|
for manufacture of veneers, for windows and doors, interior
work, for furniture, parquet, in ship building, waggon and vehicle construction
|
|
Doussi� |
well workable, tools quickly get dull, cannot be stained, hard
to varnish, resistant to wood pests and weather influences |
exposure to dust may result in irritations of the mucosa |
for peeled veneer, windows, doors, floor coverings, furniture,
in ship building and bridge construction, especially for laboratory furniture
and containers for chemicals |
|
Ebiara |
well workable, danger of discolouring, can well be stained and
varnished and easily impregnated, susceptible to wood pests, not weather-proof
|
|
for manufacture of sliced veneer, for internal work, in
furniture construction and manufacture or parquet |
|
Framir� |
well cuttable and cleavable, can well be nailed, screwed, glued,
stained and varnished, relatively resistant to wood pests, not weather-proof
|
|
for veneer and plywood production, for furniture, panelling,
parquet, for windows and doors, interior work |
|
Ilomba |
can well be planed, milled, drilled, cleft, nailed, screwed,
glued, stained and varnished, susceptible to wood pests, not weather-proof |
|
for crossband veneers, packing and interior work, not suitable
as building timber |
|
Iroko |
well workable, tools quickly get dull, predrilling required for
nailing and screwing, can be varnished after pretreatment, cannot be
impregnated, resistant to wood pests, weather-proof |
causes occasionally dermatitis and irritations of the mucosa
|
for veneer and plywood production, for furniture, panelling,
parquet, for doors and windows, for ship building and waggon construction and
timber-work |
|
Kosipo |
well workable, tools quickly get dull, predrilling required for
nailing and screwing, can well be glued, stained and varnished, susceptible to
animal wood pests, not weather-proof |
|
for sliced and peeled veneers, for plywood production, for
furniture panelling and parquet and interior work |
|
Krabak |
well workable, tools quickly get dull, can well be nailed and
screwed, glued, stained and varnished, susceptible to wood pests, not
weather-proof |
|
for veneer and plywood production, for furniture, parquet and
interior work |
|
Limba |
well workable, can well be glued, stained and varnished,
susceptible to wood pests, weather-proof |
prolonged inflammations caused by splinter injuries are possible
|
for veneer and plywood production, interior work, for doors and
windows, parquet, panelling, for furniture and timber-work |
|
Makor� |
well workable, tools quickly get dull, predrilling required for
nailing and screwing, can well be glued, stained and varnished, relatively
resistant to wood pests and weather influences |
causes dermatitis, mucositis and conjunctivitis |
for veneers, in furniture construction, for panelling, parquet,
windows and doors, interior work, in ship building and waggon construction |
|
Merawan |
workable with difficulty, tools quickly get dull, can well be
glued, stained and varnished, insect-proof, weather-proof, relatively
acid-proof, durable under water |
|
for sliced and peeled veneers, interior work, for floor
coverings, panellings, in vehicle construction and ship building |
|
Moabi |
well cuttable, tools quickly get dull, can well be glued,
stained and varnished, relatively resistant to wood pests, weather-proof |
causes irritations of the mucosa |
for veneer and plywood production, for furniture, parquet,
windows and doors, interior work, vehicle construction, boat building and bridge
construction |
|
Movingui |
workable with difficulty, tools quickly get dull, predrilling
required for nailing and screwing, hard to cleave and glue, can well be stained
and varnished, difficult to impregnate |
causes occasionally dermatitis |
for sliced veneeers, furniture, interior work, parquet, waggon
construction, ship building and wood gluing work, for laboratory furniture and
containers for chemicals |
|
Mukulungu |
well workable, tools quickly get dull, predrilling required for
nailing and screwing, splinters, gluing difficult, paint coats badly adhere,
hard to impregnate, acid-proof, resistant to wood pests and weather influences
|
causes irritations of the mucosa |
for veneers, furniture, parquet, windows and doors, for interior
work, waggon, vehicle and bridge construction, as timber for hydraulic
engineering |
|
Naga |
well workable, predrilling required for nailing and screwing,
can well be glued, stained and varnished, heartwood can be impregnated,
relatively resistant to wood pests |
|
for veneer and plywood production, for furniture and interior
work, for windows, doors and floor coverings |
|
Niangon |
well workable, cleavable with difficulty, predrilling required
for nailing and screwing, pretreatment necessary before gluing and surface
treatment, resistant to wood pests, weather-proof |
|
for veneer production, for interior work, for parquet, windows,
doors, in vehicle construction, hydraulic and bridge engineering and
construction of wooden houses |
|
Okoum� |
well workable, tools quickly get dull, can well be glued,
stained and varnished, relatively resistant to wood pests, not weather-proof,
fairly durable under water |
|
for peeled veneer an plywood production, for furniture
construction and interior work, for packing, in car body and boat building |
|
East Indian jacaranda |
well workable, tools quickly get dull, cleavable with
difficulty, predrilling required for nailing and screwing, can well be glued,
stained and varnished, resistant to wood pests, weather-proof |
causes dermatitis |
for sliced veneer production, for furniture, panelling, parquet,
in model making and boat building |
|
Ozigo |
well workable, tools quickly get dull, can well be glued,
stained and varnished, relatively resistant to wood pests, not weather-proof
|
|
for peeled veneer production, furniture construction, interior
work, for parquet and packings |
|
Sapelli |
well workable, can well be glued, stained and varnished,
relatively resistant to wood pests, not weather-proof |
|
for sliced veneers, in furniture construction, for windows,
doors, parquet, in vehicle construction and boat building |
|
Sipo |
well workable, can well be glued, stained and varnished,
relatively resistant to wood pests, weatherproof |
|
for veneer and plywood production, in furniture construction and
interior work, for parquet, windows and doors, in vehicle construction and boat
building |
|
Tali |
workable with difficulty, hard to cleave, tools quickly get
dull, predrilling required for nailing and screwing, difficult to glue, can well
be stained and varnished, resistant to wood pests, weatherproof |
causes irritations of the mucosa |
for veneer production, for parquet, windows, doors, floor
coverings, in vehicle construction, bridge construction and mining, for
containers for chemicals |
|
Teak |
well workable, predrilling required for nailing and screwing,
tools quickly get dull, gluing and varnishing difficult, resistant to wood
pests, weather-proof, acid-proof, inflammable with difficulty |
causes occasionally dermatitis |
for sliced veneers, in furniture construction, for parquet,
windows, doors, for interior work, in vehicle construction and boat building, in
hydraulic engineering, for containers for chemicals |
|
Tiama |
well workable, resin content causes clogging of the tools, can
well be glued, stained and varnished, resistant to vegetable wood pests, but
suscectible to animal wood pests, not weather-proof |
|
for veneer and plywood production, for furniture, interior work,
for parquet, windows, doors, in vehicle construction and boat building |
|
Weng� |
well workable, predrilling required for nailing and screwing,
gluing and surface treatment difficult, resistant to wood pests, weather-proof
|
|
for sliced veneers, for furniture, panellings, parquet, windows
and doors, as structural timber in the building industry |
|
Yang |
workable with difficulty, tools quickly get dull, resin content
causes clogging of the tools, hard to glue, surface treatment difficult,
relatively resistant to wood pests, moderately weather-proof |
causes dermatitis, irritations of the mucosa furunculosis |
for veneer and plywood production, for windows and doors, for
interior work, vehicle construction and ship building |
|
Zingana |
moderately well workable, cleavable with difficulty, can well be
glued, stained and varnished, resistant to wood pests and weather influences
|
|
for sliced veneers, in furniture construction, for interior
furnishing, for windows and doors |
*) dermatitis - inflammation of the skin caused by
external
influences
1.5. Wood Defects Caused by Growth Influences
Defects of and damage to the wood are deviations from the normal
quality.
|
Kind of defect |
Description of defect |
Consequences |
Wood species concerned |
|
taper |
reduction of the trunk diameter by 1 cm · m-1
|
lower wood yield |
Douka, Yang |
|
curvature |

curved deviation of the trunk from
the straight line
|
lower wood yield, warping, shakes |
wood species mentioned under 1.4. |
|
wavy rings |

deviation from the normal trunk
cross-section by pointed or round wave-shaped annual rings
|
limited use, lower wood yield, strength variations, warping,
shakes |
African Padouk, Avodir�, Tali |
|
eccentric growth, heart displacement |

deviations of the pith duct from the
centre of the cross-section visible in the cross-section
|
limited use, lower wood yield, strength variations, warping,
shakes |
African mahogany, Ail�, Avodir�, B�t�, Dark red meranti,
Dibetou, Douka, Ebiara, Framir�, Ilomba, Kosipo, Limba, Krabak, Moabi,
Mukulungu, Niangon, Okoum�, Ozigo Tali, Teak |
|
spiral growth |
helical wood fibre direction around the trunk axis |
limited use, lower strength, shakes, warping |
Abura |
|
tension wood |
wood zones on the upper side of crooked trunks and branches
which appear to be of lighter colour than the surrounding wood |
greater swelling and shrinkage, due to warping, shakes, working
is more difficult |
Doussi� |
|
ring shakes |
circular shakes following the annual rings mainly in the lower
part of the trunk |
unusable as timber |
African Padouk, Framier� |
|
knottiness |
excessive existence of a great number of knots, in particular
also dry, dead knots |
lower wood yield, lower quality of the timber, reduced strength
|
Abura, Avodir�, B�t�, Dibetou, Framir�, Limba, Krabak,
Mukulungu, Niangon, East Indian jacaranda. Teak, Weng� |
|
shakes |
separations of the fibre structure which may occur as radial and
tangential shakes |
limited use, lower wood yield, possibly not usable as timber
|
almost all wood species described under 1.4. |
|
resin galls, resin pockets |
narrow tangential clefts in the trunk which are of varying
length and filled with resins or latex *) |
working is made more difficult, limited use, lower wood yield,
lower strength |
Bitangor, Bubinga, Makor�, Tiama, Yang, Zingana |
|
false heartwood, coloured heart-wood |
differently coloured inner zone or the trunk depending on the
wood species (brown, yellowish, green and other colours) |
lower wood yield, limited use, lower quality of the final
product |
Tiama |
|
figured growth burls |
great nodular accumulation of a large number of dormant buds
concentrated in a very confined space |
low strength, working is made more difficult |
|
|
blue stain and other discoloration caused by fungi |
blue stain, but also fungus attack occuring as blue-green or
brown discoloration of the wood, which may be accompanied by decay or insect
damage |
limited use, surface treatment made more difficult, reduced
impregnability |
Abura, African mahogany, Ail�, Avodir�, Boss�, Douka, Ebiara,
Framir�, Ilomba, Krabak, Limba, Makor�, Movingui, Naga, Okoum�, Ozigo, Sapelli,
Tiama |
*) latex: rubber
milk
| | | Formulae and Tables - Wood / textbooks for vocational training (GTZ, 122 p.) | | | 2. Materials Made of Wood | | | 2.1. Solid Wood | | | (introduction...) | | | 2.1.1. Not Improved Solid Wood | | | 2.1.2. Improved Solid Wood | | | 2.2. Laminated Wood | | | 2.3. Sandwich Boards | | | 2.4. Fibreboards | | | 2.5. Particle Boards |
|
Formulae and Tables - Wood / textbooks for vocational training (GTZ, 122 p.)
2. Materials Made of Wood
2.1. Solid Wood
Solid wood is obtained from raw wood by longitudinal and cross
cutting. It is used without or after improvement of the
wood.
2.1.1. Not Improved Solid Wood
|
Name |
Definition |
Remarks |
|
round timber |
Round timber is obtained from rough wood by cross cutting. It
includes saw logs, veneer flitches, masts, poles and others. |
Saw logs and veneer flitches are intermediate products which are
intended for further cutting. |
|
Sawn timber |
Sawn timber is produced by longitudinal cutting of round timber.
Sawn timber has at least 2 parallel surfaces and is thicker than 5 mm. |
Making of simple cut and double cut; simple cut:
 |
|
|
single passage through the machine yields untrimmed products;
double cut: |
|
|

|
|
|
two passages through the machine;
first passage is precut,
edge boards and slabs are cut off;
second passage is second cut; from the
material turned by 90° the trimmed product is obtained. |
|
Veneer |
Is produced by longitudinal cutting (slicing, sawing) or arcuate
cutting-off (peeling) of round wood; veneer is £
3 mm thick and ³ 80 mm broad. |
|
Kinds of sawn timber
|
Kinds
Schematic representation |
Width in mm (b) |
Thickness in mm (s) |
|

squared timber
|
>100 |
>100 |
|

frame timber
|
£ 2s |
38...100 |
|

board (1) round-edged
|

(2) edge-trimmed
|
round-edged ³ 2
s
edge-trimmed ³ 75 |
>16
16...100 |
|

lath
|
>75 |
16...35 |
|

ply
|
edge-trimmed ³ 75 |
6...15 |
|

strip
|
or
round-edged < 75 |
6...15 |
Kinds of veneers
|
Kinds Schematic representation |
Manufacture |
|

sliced veneer
|
Sliced veneers are made by slicing off lamella by lamella in an
operation similar to planing. Effective strokes of the machine: 16...36
min-1
cutting speed: 0.5 to 1.5 m s-1
length: up to
5 m
thickness: 0.05 to 2.7 mm |
|
1 knife, 2 knife holder, 3 veneer, 4 pressure strip, 5
pressure bar |
|

peeled veneer
|
Peeled veneers are taken from a rotating trunk by an operation
similar to turning.
cutting speed: 0.2 to 2.5 m ·
s-1
length: up to 4.5 m
thickness: 0.08 - 2.7 mm |
|
1 veneer knife, 2 knife holder, 3 veneer, 4 pressure strip, 5
pressure bar, 6 scratcher knife |
|

saw veneer
|
Sawn veneers are produced with a horizontal frame saw or a
veneer circular saw. Speed of the veneer frame saw: 200...300
min-1
cutting speed: 6...8 m · s-1
length: up to 5
m
thickness: 0.5 to 3.0 mm |
|
1 saw blade, 2 compression roll, 3 veneer, 4 cleaving
knife |
2.1.2. Improved Solid Wood
|
Kind of solid wood |
Manufacture |
Application |
|
compressed solid wood |
solid wood compressed by pressing, beating or rolling under the
influence of pressure and temperature |
machine parts in the textile industry, bearing shells,
press-drawing tools, etc. |
|
impregnated solid wood |
solid wood impregnated with various agents (e.g. resin, oil,
metal) for changing its properties |
synthetic resin-impregnated timbers in electric engineering,
oil-impregnated wood as self-lubricating machine parts, metal-impregnated wood
as slide bearing |
|
formed solid wood |
solid wood formed under the influence of temperature, moisture
and pressure (by applying pressure on the cross-grain ends of the blank the
latter is compressed and thus made bendable) |
for bent parts in furniture construction, in vehicle
construction and boat building, for the manufacture of sports equipment etc.
|
2.2. Laminated Wood
Laminated wood consists of veneer layers which are symmetrically
laid one on top of the other. It is glued together by means of adhesive under
pressure and temperature to form sheet material. Laminated wood has improved
properties compared with solid wood and can be used for many more purposes.
|
Name |
Material construction |
Physical quantities |
Application |
|
plies (plywood) |

symmetrical arrangement of the
veneer layers, the layers are staggered alternately 90° according to the
grain direction
|
r = 0.60...075 g ·
cm-3
dzB =35...55 MPa
ddB = 60...80 MPa
dbB = 55...75 MPa |
furniture industry, interior work, packaging industry, building
industry etc. |
|
laminated wood |
veneers are arranged in parallel with each other (grain
direction); up to 15 % vertically to it |
r = 0.65...0.95 g ·
cm-3
dzB =80...170 MPa
ddB = 70...110 MPa
dbB = 120..200 MPa |
aircraft manufacture, shipbuilding, vehicle construction, timber
engineering etc. |
|
compressed laminated wood |
arrangement of the veneers is the same as with plywood or
laminated wood; by applying pressures of about 10 MPa compression is achieved
(10 %) |
r = 0.80...1.15g ·
cm-3
dzB £ 220 MPa
ddB £ 250 MPa
dbB £ 250 MPa |
machine parts, timber engineering, apparaturs construction,
toolroom work, vehicle construction |
|
plastic compressed laminated wood |
same as compressed laminated wood, but made of synthetic
resin-impregnated veneer |
p = 1.15...1.35 g · cm-3
dzB £ 140 MPa
ddB £ 300 MPa
dbB £ 240 MPa |
vehicle construction, electric engineering, apparatus
construction, timber engineering, machine parts |
2.3. Sandwich Boards
Sandwich boards consist of a core and two cover plies, one on
each side. Compared to the solid starting material considerable savings in
material are possible and improved properties are reached.
|
Name |
Material construction |
Physical quantities |
Application |
|
sandwich board with solid wood core |

|
r = 0.42...0.52 g ·
cm-3
ddB = 12...38 MPa
dbB = 30...40 MPa |
furniture industry, interior work, pattern making, development
working etc. |
|
1 cover ply of crossband veneer; thickness ³ 1.8 mm
2 solid wood core of
blackboard |
|
|
|
sandwich board with hollow core |

|
r = 0.01...0.04 g ·
cm-3
dzB = 1.7 MPa
ddB = 2.9 MPa
dbB =
14 MPa |
doors, partition walls, vehicle construction and shipbuilding,
interior work, boat building |
|
1 outer layers of veneer, plywood, hard fibre boards, metal
or plastic boards; 2 core of paper honeycombs |
|
|
|
sandwich board with particle board core |
Particle boards as cores are coated on both sides with veneer or
synthetic resin-impregnated papers. In this way their properties and appearance
are improved. |
r = 0.7...0.8 g ·
cm-3
face strength » 0.9
MPa
dbB » 40
MPa |
furniture construction, interior work, ship building and waggon
construction |
2.4. Fibreboards
Fibreboards are a flat, sheet wood-based material made under the
influence of pressure and temperature which consists of fibrous material
cotaining lignocellulose.
Properties of fibreboards
|
Kind of board |
Thickness in mm |
Gross density r in g ·
cm-3 |
Bending strength dbB in MPa |
Compressive strength ddB in MPa |
Transverse tensile strength d in MPa |
|
hardened fibreboards |
1...6 |
1.0...1.1 |
60 |
50...60 |
30...55 |
|
hard fibreboards |
1...6 |
0.95...1.05 |
25...75 |
25...50 |
15...40 |
|
medium hard fibreboards |
6...25 |
30...75 |
10...40 |
80 |
8...25 |
|
porous fibreboards |
6...20 |
25...40 |
1.0...3.0 |
0.8...2.0 |
1.0...3.0 |
|
medium-dense fibreboards |
10...19 |
0.60...0.85 |
15...32 |
|
0.3...0.7 |
Use of the fibreboards
|
Kind of board |
Special features |
Applications |
|
medium-dense fibreboards |
three-layer structure, high surface quality, homogeneous core
structure, closed homogeneous narrow surfaces |
same as (three-layer) particle boards for furniture, especially
for visible outer surfaces of furniture |
|
porous fibreboards |
low density, low strength, heat-insulating |
ceilings and panellings, roof sheathing, floor underlay |
|
medium-hard fibreboards |
heat-insulating |
partition walls, panellings, roof sheathing |
|
hard fibreboards |
uniform surface, elastic, bendable, nailing and screwing
possible |
ceiling boarding and panelling, furniture parts, doors,
partition walls, coverings |
|
hardened fibreboards |
oil-impregnated, especially abrasion-proof, water-repellent
|
panelling and sheathing outdoors, inner and outer doors,
concrete moulds, floor, staircase and table coverings |
|
sound-absorbing boards |
porous fibreboards provided with holes, slits or similar for
sound absorption |
ceiling boarding and panellings in offices, telephone exchanges,
cinemas, concert halls etc. |
|
multilayer insulating boards |
boards consisting of two or more layers of porous fibreboards
glued in a water-proof manner |
partition walls, displaceable walls, false ceilings |
|
varnished boards |
hard fibreboards with varnish coating |
panellings in kitchens, shops, bathrooms, for furniture in rooms
in which water is handled |
|
sheet and plastic-coated fibreboards |
hard fibreboards coated with coloured plastic sheets or
synthetic resin-impregnated special papers |
panellings in kitchens and bathrooms, for furniture in damp
rooms, for table coverings in kitchens, shops, workshops, laboratories etc.
|
|
embossed fibreboards |
hard fibreboards which during manufacture were given an embossed
surface and (possibly subsequently) a colour treatment |
for decorative purposes in interior work |
|
floor boards |
extra hard fibreboards which are laid like parquet, high wear
resistance |
for floor coverings |
|
hard multi-layer boards |
boards consisting of two or more layers of subsequently glued
medium-hard or hard fibreboards |
panels, shock-resistant coverings, partition walls, false
ceilings |
2.5. Particle Boards
The particle board is a wood-based material made of wood chips
with the addition of synthetic resin under the influence of pressure and
temperature. Its properties can be varied by the kind and quantity of the
additives, by the quality and arrangement of the chips and the compression
ratio.
Properties of the particle boards
|
Kind of board |
Thickness in mm |
Gross density r in g ·
cm-3 |
Bending strength dbB in
MPa |
Transverse tensile strength r in MPa |
|
single-layer flat pressed particle boards |
6...25 |
0.5...0.85 |
15...20 |
0.2...0.3 |
|
triple-layer flat pressed particle boards |
6...25 |
0.55...0.85 |
20...30 |
0.2...0.3 |
|
extruded particle boards |
8...75 |
0.55...0.70 |
» 2.0 in pressing direction
» 15.0 at right angles to the pressing direction
|
» 0.6 in pressing direction
» 4.0 at right angles to the pressing direction
|
Use of the particle boards
|
Kind of board |
Special features |
Applications |
|
flat pressed particle boards, raw, single-layer |
dense surface, heat and sound-insulating, pressure-proof |
interior work, building construction, agricultural building,
floor underlays, insulating boards etc. |
|
Flat pressed particle boards, raw multi-layer |
like single-layer boards, but surface layer consisting of fine
particles; dense surface, little swelling |
manufacture of furniture, self-supporting structural elements,
interior work, vehicle construction |
|
extrusion particle boards, raw |
low bending strength, coating absolutely necessary, in other
aspects like single-layer boards |
core for sandwich boards in furniture manufacture, in interior
work, shipbuilding and vehicle construction, building industry |
|
impregnated particle boards |
additives are added to the binder, therefore resistant to
temperature and wood pests |
building industry, agricultural building, shipbuilding |
|
veneer-coated particle boards |
more resistant to varying climatic influences, better stability,
higher bending strength |
visible surface in furniture manufacture, interior work and
shipbuilding, for panelling, cladding |
|
particle boards coated with laminated boards, PVC-hard-boards or
decorative laminates *) |
coating on one side or both sides, higher strength, higher
resistance to moisture and chemicals, scratch resistant |
furniture in damp rooms, doors, partition walls, structural
elements for walls, but also containers, concrete moulds, mainly in the kitchen
furniture industry |
*) decorative laminates: plastic sheets with wood
pattern
| | | Formulae and Tables - Wood / textbooks for vocational training (GTZ, 122 p.) | | | 3. Plastic materials | | | (introduction...) | | | 3.1. Classification of Plastic Materials | | | 3.2. Properties of Important Plastic Materials | | | 3.3. Applications of Important Plastic Materials |
|
Formulae and Tables - Wood / textbooks for vocational training (GTZ, 122 p.)
3. Plastic materials
Plastics are synthetic materials or macromolecular
organic-chemical materials produced by conversion of polymer natural
products.
3.1. Classification of Plastic Materials
|
Type of plastics |
Starting material |
Chemical stability |
|
Modified natural materials |
|
cellulose nitrate |
cellulose, nitric acid |
resistant to weak acids and alkalis |
|
Polycondensates (thermosetting plastics) |
|
phenolic moulding compound |
phenol or cresol, formaldehyde and filler materials |
instable to concentrated acids and alkalis |
|
phenolic laminates |
phenol or cresol, formaldehyde and laminar substrates |
same as phenolic moulding compounds |
|
urea resins |
urea or melamine resins and formaldehyde |
same as phenolic moulding compounds |
|
urea resin moulding compounds |
urea or melamine resins, formaldehyde and filler materials |
same as phenolic moulding compounds |
|
urea resin laminates |
urea or melamine resins, formaldehyde and laminar filler
materials |
same as phenolic moulding compounds |
|
Polymerizates (thermoplastics) |
|
polyvinyl chloride, rigid (unplasticized PVC) |
acetylene and hydrocloric acid |
instable to some organic compounds |
|
polyvinyl chloride, flexible (plasticized PVC) |
acetylene, hydroclorid acid and plasticizer |
stability less than for rigid PVC |
|
poloystyrene |
ethylene and benzene |
instable to most of the organic compounds |
|
polyvinyl acetate |
acetylene and acetic acid |
(almost only improving or auxiliary agent) |
|
Polyaddition products |
|
polyurethanes |
diisocyanates and dialcohols |
instable to concentrated acids |
|
Polyesterification products |
|
polyester |
carboxylic acid or phtalic acid and alkohols |
instable to some organic compounds, when unsaturated |
|
epoxy resins |
epichlorhydrin, phenols |
stable |
|
alkyd resins |
maleic acid and phtalic acid, multivalent alcohols |
medium resistance to solvents and alcohols |
3.2. Properties of Important Plastic Materials
|
Plastic material |
Density in g · cm-3 |
Temperature stability in ºC |
Strain in % |
Compressive strength ddB in
MPa |
Bending strength dbB in
MPa |
Tensile strength dzB
MPa |
|
cellulose nitrate |
1.38 |
50 |
30...50 |
60 |
60 |
60...70 |
|
phenolic moulding compounds |
1.4 |
125 |
|
120...200 |
50...70 |
25 |
|
phenolic laminates |
1.4 |
125 |
|
140 |
120 |
40 |
|
urea resins |
0.014 ...0.28 |
|
0.36 |
200 |
80 |
30 |
|
urea resin moulding compounds |
1.45 ... 1.5 |
130 |
|
240 |
80 |
70 |
|
urea resin laminates |
1.3 ... 1.45 |
130 |
|
150 |
150 |
120 |
|
rigid PVC |
1.38 |
60 |
18 |
80 |
120 |
45...60 |
|
flexible PVC |
1.23 ...1.36 |
|
|
|
|
8...25 |
|
polystyrene |
1.04 ...1.09 |
60...90 |
1-20 |
45...120 |
70... 130 |
35...70 |
|
polyvinyl acetate |
|
|
|
100 |
100 |
50 |
|
poly-urethane |
1.2 ...1.215 |
<100 |
» 250 |
30...90 |
20...65 |
44...60 |
|
polyester |
1.2...1.4 |
» 130 |
|
150 |
90 |
42 |
|
epoxy resins |
1.2...1.25 |
60...120 |
|
90 |
135...150 |
72 |
3.3. Applications of Important Plastic Materials
|
Plastic material |
Applications |
|
cellulose nitrate |
varnishes and adhesives |
|
phenolic moulding compounds |
preservative (see wood-based materials), adhesive and adhesive
film, pimer paper for coating furniture elements varnishes, moulded parts |
|
phenolic laminates |
compression moulded sheets for coating kitchen furniture parts,
but also laboratory furniture and similar |
|
urea resins |
adhesives, primer paper and decorative overlay for the furniture
industry, foamed plastics and insulating materials, varnish resins |
|
urea resin moulding compounds |
moulded parts, e.g. for furniture fittings |
|
urea resin laminates |
decorative laminated sheets for kitchen furniture, laboratory
furniture and damp rooms, decorative overlays for the furniture industry |
|
rigid PVC |
films, sheets, moulded parts |
|
flexible PVC |
flexible sheet as furniture fittings, decorative overlay and
foam sheet, small surface tape for coating furniture veneered stock, overlapping
edge bands, foamed plastics, varnishes |
|
polystyrene |
compression moulded sheets, furniture films, moulded parts,
foamed plastics and varnishes |
|
polyvinyl acetate |
adhesives, surface coatings, oil-resistant sheets, varnishes
|
|
polyurethanes |
adhesives, varnishes, rigid foamed plastics as insulation
material and for furniture elements (seat shells), structural foam as moulded
parts for furniture, semirigid foam for cushions, back-rests and similar,
flexible foam for upholstery etc. |
|
Polyester |
adhesives, primer paper and decorative overlay, foamed plastics,
varnishes |
|
epoxy resins |
adhesives and varnishes |
|
alkyd resins |
varnishes |
| | | Formulae and Tables - Wood / textbooks for vocational training (GTZ, 122 p.) | | | 4. Glass Materials | | | (introduction...) | | | 4.1. Classification of Glass Materials | | | 4.2. Properties of Glass Materials | | | 4.3. Applications of Glass Materials |
|
Formulae and Tables - Wood / textbooks for vocational training (GTZ, 122 p.)
4. Glass Materials
Glass is a transparent, isotropic *) inorganic material.
*) showing the same physical properties in all
directions of
space
4.1. Classification of Glass Materials
|
Classification aspect |
Glass grade |
Remarks |
|
flat glass |
sheet glass |
as thin, window and thick glass |
|
flat glasses with special effects, refined flat glass products
|
ribbed glass, antique glass, opal glass, frosted glass, plate
glass, safety glass, thermoglass panes |
|
fibre-glass materials |
glas fibres |
coarse glass fibres, textile fibres made of glass |
|
glass silk |
superfine glass fibres |
4.2. Properties of Glass Materials
|
Property |
Sheet glass |
Glass fibres |
|
density r in g · cm-3 |
2.4...2.6 |
2.5 |
|
compressive strength ddB in MPa
|
800...1000 |
|
|
tensile strength dzB in MPa
|
70...90 |
850...4000 according to the thickness |
|
bending strength dbB in MPa
|
50...150 |
170...3400 according to the thickness |
|
temperature stability in °C |
£ 500 |
-50...+300-C |
Dimensions of sheet glass
|
Glass grade |
thickness in mm |
width in mm |
length in mm |
|
thin glass |
0.9...1.6 |
300...700 |
1200...1400 |
|
window glass |
2.0...4.0 |
300...1800 |
1000...2000 |
|
thick glass |
4.5...5.5 |
400...2010 |
1050...2550 |
Dimensions of furniture glass
|
Glass element |
thickness in mm |
width in mm |
length in mm |
|
sliding doors |
3.0...6.0 |
80...1200 |
100...1600 |
|
revolving doors |
5.0...6.0 |
80...1200 |
100...1600 |
|
panels |
3.0...6.0 |
80...1200 |
100...1600 |
|
glass tops |
3.0...5.5 |
80...1200 |
100...1600 |
|
insertable plates |
3.0...7.5 |
80...600 |
100...1600 |
4.3. Applications of Glass Materials
|
Material |
Application |
Remarks |
|
thin glass |
picture glass |
|
|
window glass |
glazing in housing construction and social buildings, furniture,
glass-houses, stables etc. |
|
|
thick glass |
shop windows, shop fittings, furniture making |
|
|
ribbed glass |
shop building, interior work, kitchen furniture etc. |
shaping is made during the drawing process |
|
antique glass |
interior work, period furniture |
old glass is imitated by inclusions, staining and similar |
|
opal glass |
hospital windows, office partition walls and similar |
toughened or etched panes |
|
frosted glass |
shop building, interior work, furniture |
an opal glass from the frosted side of which flat splinters are
torn out |
|
plate glass |
mirrors in flates and social buildings, vehicle construction,
furniture making etc. |
flat glass covered on one side with a silver layer of ³ 70 nm thickness; the silver layer is provided with
protective layers |
|
safety glass |
skylights, glass-roofed courts, roof parts, doors, all-glass
walls etc. |
as wired glass (rolled in wire cloth), one-layer and multilayer
safety glass and compound glass (flat glass panes bonded with transparent foil)
|
|
thermoglass panes |
housing construction and social buildings |
two window glass panes hermetically joined together enclose a
space filled with dry air, which prevents misting up of the panes at outdoor
temperatures down to -15 °C |
|
glass fibres |
building industry, machine building, textile industry |
for heat and sound insulation, for reinforcement of plastic
building materials |
|
glass silk |
structural elements, vehicle construction |
processing with, for example, polyester resins into
high-strength materials |
| | | Formulae and Tables - Wood / textbooks for vocational training (GTZ, 122 p.) | | | 5. Steel | | | (introduction...) | | | 5.1. Classification of Steels | | | 5.2. Properties of Important Steels | | | 5.3. Applications of Important Steels | | | 5.4. Screws and Nails |
|
Formulae and Tables - Wood / textbooks for vocational training (GTZ, 122 p.)
5. Steel
Steels are ferrous materials which regardless of other alloying
constituents have carbon contents of less than 2
%.
5.1. Classification of Steels
|
Classification aspect |
Kinds of steels |
Remarks |
|
according to the manufacturing process |
Bessemer steel
Thomas steel
open-hearth steel
electric
steel
crucible cast steel |
converter process like Bessemer steel open-hearth process made
in the electric furnace remelting process in refractory crucibles |
|
according to properties and application |
general structural steels
steels for mechanical
engineering
structural steels for special applications
high-alloy special
steels
steels with special electric and magnetic properties tool steels |
e.g. sectional steels
e.g. screw steel
e.g. wear-resistant
steels
e.g. corrosion-resistant steels
e.g. dynamo sheet steels
e.g.
high-speed steels |
|
according to the composition |
|
|
|
structural steel |
unalloyed and alloyed steels |
single-alloy steels (one alloying constituent); multiple-alloy
steels (several alloying constituents) |
|
tool steels |
unalloyed tool steels, low-alloy tool steels, medium-alloy tool
steels, high-alloy tool steels |
|
|
according to the form of production |
sectional steel
special profiles
bar steel
strip
steel
plate and sheet |
e.g. U-steel, > 80 mm high
e.g. rails
e.g. U-steels,
£ 80 mm high |
|
tube
wire
semifinished products
forged pieces |
e.g. plate > 4 mm thick, sheet < 4 mm thick seamless or
welded various gauges and cross-sections sheet bars, billets etc. hammer and
drop forgings |
5.2. Properties of Important Steels
|
Name |
Designation of the steel grade |
Carbon content C in % |
Tensile strength dzB in
MPa |
Alloying constituents in % |
|
heat-treated steel |
C 22 |
0.18...0.25 |
500...600 |
0.3...0.6 Mn,
£ 0.045
P
0.15...0.35 Si
£ 0.045 S |
|
C 35 |
0.32...0.40 |
600...720 |
0.4...0.7 Mn
0.15...0.35 Si
£ 0.045 P and S each |
|
C 45 |
0.42...0.50 |
650...800 |
0.5...0.8 Mn
0.15...0.35 Si
£ 0.045 P and S each |
|
C 60 |
0.57...0.65 |
750...900 |
like C 45 |
|
30 Mn 5 |
0.27...0.34 |
800...950 |
1.2...1.5 Mn
0.15...0.35 Si |
|
37 Mn Si 5 |
0.33...0.41 |
900...1050 |
1.1...1.4 Mn
1.1...1.4 Si |
|
25 Cr Mo 4 |
0.22...0.29 |
800...950 |
0.5...0.8 Mn
0.9...1.2 Cr
0.15...0.35 Si
0.15...0.25
Mo
£ 0.035 P and S each |
|
34 Cr Mo 4 |
0.30...0.37 |
900...1050 |
like 25 Cr Mo 4 |
|
42 Cr Mo 4 |
0.38...0.45 |
1000...1200 |
like 25 Cr Mo 4 |
|
50 Cr Mo 4 |
0.46...0.54 |
1100...1300 |
like 25 Cr Mo 4 |
|
36 Cr Ni Mo 4 |
0.32...0.40 |
1000...1200 |
0.9...1.2 Cr and Ni each £ 0.035
P and S each |
|
34 Cr Ni Mo 6 |
0.30...0.38 |
1100...1300 |
1.4...1.7 Cr and Ni each £ 0.035
P and S each |
|
30 Cr Ni Mo 8 |
0.26...0.34 |
1250...1450 |
1.8...2.1 Cr and Ni each £ 0.035
P and S each |
|
case-hardening steels |
C 10 |
0.06...0.12 |
420...520 |
0.15...0.35 Si
0.25...0.5 Mn
£ 0.045 P and S each |
|
C 15 |
0.12...0.18 |
500...650 |
like C 10 |
|
15 Cr 3 |
0.12...0.18 |
600...850 |
0.4...0.6 Mn
0.5...0.8 Cr
0.15...0.35 Si
£ 0.035 P and S each |
|
16 Mn Cr 5 |
0.14...0.19 |
800...1100 |
1.0...1.3 Mn
0.8...1.1. Cr
0.15...0.35 Si
£ 0.035 P and S each |
|
20 Mn Cr 5 |
0.17...0.22 |
1000...1300 |
1.1....1.4 Mn
1.0...1.3 Cr
0.15,..0.35 Si
£ 0.035 P and S each |
|
15 Cr Ni 6 |
0.12...0.17 |
900...1200 |
1.4...1.7 Cr
1.4...1.7 Ni, Mn, Si, P and S like 15 Cr 3 |
|
18 Cr Ni 8 |
0.15...0.20 |
1200...1450 |
1.8...2.1 Cr
1.8...2.1 Ni, Mn, Si, P and S like 15 Cr 3 |
5.3. Applications of Important Steels
|
Steel grade |
Applications |
|
35 W Cr V 7,80 W V 2 |
machine blades |
|
100 Cr 2 |
files |
|
100 Cr 6 |
measuring instruments, saw blades for metal, cutting tools |
|
64 Si Cr 5,85 Cr 1 |
saw blades for wood working |
|
110 Mo V 5 |
metal saw blades |
|
90 Cr 3 |
cutting tools |
|
140 Cr 2,110 Cr 2,120 W V 4 |
twist drills |
|
C 115 W 1 |
screws |
|
C 100 W 1 |
cutters |
|
C 130 W 2 |
files, flat drills, countersinks and counterbores |
|
C 90 W 2 |
circular saw-blades, planing tools, cutters, cutter chain teeth,
wood-carving knives |
|
C 80 W 2 |
hammers, machine bits for wood |
|
C 70 W 2 |
screw drivers, axes, pliers, vice jaws |
|
C 60 W 3 |
wood working tools |
|
C 85 W 6 |
hand saw blades, frame and circular saw blades |
|
X 97 W Mo 3.3 |
twist drills |
|
X 82 W V 9.2 |
high-speed wood working tools |
|
X 86 W V 12.2 |
turning tools, cutters, twist drills |
|
C 35, C 45, 25 Cr Mo 4 |
screws, nuts |
5.4. Screws and Nails
(Material: unalloyed steel with low or medium carbon content, C
= £ 0.55 %)
|
Name |
Representation |
Dimensions |
|
raised countersunk head wood screws |
|
d1 = 1.6...8.0 mm
d2 = 3.0...14.5 mm
1 =
8.0...90.0 mm |
|
cross recessed raised countersunk oval head screw |

|
similar dimensions |
|
slotted round head wood screw |
|
d1 = 1.6...8.0 mm
d2= 3.2...16.0
mm
1 = 8.0...90.0 mm |
|
cross recessed round head wood screw
slotted countersunk head wood screw |
|
similar dimensions
d1 = 1.6...8.0 mm
d2 = 3.0...14.5
mm
1 = 8.0...90.0 mm |
|
cross recessed countersunk head wood screw
hexagon head cap wood screw |
|
similar dimensions
d1 = 6.0...12.0 mm
d2 £ d1
1 = 30.0...120.0 mm |
|
countersunk-head nails |
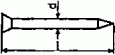
|
d = 1.4...6.0 mm
1= 20.0...200.0 mm |
|
flat-headed nails |
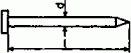
|
d= 0.8...4.6 mm
1= 8.0...130.0 mm |
|
button-head nails |
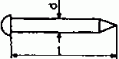
|
d = 0.8...2.5 mm
1 = 8.0...30.0 mm |
|
upset-head nails |

|
d = 1.0...3.8 mm
1= 14.0...100.0 mm |
|
tin tacks |
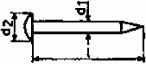
|
d1 = 1.4...2.8 mm
d2 = 4.0...10.5
mm
1 = 10.0...40.0 mm |
|
clout nails |
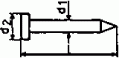
|
like tin tacks |
|
hardened nails |

|
d= 1.2 and 2.0 mm
1 = 16.0...50.0 mm |
|
light wood board nails |

|
d= 3.1.; 3.4 mm
1 = 70.0; 80.0 mm |
| | | Formulae and Tables - Wood / textbooks for vocational training (GTZ, 122 p.) | | | 6. Basic Terms of Cutting | | | (introduction...) | | | 6.1. Faces and Angles on the Tool | | | 6.2. Directions of Cutting | | | 6.3. Cutting Speeds | | | 6.4. Cutting-Edge Dulling and Cutting-Edge Wear |
|
Formulae and Tables - Wood / textbooks for vocational training (GTZ, 122 p.)
6. Basic Terms of Cutting
The science of cutting deals with the processes, laws and
connections for chip-forming working with cutting
tools.
6.1. Faces and Angles on the Tool
|
Term
Representation |
Symbol |
Definition |
|
primary cutting edge faces on the tool - saw tooth
 |
HS |
line of cut between flank and tool face |
|
secondary cutting edge faces on the tool - milling tool
 |
NS |
cutting edge adjacent to the primary cutting edge |
|
tool face
faces on the tool - drilling tools
 |
Sf |
face on the cutting wedge on which he chip is removed |
|
flank |
Ff |
face on the cutting wedge facing the area of cut produced on the
work-piece |
|
flank of the drill point |
Hf |
face on the tool next to the flank |
|
comer |
E |
point on the tool at which primary and secondary cutting edges
meet |
|
tool orthogonal clearance
angles on the tool - planing
tool
 |
a |
angle between flank and tool cutting plane (plane through the
cutting edge) |
|
tool orthogonal wedge angle
angles on the tool - saw
tooth
 |
b |
angle between flank and tool face |
|
tool orthogonal rake |
g |
angle between tool face and a vertical to the tool cutting
plane
g = 90º -a -b |
|
cutting angle
angles on the tool - drilling tools
 |
d |
angle between tool face and tool cutting plane d = a + b |
|
tool cutting edge inclination
angles on the tool - drilling
tool
 |
l |
angle between cutting edge and tool reference plane |
|
point angle |
e |
angle between primary and secondary cutting edges |
|
drill point angle |
eB |
angle between two primary cutting edges, also called face angle
|
6.2. Directions of Cutting
The cutting direction of a cutting operation is the direction of
motion of the primary cutting edge referred to the grain direction of the solid
wood or the board plane of plane materials of wood.
|
Cutting directions in solid wood |
Cutting directions in laminated wood |
Cutting directions in particle and fibre boards |
|

|

|

|
|
A cross-cutting cutting direction vertically to the grain
direction; smooth area of cut, crumbly chip, short tool path |
b
cutting direction vertically to the board plane;
approximately like cross-cutting of solid wood |
b
cutting direction vertically to the board plane; rough area
of cut, crumbly chip |
|
B longitudinal cutting cutting direction parallel to the grain
direction; rough area of cut, coherent chip, long tool path |
a/B
cutting direction in board plane, in the direction of the
grain direction of the top layer; like longitudinal cutting of solid wood |
a
cutting direction in board plane; cutting only in the top
layer, smooth area of cut, crumbly chip |
|
C transverse cutting cutting direction transversely to the grain
direction; rough area of cut, brittle chip |
a/C
cutting direction in board plane and transversely to the
grain direction of the top layer; like transverse cutting of solid wood |
|
6.3. Cutting Speeds
|
Term |
Symbol |
Definition |
|
cutting speed |
v |
speed at which the cutting edge of a tool performs chip-forming
movements in the workpiece |
|
|
v = d · p · n |
in m · s-1 |
|
|
|
d = diameter of the cutting circle of the tool |
|
|
|
n = tool speed |
|
feed rate |
u |
speed at which the workpiece is fed to the stationary tool or
the tool is fed to the workpiece clamped in place; unit of measurement: m ·
min-1 |

Figure 3 Graph of cutting
speeds for circular sawing machines
Example:
Which cutting speed does a circular saw blade having a diameter
of 400 mm reach at a speed of rotation of 3000 min-1?
Solution:
Find the diameter on the lower line, go vertically upwards to
the point of intersection with the diagonal for n = 3000 min-1, from
there read off the result horizontally on the left side: v = 62.8m · s-1

Figure 4 Graph of cutting
speeds for fluting machines
Example:
A cutting speed of approx. 15m · s-1 is to be
reached; the tool speed is 6000 min-1.
Which tool diameter is to be chosen?
Solution:
Find the value for v on the left side, find horizontally the
point of intersection with the diagonal for n = 6000 min-1, from
there drop a perpendicular and read off on the lower line: d » 50
mm.
6.4. Cutting-Edge Dulling and Cutting-Edge Wear
The loss of the original keenness (dressed keenness) of the tool
cutting edge and the outer comers in the process of cutting is called dulling,
its result is called wear.
Causes of wear
|
Cause of wear |
Effect of wear |
|
Angles on the tool cutting edges |
|
wedge angle |
The cutting forces rise with increasing wedge angle. Therefore,
it must be kept as small as possible (taking into consideration the necessary
stability). |
|
rake angle |
If the rake angle is too small, the consequences will be the
same as with a too large wedge angle. |
|
clearance angle |
Large clearance angles result in a smaller load on the cutting
edge (less friction and lower temperature). |
|
Cutting conditions |
|
cutting speed |
High cutting speeds have the effect of increasing the load on
the whole cutting wedge. For economical reasons they are to be kept as low as
possible. |
|
cutting depth |
Keep it as small as possible. Great cutting depths lead to
increasing mechanical stress on the cutting edges. |
|
Mechanical stresses |
|
friction |
Excessive roughness of the cutting edge (choice of the proper
abrasive tool) results in increased wear at the cutting wedge. |
|
impact load |
Mainly at the beginning of cutting when the cutting edge
penetrates into the wood for the first time; it results in the loss of the
original keenness. |
|
compressive stress |
The pressure of the workpiece on the tool is increasing with
dulling (sharpening in time is necessary). |
|
Various kinds of stresses |
|
thermal stress |
The friction between workpiece and tool produces temperatures of
about 800 °C at the cutting edge. This results in softening of the cutting
wedge surface and increased abrasion of material (proper choice of the
cutting-edge material of the tool is necessary). |
|
electrochemical stress |
The diluted acids in the wood cells form electrolytes. In
connection with frictional electricity produced during cutting the cutting-edge
material is dissolved by electrolysis. |
|
electroerosion |
Spark discharges occur through electrostatic charges during
cutting as a result of which particules are torn out of the flank. This
formation of craters (increased roghness) favours the mechanical wear. |
Forms of wear
|
Form of wear
Representation |
Influences and measurable variables |
|
tool-flank wear
 |
a result of mechanical wear, thermal load and electroerosion;
the wear-land width is the measurable variable. This mark characterizes the size
of the regrind, because the cutting edge has to be set back during sharpening so
far that the wear mark disappears; wear mark for steel cutting edges s
0.3 mm. |
|
cutting edge-wear
 |
caused especially by thermal and frictional stresses; the
external radius of the cutting edge is the measure of the cutting-edge wear;
|
|
corner wear
 |
caused by the influence of friction and temperature; with
increasing dulling the comer wear rapidly rises; |
|
tool face wear
 |
Apart from friction (flowing off chip) and temperature there is
above all the electrochemical influence that is at work. The resetting of the
cutting edge is the measure of the tool face wear (recommended dimension » 0.15). |
|
crater wear
 |
special form of the tool face wear as a result of friction and
thermal influence by the flowing off chip |
|
measurable variables of cutting-edge dulling

1 crater wear, 2 cutting-edge reset, 3 wear-land width,
4 cutting-edge rounding |
|
Development of the cutting-edge dulling

Figure 5 Graph of cutting-edge
dulling
|

|

|

|
|
cutting wedge (dressed keenness) with the original cutting-edge
angles a1, b1 and g1 |
cutting wedge (operating keenness) with the wedge angle b2 that has become larger by incipient
dulling and the tool orthogonal clearance a2 that has become smaller and the tool
orthog rate g2 |
cutting wedge (advanced stage of dulling) with b3 that has become still larger and a3 and g3 that have become still smaller |
Dulling period of the cutting edge
|
Term |
Symbol |
Definition |
Connections |
|
tool life |
T |
pure operating time of a cutting edge between two regrinds |

S = tool
path
Wt = path of cut per unit of time
|
|
tool path |
S |
distance travelled by the cutting edge cutting in the material
between two regrinds |
the tool path in connection with the tool life is an important
parameter for the economical use of machine tools |
| | | Formulae and Tables - Wood / textbooks for vocational training (GTZ, 122 p.) | | | 7. Hand Tools | | | (introduction...) | | | 7.1. Measuring and Marking Tools | | | 7.2. Sawing Tools | | | 7.3. Planing Tools | | | 7.4. Mortising and Ripping Tools | | | 7.5. Drilling and Boring Tools | | | 7.6. Rasps and Files | | | 7.7. Other Tools |
|
Formulae and Tables - Wood / textbooks for vocational training (GTZ, 122 p.)
7. Hand Tools
Hand tools are individually guided working tools by means of
which action is taken on the object of work (workpiece) when the respective
operations are carried
out.
7.1. Measuring and Marking Tools
Marking tools serve the purpose of transferring sizes to the
workpiece and of marking the transferred sizes.
|
Tool
Representation |
Construction and use |
|
back square
 |
The back square serves for marking out right angles. It has a
shorter, thicker part (head piece, stop) and a longer, thinner blade (rail). It
consists of wood or steel. |
|
mitre rule
 |
Mitre rules serve to mark out 45° angles, with the shorter
leg serving as stop. |
|
bevel gauge
 |
Bevel gauges are back squares where both legs can be adjusted to
each other as desired (angles of any size can be formed). |
|
scratch gauge
 |
The scratch gauge serves for marking out straight scribed
linears parallel to one side of the workpiece. The stop is adjustable and is
arrested by wedges or screws. |
|
Compasses
 |
The compasses serve for taking and transferring sizes and for
marking out circular arcs. |
|
1 guide beam, 2 centring point, 3 slide, 4 pencil holder
|
|
|
vernier caliper with depth gauge
 |
Length measurements are possible by placing the workpiece
between graduation carrier and sliding member. The diameter of bore holes can be
measured with the sensing elements. For determining the depth of bore holes and
similar the depth gauge is used. |
|
1 measuring surface of the graduation carrier, 2 measuring
surface of the sliding member, 3 sensing element for determining the diameter of
bore holes, 4 depth gauge |
|
|
outside caliper
 |
caliper-like measuring instrument (caliper) with inwardly bent
legs for tracing and comparing diameter, lengths and tick-nesses |
|
inside caliper
 |
caliper-like measuring instrument (internal caliper gauge) with
outwardly bent leg points for tracing and comparing bore holes, counterbores and
similar |
|
radius gauge/profile gauge
 |
Radius gauges are templates like profile gauges and similar, by
means of which the profiles of boards, but also of narrow surfaces can be
checked. |
7.2. Sawing Tools
Hand saws have triangular teeth and consist of tool steel. We
distinguish between span-web saws and saws without span web.
Parts of a saw without span web

Figure 6 Parts of a span web
saw
Parts of a saw without span web

Figure 7 Parts of a saw
without span web
Kinds and dimensions of span-web saws (frame saws)
|
Kind of saw |
Saw blade |
|
|
|
|
|
length in mm |
width in mm |
thickness in mm |
Saw pitch in mm |
Setting width*) in mm |
Applications |
|
cabinet saw |
700;800 |
25 |
0.7 |
5 |
0.4 |
for work in grain direction; trimming, cutting off |
|
pad saw |
700:800 |
40 |
0.7 |
4 |
0.25 |
finer cuts across the grain direction, for wood-based materials
|
|
fret saw |
700 |
10 |
0.7 |
3 |
0.25 |
for sawing out bends |
*) tooth set: alternate bending out of saw teeth to
reach a cutting width which is greater than the blade thickness.
Kinds and dimensions of saws without span web
|
Kind of saw |
length in mm |
Saw blade width in mm |
thickness in mm |
Saw pitch in mm |
Setting width in mm |
Applications |
|
foxtail
 |
250-500 |
|
0.7-0.8 |
3-5 |
0.2-0.25 |
fine work, cutting of plywood and other materials |
|
keyhole saw
 |
300 |
|
1.0 |
4 |
0.35 |
for cutting out openings |
|
fine saw
 |
250 |
65 |
0.5 |
1.5 |
0.15 |
especially for mitre cuts |
|
back saw
 |
300 |
100 |
0.7 |
3-4 |
0.2 |
like fine saw |
nest of saws: Saw blades of all span-web saws known
so far can be fixed to a handle as required.
Tool geometry of hand saws
|
Kind of saw |
Angle at the a tool cutting edge in ° |
|
a |
b |
g |
|
cabinet, pad, fret saws |
45 |
70 |
-25 |
|
foxtail saw, keyhole saw |
60 |
60 |
-30 |
|
fine saw |
65 |
50 |
-25 |
|
back saw |
10 |
60 |
20 |
Recommendations for maintenance and use
Untension frame saws after use, turn the row of teeth inwards
during transport, saturate wooden parts with linseed oil varnish or with polish
to prevent impurities from getting into them; keep hand saws in a hangig
position, clean the saw blade from impurities by means of petroleum or similar
and protect it against rust by means of acid-free grease. Cover the teeth of
saws without span web during transport and storage so that no injuries are
possible.
7.3. Planing Tools
Parts of a plane

Figure 8 Parts of plane
|
Kind of plane |
Cutting angle d in
º |
Applications |
|
finish plane
 |
45 |
without flap; coarse chip removal, for flattening and rough
smoothing, chip thickness up to 1 mm |
|
1 plane knife, 2 plane body, 3 chip hhole, 4 workpiece, 5
chip, 6 wedge angle, 7 cutting angle, 8 flap of the plane |
|
|
|
double iron plane
 |
45 |
with flap, smoother surface than with the finish plane, for
flattening of finished surfaces |
|
1 plane knife, 2 plane body, 3 chip hole, 4 workpiece, 5
chip, 6 wedge angle, 7 cutting angle, 8 flap of the plane |
|
|
|
trying plane |
45 |
with flap; basically a long double plane; for dressing of
surfaces, for edging and jointing of narrow surfaces |
|
smoothing plane
 |
49 |
with flap; for smoothing of surfaces, for planing of end
surfaces |
|
1 plane knife, 2 plane body, 3 chip hole, 4 workpiece, 5
chip, 6 wedge angle, 7 cutting angle, 8 flap of the plane |
|
|
|
rabbet plane
 |
45...48 |
simple rabbet plane without flap, double rabbet plane with flap;
for replaning and resmoothing of rebates |
Recommendations for maintenance and use
Regularly clean the plane iron and the face of the plane; when
putting the plane down, lay it on its side; the face of the plane must be even,
if not, dress it and afterwards oil it slightly; replace faces of planes that
are excessively worn by new ones; if the plane is blocking, check whether the
flap is tightly fitting, the wedge is fitting or whether the pressure of the
wedge is properly acting on the lower part of the plane
iron.
7.4. Mortising and Ripping Tools
Mortising and ripping tools are hand tools for chiselling,
mortising and turning operations.
Parts of the mortising and ripping tools

Figure 9 Parts of the
mortising and chiselling tools
Kinds and dimensions of the mortising and ripping tools
|
Tool |
|
Dimension of the blade |
|
|
|
width in mm |
thickness in mm |
Applications |
|
ripping chisel
 |
light medium heavy |
4...50
6...40
20...35 |
2.5...4
3.5...4.2
4.2...5 |
for mortising recesses, for recessing fittings, for mortising
recesses at an acute angle |
|
mortise chisel
 |
|
2...26 |
12...15 |
for mortising orftenon holes and similar |
|
turning chisel, flat
 |
|
4...50 |
3.5; 4.5 |
making of turned bodies, soft wood working, finishing
work;
a = 10...20º
b = 20...30º |
|
turning chisel, hollow
 |
|
4...50 |
3.5...6 |
hard wood working, roughing work;
a = 10...20º
b = 40...50º |
Recommendations for maintenance and use
The tool must be clean and sharp; always clamp the workpiece,
always chisel on the carpenter’s bench plate, not on the collets; further
hints: like plane
irons.
7.5. Drilling and Boring Tools
Drills are tools for making round holes.
Parts of a drill

Figure 10 Parts of a drill
|
Drilling and boring tool |
Dimensions in mm |
Applications |
|
twist drill with roof-shaped point

|
diameter thread length |
3.0...8.3 42...70 |
for drilling into hard wood and end-grained wood, into
wood-based materials and metals |
|
twist drill with a spiral flute
 |
diameter overall length |
2...12 120...170 |
for drilling into end-grained wood |
|
auger bit
 |
diameter length |
6...30 185...250 |
for deep drilling into soft and hard wood |
|
twisted auger
 |
diameter length |
3...10 125...160 |
mainly for predrilling for woods screw into soft wood; produces
high splitting effect |
|
centre bit
 |
diameter length |
6...50 80...140 |
drilling into cross pieces |
|
grimlet
 |
diameter length |
2..10 90...200 |
for predrilling screw and nail holes, mainly into soft wood
|
|
wood countersinks
 |
diameter length |
16 and 20 100 |
for reaming bore holes, these get a funnel-shaped bevel |
Aspects for the drill selection
|
Feature |
Application |
|
with square shank |
for breast drill |
|
with parallel shank |
for drill chuck and machine |
|
with entering tap |
for cross-piece drilling |
|
with chip groove |
for deep drilling |
|
with roof-shaped point |
for non-fibrous materials and end-grained wood |
|
with centre point |
for exact advance |
|
with feed thread |
for manual work |
|
without feed thread |
for machine work |
|
with short die head |
for flat drilling |
Recommendations for maintenance and use
Drilling and boring tools must be clean and well sharpened. When
storing them, protect cutting parts. Keep them safe in a hanging or lying
position in cabinets or cases, they must not contact each other. Remove
impurities with hot water or petroleum after use, slightly grease them with
acid-free grease against
rust.
7.6. Rasps and Files
Rasps and files are hand tools for flattening and smoothing.
Rasps have coarser cutting edges, files have finer ones.
Parts of rasps and files

Figure 11 Parts of rasps and
files
Kinds and dimensions of rasps
|
Tool |
Length in mm |
Cross-section in mm |
Application |
|
flat rasp

1 width, 2
thickness |
200...350 |
20 × 5...36 × 8 |
Rasps serve for coarse smoothing of round portions and recesses.
|
|
half-round

1 width, 2
thickness |
200...300 |
18 × 6...30 × 10 |
|
|
round rasp

1 width |
200...250 |
diameter 8 and 10 mm |
|
Kinds of dimensions of files
|
Tool |
Length in mm |
Cross-section in mm |
Application |
|
rectangular file

1 width, 2
thickness |
200 and 250 |
20 × 3.5; 25 × 4 |
for fine smoothing of round portions and recesses, reworking of
rasped surface |
|
flat/round file

1 width, 2
thickness |
like rectangular file |
|
|
|
triangular file

1 width
|
100...200 |
side length 6...17 |
especially as saw sharpening file, edge angle 60°, edges
slightly rounded for machining the tooth gullet |
Special kinds, e.g. as special saw and mill
files
Recommendations for maintenance and use
Use only tools the tangs of which are straightly and firmly
seated in the haft (stab injuries). Work in grain direction, if possible. Choose
tooth spacing*) according to the wood quality (use files with coarse cut for
soft or damp wood). Clean the tools from impurities by dipping them into hot
water, brush them with a hand brush. Clean metal files with file brushes made of
fine copper wires.
*) Cuts: Cutting edges lying closely one after the
other and recessed or cut into the metal base body by
machine.
7.7. Other Tools
|
Tool |
Application |
|
glass cutter
 |
for cutting glass panels.
The glass is scratched under slight
pressure by means of a diamond particle or a hard metal tip. |
|
setting iron
 |
for setting hand saws. The tool head provided with the recesses
may have a varying number of notches; the notches are of different widths and
correspond to the different thicknesses of the saw blades. |
|
setting pliers

1 adjusting screw
for tooth depth 2 adjusting screw for setting width |
for setting hand and machine saw blades. The setting pliers are
designed for various tooth depths and blade thicknesses; setting depth and
setting width can be adjusted. The setting pliers allow more exact working than
the setting iron. |
|
setting pliers for tooth depths of up to 8 mm and blade
thicknesses of 0.3...1.5 mm

1 adjusting screw
for tooth depth 2 adjusting screw for setting width |
|
|
setting pliers for tooth depths of up to 15 mm and blade
thicknesses of 0.5...3.0 mm |
|
|
hone
 |
for honing (smoothing) the cutting edge.
Natural as well as
synthetic stones are used, with the latter mostly having on both sides different
grain sizes (rough honing, fine reworking). Water and oil are used as
lubricants. |
|
scraper |
for smoothing hard wood surfaces.
Chip removal by sharp burrs
on the longitudinal edges; 0.8 - 3 mm thick, made of tool steel |
| | | Formulae and Tables - Wood / textbooks for vocational training (GTZ, 122 p.) | | | 8. Wood Working Machines | | | 8.1. Sawing Machines | | | (introduction...) | | | 8.1.1. Circular Saw Benches | | | 8.1.2. Parallel Rocking Circular Sawing Machine | | | 8.1.3. Table Band Sawing Machine | | | 8.2. Milling Machines | | | (introduction...) | | | 8.2.1. Smooth Miller | | | 8.2.2. Thicknessing Miller | | | 8.2.3. Shaping Machine | | | 8.2.4. Slot Milling Machine | | | 8.3. Lathe | | | 8.4. Drilling Machines | | | (introduction...) | | | 8.4.1. Box-Column Drilling Machine | | | 8.4.2. Hand Drilling Machine | | | 8.5. Sanding Machines | | | (introduction...) | | | 8.5.1. Horizontal Belt Sanding Machine | | | 8.5.2. Column-Type Disk Sanding Machine | | | 8.6. Presses | | | 8.7. Sharpening Machines | | | 8.7.1. Ripping Chisel and Plate Iron Sharpening Machine | | | 8.7.2 Sharpening Machine for Circular and Band Saw Blades | | | 8.7.3 Milling Cutter Sharpening Machine | | | 8.7.4. Blade Sharpening Machine |
|
Formulae and Tables - Wood / textbooks for vocational training (GTZ, 122 p.)
8. Wood Working Machines
8.1. Sawing Machines
Sawing machines are used mainly for parting materials made of
wood.
8.1.1. Circular Saw Benches
The machine serves for making straight longitudinal, cross,
angular and mitre cuts.
Construction

Figure 12 Circular saw bench
Information on labour safety
The splitting wedge has a clearance of 10 mm; blade thickness
< splitting wedge thickness < setting width; the splitting wedge is
secured against removal. The protective hood is fixed to the splitting wedge and
must cover unused parts of the saw blade above the workpiece. It must project 20
mm beyond the entrance of the cutting circle in the machine table. In case of
hand feed the stop rail should project 1/4 of the saw blade diameter beyond the
centre of the blade in cutting direction. In principle, gauges or work guides
are to be used when sawing. Sliding and rolling tables must firmly be connected
with the machine and secured against lifting. The table edges adjacent to the
saw blade consist of cuttable material and are replaceable. The spacing between
saw blade and table is £ 3 mm.
Recommendations for maintenance
Remove chips, wood residues and dust before using the machine.
Regularly lubricate bearings and other movable parts according to the
lubrication instructions. Protect bare parts against corrosion.
Specification
|
tool diameter |
250...600 mm |
|
tool speed |
1500...4500 min-1 |
|
dimensions of the main table |
1000 mm × 1200 mm |
|
dimensions of the sliding table |
750 mm × 350 mm |
|
input power |
2.5...5.6 kW |
8.1.2. Parallel Rocking Circular Sawing Machine
The machine is used for rough cross cuts in solid wood.
Construction

Figure 13 Parallel rocking
circular sawing machine
A round column supports the revolving and vertically adjustable
upper part of the machine. A swivel arm carries the saw motor the feeding
movement of which is effected in a straight line and in parallel to the surface
of the supporting table by means of a parallel linkage. The tool is mounted on
the motor shaft.
Information on labour safety
After the cut the saw blade must automatically return to the
position of rest and be held in place. In doing so, the saw blade must run into
a safety guard. The locking device must be disengageable by the handle. The
spacing between work stop and lower edge of the protective hood must be < 8
mm in position of rest. The work supporting table must have rolls or rollers.
Slots are not permitted on both sides of the saw blade at a distance of 400 mm.
See also circular saw benches.
Recommendations for maintenance
Regularly check the function of the feeding rolls or rollers.
Lubricate all moving parts according to plan. See also recommendations for
circular saw benches.
Specification
|
tool diameter |
300...600 mm |
|
tool speed |
» 3000 min-1 |
|
swiveling angle of the saw blade |
£ 45° |
|
width of the cut |
£ 600 mm |
|
height of the cut |
£ 150 mm |
|
input power |
2.0...5.5. kW |
8.1.3. Table Band Sawing Machine
The machine is used for straight longitudinal, cross and angular
cuts as well as for chamfering and rounding.
Construction

Figure 14 Table band sawing
machine

Figure 15 Roller guide of the
band saw blade
The machine consists of frame of the machine, upper and lower
band saw guide rollers and machine table. The upper band saw guide roller serves
as stretcher for the saw blade the deflection of which under stress is prevented
by saw blade guides. The upper band saw guide roller is tillable for adjustment
of the blade run (saw tilt).
Information on labour safety
Adjustment of the upper saw blade guide must be possible without
any danger while the machine is running. Cover those parts of the saw blade
which are not required for sawing as well as the saw blade after the sawing
process up to the table surface. When cross-cutting round wood or similar, work
with holding means. The saw blade passage in the machine table must not be
broader than 3 mm. An emergency circuit breaker for quickly braking the motor
must be available.
Recommendation for maintenance
Regularly check the guide rollers for proper setting. Regularly
check the rubber coating of the band rollers for cleanliness, wear and damage.
Untension the saw blade of machines which will not be in operation for a long
time.
Specification
|
saw-blade length |
3000...5500 mm |
|
saw-blade width |
5...60 mm |
|
speed of the band saw guide rollers |
650...950 mm-1 |
|
roller diameter |
300...850 mm |
|
depth of throat (cutting width) |
350...900 mm |
|
workpiece thickness |
£ 500 mm |
|
input power |
1.0...5.5 kW |
8.2. Milling Machines
Milling machines are used for dressing, levelling and shaping of
materials made of
wood.
8.2.1. Smooth Miller
The machine serves for making plane surfaces.
Construction

Figure 16 Smooth miller
The box-like cast column supports the two vertically adjustable
machine tables and the housings of the antifriction bearings for the blade
shaft. The electric motor in the column drives the blade shaft via a belt drive.
An adjustable stop rail serves for guiding the workpiece. The feeding table is
set to be lower then the unloading table by the amount of the cutting depth.
That part of the blade shaft which is not required is covered by a safety guard
which is firmly connected to the machine.
Information on labour safety
The spacing between the table lips and the cutting circle is a 3
mm. The table lips must not be damaged, when feeding by hand they must not be
recessed. Adjust the table only when the blade shaft is at rest. Workpiece with
a length of less than 400 mm and a thickness of less than 25 mm and workpieces
with a length of 400...800 mm and a thickness of less than 10 mm must not be
machined. Machine such work-pieces only with the help of a feeding device.
Recommendations for maintenance
Clean the table surface and stop rail from resin residues and
other impurities after use. Regularly check the table lips for damage. Regularly
check the stop rail for ease of motion. Lubricate it according to the
lubrication chart.
Specification
|
diameter of the blade shaft |
100... 125 mm |
|
speed of the blade shaft |
4500...6000 min-1 |
|
number of blades |
2; 4 |
|
length of the feeding table |
1100...1600 mm |
|
length of the unloading table |
1100...1500 mm |
|
working width |
400...600 mm |
|
input power |
3.0...6.0 kW |
8.2.2. Thicknessing Miller
With this machine parallel broad surfaces and - in case of
strip-like thicker workpieces - also narrow surfaces are produced.
Construction

Figure 17 Thicknessing miller
The box-like frame of the machine (cast or welded construction)
supports the vertically adjustable machine table and the functional elements of
the machine. A heavy driving motor (mostly outside the machine) drives the
higher blade shaft via a belt drive. Feeding is effected by higher feed rollers
and lower table rollers which are driven by the blade shaft. A motor provides
for the table height adjustment (rapid adjustment).
Information on labour safety
Rebound protections must be available. The feeding devices must
be constructed in such a way that the workpiece is safely supported and cannot
be thrown out. Workpieces having a thickness of less than 5 mm must be machined
with a base. Open protective hoods of blade shafts only when the machine is at
rest. Workpieces which are thinner than 25 mm require elements of rebound
protection which are half as wide as the workpiece. It must be possible to stop
the feeding device independently of the tool.
Recommendations for maintenance
Regularly check the vee belt belt between motor and blade shaft
for proper tension. Make sure that the chips are properly removed. Lubricate
according to the lubrication chart.
Specification
|
diameter of the blade shaft |
100...125 mm |
|
speed of the blade shaft |
4500...5500 min-1 |
|
number of blades |
2; 4 |
|
feeding speed |
4...30 m/min |
|
workpiece length ³ 200 mm |
|
|
workpiece width |
5...800 mm |
|
workpiece thickness |
3...300 mm |
|
input power |
4...7.5 kW |
8.2.3. Shaping Machine
With this machine profiles, groove and tongue joints, overlap
joints, mortise and tenon joints etc. can be produced.
Construction

Figure 18 Shaping machine

Figure 19 Tool carrier of the
shaping machine
The frame of the machine supports the work-rest table which has
a round opening for the tool carrier. An electric motor drives over a belt drive
the cutter spindle on the extension of which, i.e. the cutter arbor, the tool is
mounted. During operations where the cutter arbor is heavily loaded the latter
can be guided in an upper bearing. For vertical adjustment either the spindle or
the rest table is adjusted.
Information on labour safety
The following fixtures must be available: stop rail with stop
block; fence ring and fence strip of extended template; clamp carriage and
feeding slide; steel band hand guard and guard bow; upper cover for chip
suction; guard bow and protective ring with ball bearings; protective box or
protective bell; pressure racks, rebound gripper; rebound-proof guide box with
stop block. The distance from the cutting circle to the halves of the stop rails
may be £ 3 mm.
Cutter arbors with upper bearing journal are to be used with
upper bearing also for test work. For clockwise and anti-clockwise rotation the
holding nut must be secured by a lock nut. The time lag of the tool after
switching-off of the machine is £ 10 seconds.
Recommendations for maintenance
Clean seatings and bearing surfaces as well as guide slots
daily. Regularly clean the air intake side of the motor and facilities of
vertical and stop adjustment from chips and dust. Regularly check the spacers
and fence rings for cleanliness and intactness. Regularly check the seat of the
Morse taper.
Specification
|
length of the machine table |
800... 1200 mm |
|
width of the machine table |
500...1000 mm |
|
height of the machine table |
850...900 mm |
|
cutter arbor diameter |
30; 40 mm |
|
spindle speed |
1200...12,000 min-1 |
|
input power |
1.0...12.0 kW |
8.2.4. Slot Milling Machine
With this machine round holes and longitudinal slots can be
produced.
Construction

Figure 20 Slot milling machine
A cast frame carries the tool box, the motor and, on the front
side, the machine table with the mechanisms for movement. The axial feed
(drilling) is carried out by the tool box or the machine table with mounted
workpiece. The cross feed (milling) is performed either by the machine table or
by a floating movement of the tool with the table being motionless. For angular
recesses the table can be adjusted (tilted), the work can be set up with
eccentric gripping lever, screws or pneumatic clamping elements. The drive is
effected by a belt drive.
Information on labour safety
A bonnet is necessary. Check the tool clamping devices regularly
for their operational reliability.
Recommendations for maintenance
Keep clamping shanks and chuck clean. Always keep the surface of
the machine table and work stop clean. Lubricate according to the lubrication
chart.
Specification
|
tool diameter |
4...25 mm |
|
spindle speed |
1400...10,000 min-1 |
|
drilling depth |
£ 100 mm |
|
length of the longitudinal slot |
£ 200 mm |
|
input power |
1.5...5 kW |
8.3. Lathe
This machine serves for turning between centres and face turning
and is suited for chucking work. Construction

Figure 21 Lathe
The machine bed made of cast iron carries the headstock,
tailstock, hand rest and spindle drive. The electric motor for the spindle drive
is located in the left base. Tailstock and rest are adjusted along the bed by
hand and arrested by an eccentric. The gap makes machining of short workpieces
with large diameter possible.
Information on labour safety
Chucks with protecting chuck jaws, clamp or locking screws are
to be provided with a smooth all-round cover. Never leave the key in the chuck.
Do not check the workpieces while they are rotating. Do not remove the chips
while the machine is running. Do not slow down workpieces by hand during the
run-out. The hand rest should be as close to the workpiece as possible. Do not
lay down tools on the machine bed. Wear tightly fitting clothing.
Recommendations for maintenance
Slightly grease all bare parts regularly with acid-free grease.
Regularly check the function of the cam-lock. Keep the machine bed clean. Make
sure that the tailstock is in perfect condition. Clean the faceplate, chuck and
tailstock centre regularly from adhering dirt, resin and similar.
Specification
|
centre distance |
1000...2000 mm |
|
centre height |
200...400 mm |
|
work diameter above gap |
£ 750 mm |
|
length of the workpiece to |
£ 225 mm |
|
be turned in the gap spindle speed |
250...2500 min-1 |
|
speed increments of the spindle |
» 9 |
|
input power |
1.5...2.5 kW |
8.4. Drilling Machines
Drilling machines are used for making rotationally symmetrical
bore
holes.
8.4.1. Box-Column Drilling Machine
The machine serves for drilling round holes.
Construction

Figure 22 Box-column
drilling machine
The base plate carries the column with the vertically adjustable
work supporting table and the drill head with motor, belt drive and tool
spindle. The drilling feed is produced by a hand or foot lever or automatically
(transferred from the spindle drive).
Information on labour safety
Locking screws on toolholders must be covered or countersunk.
Clamping fixtures have to provide for proper seating of the tool and workpiece.
All safety guards must be adjustable to the various height and depth settings of
the drills.
Recommendation for maintenance
Keep drill chucks and tool shanks clean. Clean the work support
and the work stops regularly. Lubricate according to the lubrication chart.
Specification
|
tool diameter |
£ 40 mm |
|
speed of the tool spindle |
150...4500 min-1 |
|
travel of the tool spindle £ 150
mm |
|
|
length of the support table |
250...450 mm |
|
width of the support table |
200...350 mm |
|
input power |
0.7...2.5 kW |
8.4.2. Hand Drilling Machine
The hand drilling machine serves for drilling round holes and is
mainly used on building sites and for erection work.
Construction

Figure 23 Hand drilling
machine
In most cases the driving element is a universal motor which can
be used for direct and alternating currents. The prolonged motor shaft is
simultaneously the carrier and is provided with a chuck. The motor is enclosed
by a light-metal casing with handle.
Information on labour safety
Plug the machine only into a socket with earthing contact. Never
use damaged cables.
Recommendations for maintenance
Regularly check the condition of the lead-in cable. Always keep
the chuck and tool shanks clean.
Specification
|
tool diameter |
£ 40 mm |
|
tool speed |
350...2000 min-1 |
|
input power |
0.2...0.8 kW |
|
weight |
1.4...6.0 kg |
8.5. Sanding Machines
Sanding machines are used for making smooth and flat surfaces on
wood-based
materials.
8.5.1. Horizontal Belt Sanding Machine
This machine is required mainly for smoothing of broad surfaces,
but it can also be used for lacquer sanding.
Construction

Figure 24 Horizontal belt
sanding machine
Between the columns of a cast upright standard the vertically
adjustable work supporting table is running on round bars or guide rails. The
drive is capable of being switched over (clockwise or anticlockwise rotation),
the driven belt roller is designed in most cases as face sanding disk. For
sanding on the sliding table which is provided with an adjustable stop a
pressure shoe is used on which felt is glued on. For lacquer sanding the
pressure shoe must be provided with hard bristles instead of the felt. This
helps to reduce the frictional heat. (Reduce sanding belt speed to 12...14 m/s).
Information on labour safety
The sanding belt at the belt rollers and the upper part of the
rotating belt at the front edge must be completely covered. The pressure shoe
must automatically lift itself when not being used. The hand guiding the table
must not get within reach of the sanding belt. Collecting grids are to be
attached to the exhaust openings. Strictly observe the regulations on exhausting
the sanding dust and storing it. Lacquer and wood sanding dust must be exhausted
and kept seperatly. When sanding lacquer, connect all conductive parts to earth
to prevent electrostatic charges and increase the relative air humidity to 70 %.
Use antistatic polishing agents.
Recommendations for maintenance
Protect bare parts against corrosion. The pressure shoe must be
movable to slightly reciprocate and to adapt itself to the work surface. The
pressure shoe must be in an impeccable condition.
Specification
|
sanding belt width |
150...500 mm |
|
sanding belt speed |
15...30 m/s |
|
belt roller diameter |
» 300 mm |
|
distance between belt roller centres |
» 3000 mm |
|
belt roller speed |
» 1500 min-1 |
|
length of the supporting table |
1000...2500 mm |
|
width of the supporting table |
300... 1000 mm |
|
input power |
3...10 kW |
8.5.2. Column-Type Disk Sanding Machine
This machine serves for smoothing small and thin as well as
curved parts.
Construction

Figure 25 Column-type disk
sanding machine
A box-like cast column accommodates the driving motor. Over a
vee-belt the motor drives the machine parts on which the sanding disks are
mounted. The work supporting table is inclinable in most cases.
Information on labour safety
Distance between disk and table s 3 mm; the sanding tool must be
fixed by means of a locking ring (at least 6 fastening screws). With the
exception of the working surface the disk must be covered on all sides. When
working on the upwards running portion of the disk, secure the workpiece against
being torn upwards. Regularly check disks made of grey cast iron for cracks.
Recommendations for maintenance
Lubricate the machine according to the lubrication chart.
Protect all bare parts against corrosion. Regularly check the vee-belt for
serviceability.
Specification
|
sanding disk diameter |
600...1300 mm |
|
speed of the sanding disk |
750... 1500 min-1 |
|
input power |
3.0...7.5 kW |
8.6. Presses
Presses are used for compressing flat workpieces during
solidification of the glue.
Hand Screw Press
This press serves for coating flat workpieces and for similar
operations.
Construction
The frame made of sectional steel is bolted. Cross members on
the bottom beams cary the press table (sometimes the press table is retractile).

Figure 26 Hand screw press

Figure 27 Mode of
action of the hand screw
Between the upper beams there are flanged cross bars with
threads for transmitting motions for the screws. At the lower end of the screw
the pressure shoe is supported. By means of the press plate forming the lower
end of the pressure shoe a uniform force transmission is obtained.
Information on labour safety
The pressure elements require a safety guard, they are to be
secured against unintended lowering.
Recommendations for maintenance
Make sure that the points of support are regularly lubricated.
Immediately remove impurities, especially those of the press plates. Regularly
apply parting compounds on the press plate to prevent sticking of glue residues.
Specification
|
press length |
2500...3000 mm |
|
press width |
1000...1100 mm |
8.7. Sharpening Machines
8.7.1. Ripping Chisel and Plate Iron Sharpening Machine
This machine serves for sharpening mortising, cutting and plane
irons and certain drilling tools.
Construction

Figure 28 Ripping chisel and
plane iron sharpening machine
A pedestal of steel or cast steel carries the motor the shaft of
which directly drives the sharpening tools. If the machines are designed for wet
grinding, the sharpening wheels run through a tray filled with cooling liquid.
In most cases the adjustable tool support is provided with a clamping fixture.
Information on labour safety
Take care to ensure that the proper grinding tool is selected.
Observe the specified speed of the sharpening tool. Do a test run of the
sharpening wheel. Use the safety guards specified.
Recommendations for maintenance
The tool carriers must be clean. Make sure that there is
sufficient cooling liquid available. Check the safety guards for functioning.
Regularly clean the machine.
Specification
|
diameter of the sharpening wheel |
£ 200 mm |
|
speed of the sharpening wheel |
» 3400 min-1 |
|
grinding speed |
» 35 m/s |
|
motor power |
0.5 kW |
8.7.2 Sharpening Machine for Circular and Band Saw Blades
This machine serves for sharpening circular and band saw blades
by dry grinding.
Construction
The machine consists of the machine frame and the grinding wheel
head which is mounted on the front side of the machine frame and arranged to
swivel. Lifting and lowering of the grinding whell head is effected by means of
a cam which corresponds to the tooth shape of the saw blade. Swivelling of the
grinding wheel head during angular grinding takes place from a special cam via
toothed segment, toothed gear, slider-crank mechanism and lever system. The saw
blade is fed by a pushing pawl.
Information on labour safety
Select the appropriate grinding tool and make sure that it is in
good condition. Do a test run of the grinding tool. Check whether the safety
guards are intact. Wear protective glasses. When grinding dry, exhaust the
grinding dust.

Figure 29 Sharpening machine
for circular and band saw blades
Recommendations for maintenance
Clean the tool carriers regularly. Check the oil level
regularly. Lubricate and clean the machine regularly.
Specification
|
diameter of the circular saw blade |
160...1200 mm |
|
width of the band saw blade |
³ 10 mm |
|
saw pitch |
5...60 mm |
|
tooth height |
3...30 mm |
|
tool orthogonal rake g |
15...30° |
|
tool cutting edge inclination a
|
8...15º |
|
diameter of the grinding wheel |
£ 200 mm |
|
speed of the grinding wheel |
2800 mm-1 |
8.7.3 Milling Cutter Sharpening Machine
This machine serves for sharpening all kinds of milling cutters
by wet grinding.
Construction

Figure 30 Milling cutter
sharpening machine
The machine consists of the machine frame which carries the
grinding tray with the guideways for the longitudinal slide rest. The
longitudinal slide rest is running on rollers. The sharpening wheels are
inserted into a chuck and will be replaced with this chuck. So they will always
have the same seating in the spindle. The tool clamping fixture can be replaced
with another one according to the tool to be sharpened. The machine is equipped
with a cooling system and a water splash guard for the operator.
Information on labour safety
Make sure that the proper abrasive tool is selected. Test the
abrasive tool in a test run. Exhaust the grinding dust in case of dry grinding.
Use a sight screen. The sight screen should be coupled with the switching-off
mechanism. Make sure that safety guards are intact.
Recommendations for maintenance
Like sharpening machine for circular and band saw blades; check
the coolant cleaning system regularly for reliability in operation.
Specification
|
cutter diameter |
£ 200 mm |
|
grinding length |
£ 150 mm |
|
speed of the sharpening wheel |
1400; 2800; 3500 min-1 |
|
input power for sharpening wheel motor |
0.6 kW |
|
input power for feeding motor |
0.25 kW |
|
input power for coolant pump |
0.13 kW |
8.7.4. Blade Sharpening Machine
This machine serves for sharpening machine blades by wet
grinding.
Construction

Figure 31 Blade sharpening
machine
A heavy column of cast steel carries the guide rails for the
mobile grinding unit and encloses the cooling tray with the grinding bed. The
blades to be sharpened are fixed on the clamping plate mechanically or
electromagnetically. The cooling liquid is supplied through the hollow shaft of
the grinding motor. The sharpening wheel is fed automatically and steplessly.
Information on labour safety
Select the appropriate grinding tool carefully. Do a test run of
the grinding tool. Observe the operating instructions strictly.
Recommendations for maintenance
Clean the clamping plate each time before a blade is to be
mounted. Make sure that the guide rails for the sharpening unit are absolutely
clean. Check the coolant cleaning system for operational reliability. Regularly
lubricate and clean the machine.
Specification
|
grinding length |
800...4500 mm |
|
blade width |
£ 250 mm |
|
feeding speed of the grinding unit |
8...16 m/min |
|
grinding speed |
» 30m/s |
|
diameter of the sharpening wheel |
175...200 mm |
|
grinding infeed |
0.002...0.3 mm |
|
input power for the sharpening wheel motor |
3.0...5.0 kW |
|
input power for the travelling drive |
» 0.75 kW |
|
input power for the coolant pump |
» 0.1 kW |
| | | Formulae and Tables - Wood / textbooks for vocational training (GTZ, 122 p.) | | | 9. Tools | | | (introduction...) | | | 9.1. Tools for Circular Sawing Machines | | | 9.2. Tools for Table Band Sawing Machines | | | 9.3. Tools for Smooth and Thicknessing Millers | | | 9.4. Tools for Shaping Machines | | | 9.5. Tools for Slot Milling Machines | | | 9.6. Tools for Drilling Machines | | | 9.7. Tools for Sanding Machines | | | 9.8. Tools for Sharpening Machines |
|
Formulae and Tables - Wood / textbooks for vocational training (GTZ, 122 p.)
9. Tools
Machine tools are working tools which are held or fixed on
spindles and shafts or in chucks and
holders.
9.1. Tools for Circular Sawing Machines
Circular saw blades are toothed steel disks with a diameter of
80 to 800 mm, a hole having a diameter of 10...40 mm in the middle of the disk
and a disk thickness of 0.8...3.4 mm.

Figure 32 Tooth form
Construction of the tooth faces and tooth gullets
|
Number of cutting edges per tooth |
1 |
1 |
1 |
1 |
1 |
1 |
|
Representation |

|

|

|

|

|

|
|
Symbol Name |
N acute-angled tooth |
K gullet tooth |
p raven beak tooth |
A triangular tooth |
Y roof-shaped tooth |
S
- |
|
Number of cutting edges per tooth |
2 |
2 |
2 |
2 |
3 |
|
|
Representation |

|

|

|

|

|
|
|
Symbol |
X |
M |
Z |
B |
W |
|
|
Tooth gullets |
|
|
|
|
|
|
|
Representation |

|

|
|

|
|
|
|
Symbol |
C |
V |
|
U |
|
|
Tooth forms are designated by two letters, the first of which
designates the form of the tooth face, the second one the form of the tooth
gullet.
Figure 33 Designation
of the tooth form NV
Number of saw teeth and saw pitch
The saw pitch is the spacing between two successive primary
cutting edges, the saw pitch can always be divided by two.
Number of teeth (z) and saw pitch (t) of circular saw
blades
|
Diameter in mm |
KV teeth |
NV teeth
g >
0º |
NV teeth
g =
0° |
AV teeth |
|
z |
t |
z |
t |
z |
t |
z |
t |
|
in mm |
in mm |
in mm |
in mm |
|
80 |
|
|
64 |
4.2 |
|
|
|
|
|
100 |
|
|
64 |
5.2 |
|
|
|
|
|
125 |
|
|
80 |
4.9 |
|
|
|
|
|
160 |
|
|
80 |
6.3 |
|
|
|
|
|
200 |
|
|
80 |
7.8 |
80 |
7.8 |
|
|
|
250 |
|
|
80 |
10 |
80 |
10 |
|
|
|
300 |
56 |
17 |
80 |
12 |
80 |
12 |
72 |
13 |
|
350 |
56 |
20 |
64 |
17 |
64 |
17 |
72 |
15 |
|
400 |
56 |
22 |
64 |
20 |
64 |
20 |
72 |
18 |
|
450 |
56 |
25 |
64 |
22 |
64 |
22 |
72 |
20 |
|
500 |
56 |
28 |
64 |
25 |
64 |
25 |
72 |
22 |
|
550 |
56 |
31 |
64 |
27 |
64 |
27 |
72 |
24 |
|
600 |
56 |
34 |
64 |
30 |
64 |
30 |
72 |
26 |
|
650 |
56 |
36 |
64 |
32 |
64 |
32 |
72 |
28 |
|
700 |
56 |
39 |
64 |
35 |
64 |
35 |
72 |
31 |
|
750 |
56 |
42 |
64 |
37 |
64 |
37 |
72 |
33 |
|
800 |
56 |
45 |
64 |
40 |
64 |
40 |
72 |
35 |
|
Application |
for longitudinal cuts at normal load with manual feed |
for longitudinal cuts at normal load in hard and soft wood with
manual feed |
for cross cuts at normal load in hard and soft wood with manual
feed |
for cross cuts at normal load and with manual feed |
Recommended values for cutting edge angles
|
Cutting direction |
Application |
Tooth form |
Tool orthogonal rake g in ° |
Wedge angle b
in ° |
Plan angle c
in ° |
Setting width a in mm |
|
longitudinal cutting |
hard wood |
KV, PV |
22 |
46 |
87 |
0.35 |
|
|
NV |
18 |
40 |
87 |
0.35 |
|
softwood |
NV, KV |
28 |
40 |
87 |
0.45 |
|
dry |
PV |
|
|
|
|
|
softwood |
NV, KV |
28 |
40 |
87 |
0.45...0.40 |
|
damp |
PV |
|
|
|
|
|
cross cutting |
hard |
NV |
19...2 |
35...48 |
65...70 |
0.45 |
|
and softwood |
AV |
-10...-38 |
40...58 |
65...70 |
0.25 |
Information on labour safety
Use only unobjectionable saw blades. Do not exceed the speed
indicated on the tools. Replace dull, resinified tools. Check sharpened tools in
a test run for running accuracy. Do not change the tool geometry. Use suitable
tool containers for transporting circular saw blades.
Recommendations for maintenance
Clean the tools before using them. Protect the saw blades
against rust by means of an acid-free grease. Store circular saw blades by
hanging them up in the bore. In doing so, protect the cutting edges by layers of
cardboard or
similar.
9.2. Tools for Table Band Sawing Machines
Band saw blades for table band sawing machines are 10 to 40 mm
wide endless steel strips which are toothed on one side. They have a thickness
of 0.4 to 0.8 mm and a setting width of 1.0 to 1.3 mm.
Recommended values for band saw blades
|
Saw pitch t in mm |
Tooth height h in mm |
Setting width a in mm |
Tool orthogonal clearance a
in ° |
Wedge angle b in °
|
Tooth form |
Application |
|
12 |
4...5 |
0.4...0.5 |
20 |
45 |
NV |
for sawing soft wood |
|
10 |
3...4 |
0.3...0.4 |
30 |
55 |
NV |
for sawing hard wood |
|
8 |
3 |
0.3 |
30 |
55 |
NV |
for sawing laminated wood, sandwich, particle and fibre boards
|
Information on labour safety
Replace dull and resinified saw blades or clean and sharpen
them. Never use cracked or badly soldered saw blades. Do a 5 minute test run of
freshly soldered or welded saw blades before using them for the first time.
Soldering and welding points must not be thicker than the saw blade.
Recommendations for maintenance
Clean dirty saw blades with solvents and slightly grease them
against rust with acid-free grease. Keep saw blades in hanging position (teeth
towards the wall). When soldering cracked saw blades, cut the free ends
rectangularly, bevel them over 10 to 15 mm, file smoothly on both sides after
soldering and grind to the normal blade
cross-section.
9.3. Tools for Smooth and Thicknessing Millers
Smooth and thicknessing millers are equipped with blade shafts.
Blade shafts consist of a cylindrical body with locating spigot, they are
250...1600 mm long and their cutting circle diameter is 60...224 mm. The stripe
irons for tipping the blade shaft have cross-sections of 30 mm x 1.8 mm to 43 mm
x 2.2 mm and lengths of 200 mm to 810 mm.
Recommanded values for cutting-edge angles on stripe irons:
tool orthagonal rake g in º 30...40
tool orthagonal clearance a in ° 4...18
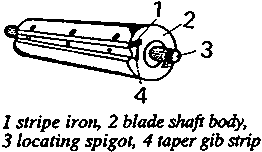
Figure 34 Blade shaft
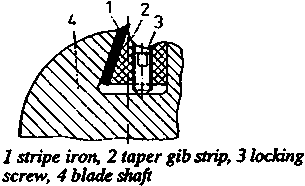
Figure 35 Mounting of
the strip irons on the blade shaft
Information on labour safety
For smooth milling machines only cylindrical blade shafts with
taper gib strips are permitted. The blades of smooth milling machines project
beyond the body of the blade shaft by 1.1 mm at the most. In case of smooth
milling machines make sure that the permissible weight difference of opposite
blades is kept. The cutting speed of 40 m/s must not be exceeded. Retighten the
fastening screws for the blades after a test run of 2 minutes. Tighten the
locking screws of the blade shafts alternately little by little starting from
the middle. The lips of the blade shafts must be close on the blades. The blades
must not be backed-up.
Recommendations for maintenance
Seatings and clamping surfaces for blades and clamping elements
must be absolutely clean when the blades are inserted. When replacing cutting
elements, make sure that the tool bore holes are clean. The tool geometry of the
blades must not be changed. Clean the tools from sticking dirt after using them,
protect bare parts against
rust
9.4. Tools for Shaping Machines
Tools for shaping machines may be solid or sectional. They have
diverse shapes and are provided with a bore hole for the cutter arbor.
Solid milling tools
As far as solid milling tools are concerned, body and cutting
edge are made of one and the same material and are integral. If the cutting edge
consists of a different material, it is permanently connected with material
closure with the body.
Arbor cutters
Form of the flank
|
Crown cutter |
Relief-turned cutter |
Relief-milled cutter or relief-ground cutter |
|

|

|

|
|
the flank is hollow-ground, so that symmetrical pairs of cutting
edges are produced |
the flank is curved (relief-turned) so that there will be no
friction between tool (flank) and workpiece |
the flank is straight (by relief milling or relief grinding)
|
|
for operations requiring a change of the direction of rotation
of the tool; it is disadvantageous that the unused cutting edge is rubbing
against the workpiece and gets dull as a result of this |
mainly for rebating and form milling tools; to maintain the
profile regrinding is made only at the tool face |
mainly for grooving cutters |
Kinds
|
Kind of cutter |
|
Dimensions in mm |
|
|
jointing cutter |
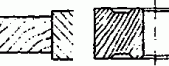
|
diameter |
63...80 |
|
|
working width |
28...63 |
|
rebating cutter |

|
diameter |
63...180 |
|
|
working width |
16...40 |
|
bevelling cutter |

|
diameter |
70...180 |
|
|
working width |
12...45 |
|
half astragal cutter |
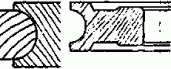
|
diameter |
63...160 |
|
|
working width |
11 ...90 |
|
quarter astragal cutter |
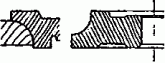
|
diameter |
63...180 |
|
|
working width |
8...51 |
|
moulding cutter |
|
diameter |
63...140 |
|
|
working width |
2.5...25 |
|
half moulding cutter |
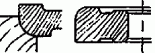
|
diameter |
63...180 |
|
|
working width |
8 ...51 |
|
cornice cutter |

|
diameter |
100...180 |
|
|
working width |
22...65 |
|
grooving cutter |

|
diameter |
80...125 |
|
|
working width |
4...14 |
|
cornice cutter with plate |

|
diameter |
80...200 |
|
|
working width |
12...42 |
Recommended values for cutting-edge angles on relief-turned
and relief-ground cutters
|
Application |
Tool orthogonal clearance a
in º |
Tool orthogonal wedge angle b in ° |
Tool orthogonal rake g in
° |
|
Softwood |
|
|
|
|
cutting direction A |
6...10 |
40...50 |
30...45 |
|
cutting direction B |
8...15 |
45...55 |
20...35 |
|
cutting direction C |
4...8 |
45...55 |
25...40 |
|
Hardwood |
|
|
|
|
cutting direction A |
8...12 |
45...55 |
25...35 |
|
cutting direction B |
8...12 |
55...65 |
15...25 |
|
cutting direction C |
6...10 |
55...60 |
20...30 |
|
chip board, uncompressed laminated wood |
5...10 |
55...60 |
20...25 |
|
hard fibre board, compressed laminated wood |
5...10 |
60...65 |
15...20 |
Sectional milling tools
Sectional milling tools consist of a body and cutting and
clamping elements. Only in combination they form a specific tool.
|
Tool |
Dimensions in mm |
Application |
|
cutter head |
diameter |
80...100 |
mainly for machining narrow surfaces, |
|

|
cutting-edge length |
80...125 |
depending on the construction of the cutter and the body also
for grooving, rebating and shaping |
|
cutter disk (slotted disk) |
diameter |
200...450 |
mostly equipped with two cutters for making |
|
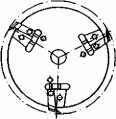
|
cutting-edge length |
6... 20 |
of grooves, but especially for slotting (mortise and tenon
joints) |
Compound milling tools
Compound milling tools consist either of different single
cutters or of a set of single cutters of one the same kind. They are provided
for a specific work task. Any change of the form or dimension of the profile to
be made requires a change of the tool.
|
Tool |
Components |
Application |
|
dovetail cutting set
 |
grooving cutter and spacing collars |
for dovetailing diameter 100...200 mm |
|
cutter combination for the manufacture of windows
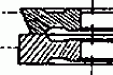 |
one rebate cutter and one bevel cutter |
for milling of casement wood; today mostly cutter heads with
profile cutters are used for this purpose |
Recommended values for cutting-edge angles
|
Kind of tool |
Tool orthogonal rake g in
° |
Tool orthogonal clearance a
in ° |
|
cutter heads |
30...40 |
4...18 |
|
cutter disks |
37...45 |
15 |
Information on labour safety
Note maximum permissible tool speeds. Use collets only if they
have a collar and are inserted into the tool from both sides. Use upper bearings
depending on the tool size.
Figure 36 shows the use of upper bearings. Work without upper
bearing only within the hatched fields. Work with upper bearing only below the
curves I to IV. Never work above the curves. When the upper cutting edge of the
tool lies more than 100 mm above the table surface, work also with upper
bearing.
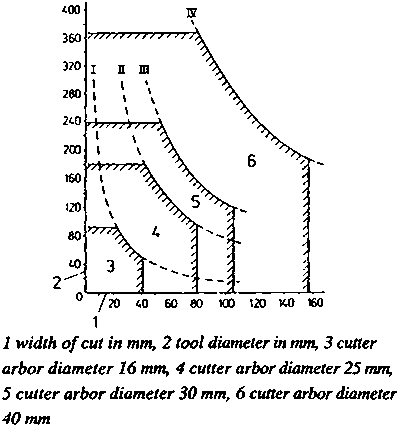
Figure 36 Use of upper
bearings
Tools with visible wear and damage are not permitted for use.
The damp nut must be held with all threads by the thread of the tool holder. It
must be designed as concentric nut with double-ended flattening for the wrench
jaw in case of cutter arbors. Note permissible tool dimensions. Locking screws
must be covered or recessed. Do not change the tool geometry.
See also hints on tools for smooth and thicknessing millers.
Recommendations for maintenance
Carefully clean the tool after use. Protect bare parts against
rust. Protect tool bore holes and tool shanks against any impurities. Keep the
tools in suitable cases ensuring protection of the cutting edges. See also hints
on tools for smooth and thicknessing
millers.
9.5. Tools for Slot Milling Machines
Tools for slot milling machines are shank cutters with one or
two cutting edges.
Shank cutters for slot milling machines
|
Tool |
Dimensions in mm |
Remarks |
|
slotting mill with one flute
 |
diameter |
4...16 |
single-edged with trough round shank |
|
cutting edge length |
10...18 |
|
|
slotting mill with two flutes
 |
diameter |
3...50 |
with through and with stepped round shank |
|
cutting edge length |
42...230 |
|
Recommended values for cutting-edge angles of slotting
mills
|
Tool |
Tool orthogonal wedge angle b in º |
Tool orthogonal rake g in
° |
|
Slotting mill |
70...79 |
11...20 |
Information on labour safety
Do not use any tools showing visible wear or damage. Mount the
tool safely. Locking screws must be covered or recessed. Do not change the tool
geometry. Work with guard bonnet over the drill chuck. Observe the specified
shank diameter of the tool.
Recommendations for maintenance
Keep the jaw chuck and tool shanks clean. Check the work
clamping device regularly for proper functioning. Lubricate according to the
lubrication chart. Regularly clean and grease the guide rails and lever
mechanism.
9.6. Tools for Drilling Machines
Tools for drilling machines are rod-shaped cutting tools with
front cutting edges and with shank for mounting in the drill chuck.
Kinds of drilling tools
|
Tool |
Dimensions |
in mm |
Application |
|
auger bit |
diameter |
6...40 |
especially for hand drilling units and deep holes, mostly with 1
or 2 taper tap(s) |
|

|
thread length |
78...1000 |
|
|
twist drill with roof-shaped point |
diameter |
3...8.3 |
for bore holes into hard wood and end-grained wood, mostly as
dowel hole drill |
|

|
thread length |
42...70 |
|
|
twist drill with centre point |
diameter |
4...50 |
for clean and accurate bore holes vertically to the wood fibre
|
|
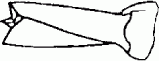
|
thread length |
45...230 |
|
|
centre bit |
diameter |
8...50 |
with centre point and taper tap; for bore holes vertically to
the fibre direction |
|

|
length |
80...140 |
|
|
Forstner bit |
diameter |
8...40 |
for sinking dimensionally stable blind holes with even bore
bottom, e.g. knot bore holes |
|
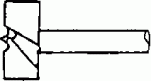
|
length |
80...125 |
|
|
countersink |
diameter |
3...10 |
countersinks serve for making screw head counter sinks |
|
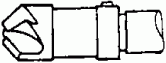
|
length |
90 |
|
Recommended values for cutting edge angles on drilling
tools
|
Kind of drill |
tool orthogonal clearance a
in º |
Wedge angle b in º
|
Drill point angle eB in ° |
|
auger drill |
15 |
25 |
180 |
|
twist drill with centre point |
12 |
45 |
90 |
|
twist drill with roof-shaped point |
15 |
45 |
100...125 or 180 |
|
centre drill |
20 |
25 |
180 |
|
Forstner bit |
20 |
30 |
180 |
Information on labour safety
When using drilling tools which are operated with a peripheral
speed > 6 m/s for the first time, do a test run of at least 1 minute. In
doing so, cover the area of danger. All locking bolts at the drill chuck must be
covered or recessed. The drill chuck must be firmly seated and well balanced.
The safety guards must be adjustable to different height and depth settings of
the drills.
Recommendations for maintenance
Take care to keep the tool shanks and drill chucks clean. After
use clean the tools carefully. Do not use any metal objects for cleaning the
tools. Store and transport the tools in such a manner that the cutting edges
cannot be
damaged.
9.7. Tools for Sanding Machines
Tools for sanding machines are flexible sanding tools. They are
used for wood and lacquer sanding. They are compound tools with geometrically
indeterminate cutting edges which consist of a flexible base body, a bonding
material and the abrasive material.
Construction of flexible sandig tools
|
Component |
Function |
|
base body |
The base body carries the abrasive material, has a high strength
and high flexibility. |
|
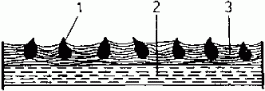
1 abrasive material, 2
base body, 3 bonding material
|
|
abrasive material |
Abrasive materials are the cutting edge bearing abrasives, they
perform the actual cutting operation. |
|
bonding material |
Bonding materials serve for attaching the abrasive materials to
the base body. |
Kinds of base bodies
|
Kind |
Stress level |
|
light papers made of soda pulp |
low |
|
compressed, sized papers made of soda pulp |
higher |
|
combination of paper and fabric |
high |
|
linen fabric |
very high |
|
combination of fabric and fibre |
very high |
|
fibre |
highest |
Abrasive material
|
Kind |
Symbol |
Application |
|
regular corundum |
NK |
for soft wood and rough plastic sanding |
|
semi-precious corundum |
HK |
for soft wood and rough lacquer sanding |
|
precious corundum |
EK |
for hard wood, lacquers, plastics |
|
silicon carbide |
SC |
for face veneer and polyester lacquers |
Grain sizes of flexible sanding tools
|
Grain group |
Designation |
Grain size of the main fraction in mm |
Grain group |
Designation |
Grain size of the main fraction in mm |
|
fine as dust |
F 3 |
3.0 ± 0.5 |
fine |
10 |
100...125 |
|
F 5 |
4.5 ± 0.8 |
|
12 |
125...160 |
|
F 7 |
6.5 ±1.0 |
|
16 |
160...200 |
|
F 9 |
9.5 ± 1.0 |
|
20 |
200...250 |
|
F 13 |
13.0 ± 1.8 |
medium fine |
25 |
250...315 |
|
F 17 |
17.5 ± 2.0 |
|
32 |
315...400 |
|
F 23 |
23.0 ± 2.5 |
|
40 |
400...500 |
|
F 29 |
29.5 ± 3.0 |
|
50 |
500...630 |
|
F 37 |
36.5 ± 1.5 |
coarse |
63 |
630...800 |
|
F 45 |
44.5 ± 2.0 |
|
80 |
800...1000 |
|
F 53 |
53.0 ± 3.0 |
|
100 |
1000...1250 |
|
very fine |
4 |
40...50 |
|
125 |
1250...1600 |
|
5 |
50...63 |
very coarse |
160 |
1600...2000 |
|
6 |
63...80 |
|
200 |
2000...2500 |
|
fine |
8 |
80...100 |
|
250 |
2500...3150 |
Spreading densities of flexible sanding tools
|
Designation |
Symbol |
Explanation |
Application |
|
closed spreading density |
cl |
There lies grain next to grain partly also one above the other
|
for very hard materials and small amounts to be removed. |
|
half-open spreading density |
ho |
small spacing between the grains, the spacing is smaller than
the grain diameter |
for hand sanding; when sanding is made by machine for hard wood,
plastics and lacquers |
|
open spreading density |
op |
The grain spacing is greater than the grain diameter |
especially for sanding soft and resin-containing wood |
Information on labour safety
Do not use any worn abrasive belts. Abrasive belts must not be
tarnished because of the danger of rupture. Keep the running direction printed
on.
Recommendations for maintenance
Carefully suck abrasive belts in the interest of prolonged
between-grind life. Store flexible sanding tools at a temperature of 16...22
°C and a relative air humidity of 50...55
%.
9.8. Tools for Sharpening Machines
Tools for sharpening machines are solid abrasive tools. They are
multi-cut chip-forming tools with geometrically indeterminate cutting edges,
consist of the abrasive body, the bonding material and have a porous structure.
|
Name |
Symbol |
Application |
|
normal corundum |
NK |
sharpening of tools made of tool steel |
|
semi-precious corundum |
HK |
same as normal corundum |
|
precious corundum |
EK |
sharpening of tools made of tool steel and high-speed steel
|
|
ruby corundum |
RK |
sharpening of tools made of tool steel, high-speed steel and
high-alloyed steel |
|
diamond |
D |
for dressing solid abrasive tools |
Bonding materials for solid abrasive tools
|
Kind of bonding |
|
Properties and application |
|
vitrified bond |
ceramic |
unlimited storage stability, sensitive to breakage, shock and
impact, sharp, most frequently used kind od bonding |
|
magnesite silicate |
limited storage stability, low strength, good self-sharpening,
for sharpening instruments |
|
organic bond |
rubber synthetic resin natural resin |
very elastic, hardly any danger of breakage, good cutting
capacity, high peripheral speed possible, well suitable for thin-walled abrasive
tools (abrasive cutting tools) |
Grain sizes of solid abrasive tools*)
*) See also under 9.7. Grain sizes of flexible
sanding tools
|
Grain group |
Grain size 1/100 mm |
Application |
|
coarse to medium |
80...50 |
grinding of shank materials |
|
medium |
40...32 |
rough grinding of tool cutting edges |
|
medium to fine |
25...16 |
finish grinding of tool cutting edges |
|
fine |
12...8 |
superfine grinding |
|
very fine |
4...3 |
for whetting and honing |
Hardness of solid abrasive tools (selection)
|
Designation |
Symbol |
Application |
|
very soft |
H |
blades for cutter heads, stripe irons |
|
soft |
i |
blades for cutter heads and cutter block spindles, milling
cutters |
|
Jot |
like under i, and drills |
|
K |
like under Jot |
|
medium |
L |
milling and drilling tools |
|
M |
milling and drilling tools, saw blades |
|
N |
like under M |
|
hard |
S |
dressing bodies for solid abrasive tools |
Selection of typical solid abrasive tools and their
application
|
Kind of tool |
Abrasive material |
Grain size |
Hardness |
Application |
|
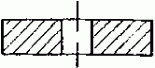
|
NK |
20...32 |
M |
hand grinding; plane iron and ripping chisel sharpening machine
|
|
chamfered on both sides
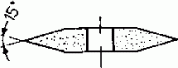 |
NK |
20...40 |
M |
saw sharpening machine |
|
round on both sides
 |
NK |
20...40 |
M |
saw sharpening machine |
|
chamfered on one side
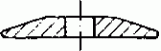 |
NK |
20...40 |
M |
saw sharpening machine |
|
cylindrical cup wheel
 |
EK |
63 |
H |
blade sharpening machine |
|
segmental tool
 |
RK/EK |
40...50 |
H |
blade sharpening machine |
|
tapered cup wheel
 |
EK |
25...32 |
Jot...N |
cutter sharpening machine |
|
dish wheel
 |
EK |
25...32 |
Jot...N |
cutter sharpening machine |
Information on labour safety
Carefully select the proper sharpening wheel. Do an obligatory
test run with every abrasive tool. Observe strictly the specified maximum
speeds. Use only well balanced abrasive tools.
Recommendations for maintenance
Keep solid abrasive tools in a hanging position. Mounting of the
abrasive tools must be done with greatest care. Use only abrasive tools provided
with all necessary specifications. Redress solid abrasive tools in time (to
ensure true
running).
| | | Formulae and Tables - Wood / textbooks for vocational training (GTZ, 122 p.) | | | 10. Setting-up of Tools | | | 10.1. Setting-up of Hand Tools | | | 10.2. Setting-up of Machine Tools |
|
Formulae and Tables - Wood / textbooks for vocational training (GTZ, 122 p.)
10. Setting-up of Tools
10.1. Setting-up of Hand Tools
Setting-up of hand saws
|
Operation
Representation |
Aids/tools |
Remarks |
|
cleaning of the saw blade |
petroleum thinner |
Remove glue residues, resin residues and similar |
|
clamping of the saw blade

1 saw
blade, 2 hand vice |
hand vice |
Clamp the saw blade horizontally, closely below the tooth gullet
line. |
|
checking of the top line
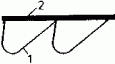
1 saw blade, 2 glass plate |
small glass plate or similar |
Differently long teeth lead to running-off centre of the saw;
the saw blade is jolting during sawing. |
|
dressing of the saw blade

1 saw
blade, 2 gauge made of wood (dimensions in cm), 3 flat file |
clamped flat file |
File a uniform tooth line. |
|
checking of the tooth form
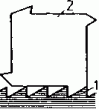
1 saw
blade, 2 plate template |
sheet-metal template for tooth - forms |
Find out which teeth are to be corrected. |
|
corrective filing of such teeth which deviate in form and
size

1 saw blade, 2 saw file |
saw file |
Hold the file horizontally and at right angles to the saw blade.
|
|
reclamping of the saw blade for saw setting with the saw
set
1 saw blade, 2 stop bar, 3 hand vice
|
hand vice and stop bar |
The teeth uniformly project 1/3 of their height beyond the stop
bar. |
|
saw setting with the saw set
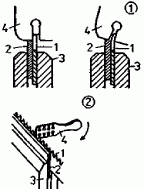
(1)
schematic representation
(2) representation showing the principle of
operation
1 saw blade, 2 stop bar, 3 hand vice, 4 saw set |
saw set |
At first set every other tooth to one side and then - after
resetting the bar and the saw blade - the rest of the teeth uniformly to the
other side.
The clearance of the saw blade in the saw set slot is ³ 0.1 mm; amount of deflection: 1/2 saw blade thickness
to each side. |
|
saw setting with saw set pliers
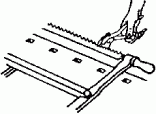 |
saw set pliers |
Set the setting height and amount of deflection (setting width)
on the saw set pliers. Mount without rule. |
|
checking of the setting width

(1)
Schematic representation
(2) Representation showing the principle of
operation
1 saw blade, 2 saw setting gauge, 3 setting width |
saw setting gauge |
Move the saw-setting gauge with the recessed edge past the teeth
in the blade plane. |
|
correction of incorrectly set teeth |
saw set or saw set pliers |
Reset or further deflect the teeth concerned by the amount
necessary. |
|
equalizing

1 saw blade, 2 saw
setting gauge, 3 setting width |
flat file or hone |
Slightly “equalize” on the tooth line and at the tooth
profile before sharpening to compensate the different resetting ability of the
saw teeth. |
|
sharpening (filing) of the saw blade

1 saw blade, 2 hand vice, 3 sharpening file, 4 direction
of pushing, 5 direction of filing |
sharpening file |
Clamp the saw blade into the hand vice; tooth gullet line at the
most 5 mm above the jaws. Hold the file exactly horizontally and at right angles
to the saw blade; the same number of file strokes in every tooth space. File
against the direction of the cut, move the file with uniform pressure. The tooth
is sharp, when the tooth crest is not bright any more, but appears dull. File
cutting face and flank uniformly. |
Mistakes made when setting-up hand saws
|
Kinds of mistake
Representation |
Effects of the mistake |
|
missing or too small tooth set
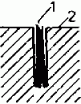
1
saw blade, 2 workpiece |
the saw is jamming or drifting |
|
too large tooth set
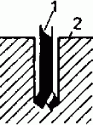
1 saw blade,
2 workpiece |
unclean cut and bad guidance of the saw |
|
one-sided tooth set
1 saw blade,
2 workpiece |
the saw deviates from the true course |
|
tooth set too deep (whole tooth height deflected)
1 saw blade, 2 workpiece |
danger or cracking at the tooth gullet; insufficient stability
of the saw blade |
|
filing into the direction of the cut
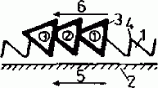
1 saw blade, 2 hand vice, 3 sharpening file, 4 filing
burr, 5 direction of pushing, 6 direction of filing |
the burr forming at the primary cutting edge acts in the
direction of the flank and reduces the cutting effect |
|
canting on the sharpening file

1
saw blade, 2 sharpening file |
chip removal at the flank or cutting face too great; differences
in the tooth height and wedge angle occur; cutting capacity is reduced, as only
a part of the teeth is working; the saw is hacking |
|
deviation of the file position from the horizontal
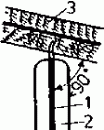
1 saw blade, 2 hand vice, 3 sharpening file |
chamfering of the flank, change of the tooth height, reduction
of the cutting effect |
|
file position not at right angles to the saw blade

1 saw blade, 2 sharpening file |
chamfering of the flank, change of the tooth height, reduction
of the cutting effect |
Setting-up of plane irons and chisels
|
Operation representation |
Tools/aids |
Remarks |
|
cleaning of the plane iron and the flap or chisel |
petroleum or similar |
Remove resin and glue residues. |
|
Checking of observance of safety regulations |
|
Use safety goggles or safety glass. Spacing between tool support
and abrasive tool must be correct. Mounting flange diameter must be correct.
Observe maximum permissible peripheral speed of the abrasive tool. Do test run
of the abrasive tool. |
|
Checking of the cutting edge
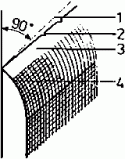
1
cutting edge not at right angles, 2 jagged cutting edge, 3 dull cutting edge
(bright edge), 4 cambered (round) land |
|
Sharpen only when it is not possible any more to get a good
cutting edge by dressing. |
|
clamping of the plane iron
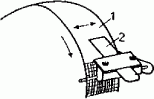
1
sharpening wheel, 2 plane iron |
plane iron and ripping chisel sharpening machine |
Firmly clamp the plane iron into the carriage, grind against the
direction of rotation of the wheel. |
|
setting of the angle of support of the tool support
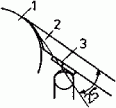
1 sharpening wheel, 2 plane iron, 3 support for plane
iron |
plane iron and ripping chisel sharpening machine |
plane iron rest is sufficient; setting e is to be made in such a
way that the correct wedge angle (27°) is reached.
Cool the plane iron.
|
|
reduction of the land width

1
sharpening wheel, 2 plane iron |
plane iron and ripping chisel sharpening machine |
This is necessary, if the wedge angle is too small.
Cool the
plane iron. |
|
increase in the land with
1
sharpening wheel, 2 plane iron |
plane iron and ripping chisel sharpening machine |
This is necessary, if the wedge angle is too great.
Cool the
plane iron. |
|
sharpening of the ripping chisel (straight flank)
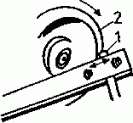
1 ripping chisel, 2 cup wheel |
sharpening machine and cup wheel |
Clamping fixture is necessary. The straight flank produces a
completely wedge-shaped cutting edge. It penetrates better into the wood. |
|
sharpening of turning tools (like ripping chisel with straight
edge)
|
sharpening machine and cup wheel |
Clamping fixture is not absolutely necessary; tool support is
sufficient, because due to the greather wedge angle of the tool cutting edge
(see 7.4.) the angle of inclination of the tool to the sharpening wheel is
considerably flatter than for the ripping chisel. |
|
honing of plane irons and ripping chisels
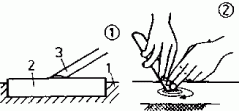
(1) Schematic representation
(2) Representation of
principle operation
1 wooden strip, 2 inserted hone, 3 plane iron
|
hone |
Clamp the hone in position, firmly put on the land of the tool,
hone with circular movements over the whole surface of the hone. Hone
alternately the land and the minor surface of the tool, until the sharpening bun
falls off by itself. |
|
Honing of turning tools
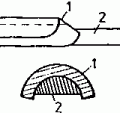
1 turning tool, 2 shaped stone |
hone |
Turning tools are honed by means of round, half-round or shaped
stones.
Move the stone on the tool. |
|
Setting-up of the plane iron flap

1 plane iron, 2 flap |
sharpening file, hone |
File the front edge of the flap until it is at right angles to
the central axis of the flap, has a width of 1 mm over the whole of its length,
firmly rests on the minor surface of the tool after tightening the screw, has a
uniform spacing to the cutting edge of 0.5... 1.0 mm; polish the bun edge
brightly with a very fine hone. |
Setting-up of the scraper
|
Operation representation |
Tools/aids |
Remarks |
|
filing of the scraper
1 pack of
scrapers, 2 work supporting block, 3 hand vice, 4 flat file |
vice, 2 hard wood blocks, flat finishing file |
Clamp packs of several pieces between 2 hard wood blocks in the
vice, align the edges in one plane, file the edges to be rectangularly even,
longitudinal direction must be exactly straight, slightly round the comers.
|
|
Honing of scrapers
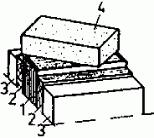
1 pack of the
scrapers, 2 work supporting block, 3 hand vice, 4 hone |
coarse hone |
Regrind the pack of filed scrapers by circular movement until
the surface is completely smooth. |
|
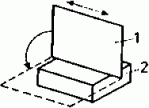
1 scraper, 2 hone
|
fine-grain hone |
Hone the narrow and broad sides until the burr is completely
removed and the edges are sharp-edged. |
|
scraping off of the scraper

1
scraper, 2 scraper steel, 3 supporting block |
scraper steel |
Place the scraper steel evenly on the scraper. Scrape off the
surfaces under pressure from the centre outwards. |
|
scraping of the cutting burr
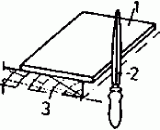
1
scraper, 2 scraper steel, 3 supporting block |
scraper steel |
Scrape the edge of the scraper with the scraper steel under
moderate pressure. This produces a cutting bun.
The burr can be enlarged by
scraping several times. |
|
resharpening of the scraper |
scraper steel |
A dull burr can be scraped off with the scraper steel and
renewed several times, before filing becomes necessary again (round edges).
|
Setting-up of drilling tools
|
Operation representation |
Tools/aids |
Remarks |
|
cleaning of drills |
petroleum or similar |
Remove impurities (resin residues etc.). |
|
sharpening of the centre point
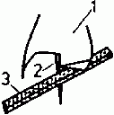
1
drilling tool, 2 centre point, 3 sharpening file |
sharpening file, hone |
File and hone the centre point uniformly from all sides until
all file traces are removed. |
|
no filing of the infeed thread

1
drilling tool, 2 infeed thread |
|
|
|
sharpening of entering taps
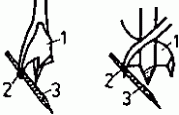
1
drilling tool, 2 entering tap, 3 sharpening file |
sharpening file, hone |
File the entering taps only from inside, then hone until all
file traces are removed. |
|
sharpening of lips
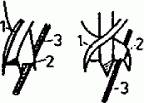
1 drilling
tool, 2 lip, 3 sharpening file |
sharpening file, hone |
File lips from below, do not interrupt the connection between
the lips and the infeed thread, hone carefully. |
|
sharpening of twist drills with roof-shaped point

1 twist drill with roof-shaped point, 2 sharpening
wheel, 3 swivel range |
plane iron and ripping chisel sharpening machine, grinding gauge
|
Take the body of the drill with thumb and forefinger of the
right hand. The left hand holds the drill at the shank and carries out an upward
and downward movement of the drill between the horizontal and an imaginary line
15° below the horizontal. In doing so, continuously check by means of the
grinding gauge the point angle, the shape of the cutting edges under the same
angle, the concentricity of the point, the position of the chisel edge and the
wedge angle. |
|
checking of sharpening
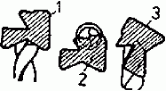
1
checking of the drill point angle, 2 checking of the position of the chisel
edge, 3 checking of the wedge angle |
|
|
10.2. Setting-up of Machine Tools
Setting-up of circular saw blades and band saw blades
|
Operation Representation |
Tools/aids |
Remarks |
|
cleaning of the saw blade |
petroleum, thinner |
|
|
setting of the saw blades
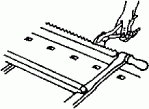 |
setting pliers, set gauge, setting dial gauge |
Use setting pliers. Because of its greater accuracy the setting
dial gauge is more suitable than the set gauge for checking the setting width.
|
|
clamping of the circular saw blade into the sharpening machine
|
sharpening machine |
Saw blade bore hole must fit exactly on the centring taper; put
grinding wheel head into highest position, set tooth height greater than
necessary. |
|
setting of the saw blade thickness
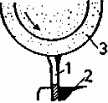
1 saw blade, 2 adjustable stop, 3 sharpening wheel
|
sharpening machine |
Middle of the saw blade exactly under the middle of the axis of
the abrasive tool. |
|
setting of the rake angle |
sharpening machine |
In case of band saw blades set according to the scale of rake
angles of the sharpening machine - choose it a little greater at first. |
|
setting of the saw pitch
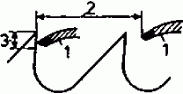
1 feed
finger, 2 path of the feed finger, 3 upper third of the saw tooth |
sharpening machine, measuring tape |
Measure the pitch at the saw blade and set it on the saw pitch
scale of the machine. |
|
fine setting of the tooth feed

1
sharpening wheel, 2 feed finger |
sharpening machine |
Switch on the machine, set the tooth feed so that the abrasive
tool coming down slightly attacks the cutting face. |
|
setting of the moment of shear |
sharpening machine |
The feed must start to act at the moment when the abrasive tool
reaches the tooth gullet. |
|
sharpening |
sharpening machine, hone |
At least 4 sharpening passes are necessary; material removed per
pass 0.05...0.1 mm; in the last pass only minimum metal removal (0.01... 0.03
mm); carefully remove the sharpening burr with a fine hone. |
|
setting of the tooth height
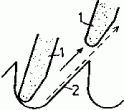
1
sharpening wheel, 2 flank of the saw tooth |
sharpening machine |
Fine setting:
Abrasive tool must run parallel to the flank.
|
|
checking of the top line |
glass plate or tooth crest dial gauge |
Check band saw blades like hand saws (see par. 10.1.), check
circular saw blades with tooth crest dial gauge. |
|
checking of cutting edge angles

1 rake angle gauge, 2 wedge angle gauge |
bevel steel square, plate template, wedge angle gauge or similar
|
Check either with plate template as is done in the case of hand
saws or with wedge or rake angle gauge or with bevel steel square. |
Mistakes made when sharpening the saw blades
|
Sharpening mistake |
Cause of mistake |
Effect of mistake |
Elimination of mistake |
|
uneven flank |
feed is acting too early (flank becomes hollow) or too late
(flank will get lugs) |
chip diasposal rendered more difficult, warming-up and drifting
of the saw blades |
Set the moment of shear correctly. |
|
tooth gullet radius too great |
saw pitch set to small |
low stability of the saw teeth, drifting of the saw blade |
Increase the travel of the feed pawl. |
|
tooth gullet radius too small |
profile of the sharpening wheel rounded too little, wheel too
thin |
drifting of the saw blade at higher feed |
Choose proper sharpening wheel, reduce the travel of the feed
pawl. |
|
tooth height too great or too small |
machine wrongly set |
changed tool geometry, shorter cutting life of the cutting edge,
drifting of the saw blade |
Correct the fine setting of the tooth height. |
|
tooth height not uniform |
axis of the sharpening wheel not exactly above the middle of the
saw blade |
load on the saw teeth not uniform, quicker dulling, worse
cutting quality |
Check the guidance of the saw blade and correct it. |
|
discolouration of teeth crests |
too much material removed by grinding or peripheral speed of the
sharpening wheel too high or sharpening wheel too hard |
loss of strength of the teeth crests, quicker dulling, drifting
of the saw blade |
Correct the sharpening wheel’s action and the tooth feed,
choose another sharpening wheel. |
|
saw pitch not uniform |
tooth feed wrongly set, the sharpening wheel coming down too
late attacks the cutting face too heavily |
load on the saw teeth not uniform, drifting of the saw blade,
worse cutting quality |
Reset the sharpening wheel action on the cutting face. |
|
wedge angle altered |
tooth height setting too great (wedge angle becomes smaller) or
too small (wedge angle becomes greater) |
altered tool geometry, worse cutting conditions, higher load on
the saw teeth |
Correct the fine setting of the tooth height setting. |
|
remaining of a sharpening burr |
great abrasion, dull or excessively coarse-grained sharpening
wheel |
quicker dulling of the cutting edges |
Make last sharpening pass with only little abrasion. |
Setting-up of stripe irons
|
Operation
Representation |
Tools/aids |
Remarks |
|
cleaning of the stripe iron and the clamping surface |
solution |
Cleaning also serves for preventing grinding inaccuracies. |
|
clamping of stripe irons for sharpening

1 stripe iron, 2 clamping plate, 3 detent of stripe
iron |
sharpening machine |
Clamp the stripe irons on the grinding beam so that the cutting
edges project about 2 mm beyond the grinding beam and the sharpening wheel can
run a few centimetres beyond the end of the stripe iron. When clamping is made
in a vice, clamp from the middle of the stripe iron outwards. |
|
infeed grinding |
sharpening machine |
Infeed the sharpening wheel according to the desired degree of
keenness by 0.01...0.03 mm each. |
|
abrasive machining |
sharpening machine |
Grind in one pass; infeed according to the degree of dulling
0.1...0.4 mm. |
|
flat grinding |
sharpening machine |
Cup wheel is without tilt angle. |
|
finish grinding |
sharpening machine |
Grind with moderate pressure. In the last pass the sharpening
wheel must come clear. Always grind against the land. |
|
hollow grinding

(1) view in the
running direction of the cup wheel
(2) view at right angles to the running
direction of the cup wheel
1 stripe iron, 2 cup wheel, 3 tilt angle
|
sharpening machine |
Tilt the cup wheel by 2...3º in the running direction of
the grinding wheel head; multiple honing is possible. |
|
honing
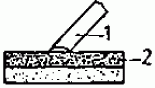
1 machine iron, 2 hone
with rough and fine sides |
sharpening machine |
Remove the grinding burr and fine traces of grinding. Hone only
at the cutting face and always in longitudinal direction of the cutting edge.
Hone must firmly be placed in position. |
Setting-up of milling cutters
|
Operation
Representation |
Tools/aids |
Remarks |
|
mounting of the cutter on the grinding arbor; centring |
sharpening machine |
Centring is made by means of centring rings. |
|
aligning of the cutting edges for sharpening |
sharpening machine |
Align always according to the shortest cutting edge which is
determined by means of the dial gauge. |
|
grinding of the tool face

1
milling cutter, 2 sharpening wheel |
sharpening machine |
Grind relief-turned cutters only at the tool face.
Regrind
cutters with straight flank (straight relief grind) at the tool face only
slightly (infeed axially). |
|
radial infeeding
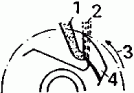
1 sharpening
wheel, 2 material removed in grinding, 3 infeed, 4 milling cutter |
sharpening machine |
Relief-turned cutters must be fed to the sharpening wheel
radially, i.e. they must be turned around the axis during feeding. |
|
checking of the cutting rake |
sharpening machine, protractor |
In order to ensure always the same cutting rake, the chip
removal over the whole tool face is not uniform (chip removal increasing towards
the periphery). |
|
grinding of the flank |
sharpening machine |
Sharpen cutters with straight flank (see par. 9.4.) at the tool
face and flank (with the exception of grooving and tonguing cutters which are
sharpened only at the tool face). |
|
axial infeeding
1 milling
cutter, 2 sharpening wheel, 3 infeed |
sharpening machine |
Sharpen cutters with straight flank mainly at the flank, in-feed
axially. |
|
sharpening |
sharpening machine |
Grind all cutting edges uniformly. |
|
dressing of the sharpening wheel |
sharpening machine, silicon carbide stone |
In case of considerable dulling of the cutting edges dress the
sharpening wheel once more before finish grinding. To do this, hold the silicon
carbide stone by freehand at an angle of 10...15° against the rotating
sharpening wheel. |
|
finish grinding |
sharpening machine |
In the final pass feed the sharpening wheel only slightly so
that the sharpening burr can easily be removed. |
|
removing of the sharpening burr |
sharpening machine, hone |
Carefully hone the cutting edges to remove the sharpening burr.
|
|
checking for true running |
sharpening machine dial gauge |
All cutting edges must lie on the same cutting circle (run-out
£ 0.02 mm). |
|
regrinding |
sharpening machine |
Regrind projecting cutting edges individually to lie on the
cutting circle. |
| | | Formulae and Tables - Wood / textbooks for vocational training (GTZ, 122 p.) | | | 11. Gluing of Wood | | | (introduction...) | | | 11.1. Important Terms of the Gluing Techniques | | | 11.2. Kinds, Properties and Processing of Important Glues | | | 11.3. Gluing Mistakes and Their Causes |
|
Formulae and Tables - Wood / textbooks for vocational training (GTZ, 122 p.)
11. Gluing of Wood
Gluing of wood implies permanently joining several workpieces to
improve technical or optical
properties.
11.1. Important Terms of the Gluing Techniques
|
Term |
Definition |
|
period of maturing (swelling) |
1 period from mixing or stirring solid glues with the gluing
liquid (also period from mixing the components of a multi-component glue) to
reaching a workable condition |
|
solid content |
non-volatile portion of glues which remains after the
volatilization of the solvents or which is forming during hardening by chemical
conversion |
|
extenders |
substances which are added to glues to improve the joint
stability or to lower the glue costs; they have a bonding power of their own
|
|
fillers |
substances added to the glues to reduce the glue costs (no
inherent bonding power) |
|
pot life |
period from preparing the glue mix or from taking the glue out
of the packing to the time the glue remains workable |
|
waiting period |
period for keeping the parts to be joined at room temperature
between glue spreading and applying pressure on the glued joints |
|
open waiting period |
time between glue spreading and putting the parts together |
|
closed waiting period |
time between putting the parts together and loading the pressing
facility |
|
gluing temperature |
according to the processing temperature we distinguish between:
|
|
|
cold gluing at 10...30 °C |
|
|
warm gluing at 30... <100 °C |
|
|
hot gluing at a 100 °C |
11.2. Kinds, Properties and Processing of Important Glues
|
Property/Operation |
Glutin glue |
Casein glue |
PVA glue |
Urea-formaldehyde glue |
|
swelling period |
10...90 min |
30...60 min (period of maturing) |
|
|
|
melting temperature |
>30...40 °C |
|
|
|
|
solid content |
20...50 % |
30...40 % |
» 50% |
60...70 % |
|
pH value |
5.5...9.0 |
10.0...14.0 |
4.0...5.0 |
7.0...8.0 |
|
moisture content of wood |
4...10 % |
4...10 % |
8...12% |
8...12 % |
|
pot life at 20 ºC |
|
4...12h |
|
according to the kind of glue and hardening from 30 min to
several hours |
|
open waiting period at 20 °C |
|
5...10 min |
5...30 min |
according to the kind of glue and hardening from 5 min to
several hours |
|
spread |
150...170g/m2 |
180...250g/m2 |
150...220 g/m2 |
80...150 g/m2 |
|
pressure |
0.6...1.2 MPa |
0.5...1.0 MPa |
0.1...1.2 MPa |
0.6...2.0 MPa |
|
pressing temperature |
10...50 °C |
10...100°C |
20...50 °C |
20...90°C |
|
pressing time |
2...4 h |
cold 2...4 h |
10...60 min |
0.5...4h at 20°C |
|
storage ability |
dry rooms at 65 ± 5 % relative air humidity for prolonged
storage |
4...6 months when kept airtight |
several months in tightly closed containers |
liquid: 3 months, powder: 12 months at 20 °C each |
|
application |
construction of chests and frame furniture, assembly gluing, for
veneering with warmed-up press plates |
making of joinery structural elements, repair work, for
veneering |
in furniture construction, window, door and interior work,
gluing wood and plastic material together, for veneering |
construction of furniture and frame furniture, interior work,
construction of windows and doors, for veneering, for all kinds of repairs |
|
Hints for use |
|
glue selection |
water-soluble warm gluing |
water-soluble cold or warm gluing |
water resistant cold or warm gluing |
like PVA glue |
|
glue preparation |
initial swelling, melting at = 70 °C; addition of water
influences spread-ability |
dissolve powered glue in glass or porcelain vessels |
ready for use as delivered |
Either mix glue and hardener solution in the ratio specified or
make both available in glass or porcelain vessels. |
|
preparation of the workpiece |
warm up the surfaces to be glued; warm up and wax the press
plates when veneering on Oat workpieces |
for warm gluing like glutin glue; for cold gluing just lay out
the work-pieces |
like casein glue |
like casein glue; make sure to label the vessels for glue and
hardener (danger or mixing up) |
|
glue spreading |
by means of a brush or roll spread the glue rapidly, uniformly
and thin on the two surfaces to be joined |
like glutin glue |
like glutin glue |
When applying the mixing technique, spread as described for
glutin glue; otherwise coat one of the surfaces to be joined with glue, the
other one with hardener. |
|
pressing of the glued joint |
join the parts coated with glue by means of a screw clamp; put
flat parts together with the heated press plates into the hand screw press |
for warm gluing like for cold gluing press use cold press
plates, |
glutin glue; plates are not if need be |
absolutely necessary, |
11.3. Gluing Mistakes and Their Causes
|
Kind of mistake |
Description of mistake |
Causes of mistake |
Elimination of mistake |
|
glue bleed-through |
bleeding of the glue through the pores of the face veneer |
glue unsuitable or too thin, insufficient addition of filler or
extender, thin or coarse-pored veneers, excessive pressure, excessive pressing
temperature, moisture content of the wood too high |
If glutin glue is used, wash out with bronze wire brush and warm
water (add oxalic acid, if required. Wash out PVA glue immediately after
veneering, otherwise not possible any more. |
|
discolouration |
colour changes caused by chemical processes between wood
components and substances added to the wood during working |
wood with high content of tanning agents, hardener vapours,
excessive pressing temperature |
Wash out iron discolourations (blue) with oxalic acid, eliminate
discolourations to the red caused by high pressing temperatures by cooling the
workpieces for several minutes after pressing. |
|
visible and invisible bubbles and similar |
Poor gluing as bubble is visible immediately after pressing,
invisible bubble is visible only after contact with moisture. |
insufficient or uneven glue spreading, insufficient pressure,
exceeding of the open or closed waiting period, wood too dry, pressing times too
short |
Cut open and glue again the - defective spots, if number and
size of the poorly glued spots allow this. |
|
uneven spots and similar |
thickness differences on the veneered workpiece |
uneven glue spreading, improperly made cores, joints in
cross-band veneer, cross-band veneers or face veneers lying one above the other
|
hardly possible |
|
warping, distortion |
deformation of panel-shaped workpieces in the plane |
one-sided veneering of base material, different moisture of the
coating material used |
hardly possible |
|
marking of veneer joints |
|
use of inaccurately joined veneers, poorly glued veneer joints,
excessive veneer moisture |
hardly possible |
|
loosening of the glued joint |
gluing destroyed or not achieved at all |
preheating temperature of the parts to be glued too high;
misfitting of the parts glued; moisture differences of glued parts |
not possible |
|
insufficient stability of the glued joint |
|
gluing of uneven surfaces; gluing of dirty surfaces; use of
dowels made of unsuitable wood, uneven glue spreading insufficient preheating of
the surfaces to be glued |
not possible |
|
marks |
base material shows through the covering material |
high pressures when gluing thin sheets on frame elements, use of
highly viscous glues for gluing thin hygroscopic sheet materials on frame
elements |
not possible |
|
waviness of the surface |
deformation in the plane of sheet materials |
processing of improperly made sandwich panels with solid wood
core, excessive pressure during processing of sandwich panels with hollow core
|
not possible |
| | | Formulae and Tables - Wood / textbooks for vocational training (GTZ, 122 p.) | | | 12. Surface Treatment of Wood | | | (introduction...) | | | 12.1. Substances for Surface Treatment | | | 12.2. Use of the Coating Compositions | | | 12.3. Examples of Wood Coating Systems |
|
Formulae and Tables - Wood / textbooks for vocational training (GTZ, 122 p.)
12. Surface Treatment of Wood
The surface treatment of wood includes all techniques by which
the wood surface is changed in its properties and is coated with liquid
substances.
12.1. Substances for Surface Treatment
Substances for deresinification
|
Name |
Composition |
Mode of application |
|
solvents |
physically acting organic compounds (e.g. acetone) |
Apply by means of a sponge or similar, then rub with a clean
roll of cloth, wash with warm water. |
|
saponification agent |
chemically acting alkaline compounds (e.g. ammonia water) |
Apply several times with a sponge, let it rest for 10 - 15
minutes, treat with a brush, neutralize with 10 % acetic acid, then wash with
warm water. |
Bleaching agents
|
Name |
Mode of application |
Use |
|
bleach liquor |
Apply solution of 40 g of soda, 50 g of chloride of lime and 30
g of potash in 11 water by means of a brush; after treatment with 5 % warm
sodium thiosulphate solution |
for bleaching basic consumer goods and especially fir wood; good
ventilation of the working rooms necessary. |
|
acetic acid |
Apply 5...10 % solution in warm state and wash and brush out
thoroughly. |
for especially sensitive wood species |
|
potash lye and hydrogen peroxide |
Precoat with aqueous potash solution, then apply hydrogen
peroxide, finally apply acid neutralizing agent. |
suitable for all wood species, removes blue stains, mould stains
|
|
sodium hydrogen sulphite |
Apply warm 3...5 % solution and then wash thoroughly. |
especially suitable for walnut wood |
|
oxalic acid and salt of sorrel |
Apply warm 2.5...5 % solution, let it harden and then wash
thoroughly. |
especially for tanniferous wood; also removal of rust and ink
stains - bleaching agent is toxic, |
|
hydrogen peroxide |
Apply 30...35 % solution in sufficient quantity. |
mainly for low-tanniferous wood species and for coniferous wood
species |
|
hydrogen peroxide and ammonia water |
Apply hydrogen peroixide solution with 10 % ammonia water by
means of a brush. |
for quick bleaching of small surfaces |
|
citric acid |
Apply 3...5 % solution in a hot state, then wash and brush out
well. |
for brightening tanniferous wood and for removing stains caused
by iron-tanning agent reactions and blue stains |
|
Technique |
Properties |
Use |
|
plain staining |
solutions of heavy metal salts with dyestuffs |
only for tanniferous wood species |
|
double staining |
Preliminary stains contain tan-like compounds, stains for the
second coating contain various metal salts |
for low-tanniferous wood; apply the second coating of stain only
after the preliminary stain has dried; stains are water-insoluble and resistant
to light |
|
wax staining |
solutions of metal salts, dyestuffs and wax additives ready for
use |
for all wood species, not in furniture construction, mat finish
effect due to wax portion |
Dyestuffs
|
Name |
Properties |
Use |
|
water-soluble dyestuffs |
made of acid coal-tar dyestuffs and supplementary agents,
dissolve in soft water, good penetrability, high light resistance, no or only
low water resistance |
for all wood species |
|
spirit-soluble dyestuffs |
solution of dyestuffs in spirit or in low-binder varnish; good
penetrability, low light resistance, low water resistance |
for colouring small workpieces, for example in the production of
wooden articles or toys |
Smoothing agents
|
Name |
Properties |
Use |
|
pore filler |
pulpy mixture consisting of 40...50 % binder (of drying oils or
SH, UP or PUR lacquers) and 50...60 % pore filler powder (heavy spar powder,
gypsum, kaolin, quartz powder and others) as well as dyestuffs |
for coarse-pored timbers with subsequent lacquer coating;
rubbing in of the pore filler by hand with rolls of cloth, after drying removal
of the excess filler with a soft, spirit-impregnated cloth |
|
putty |
binder as described for pore filler plus fillers and dyestuffs,
if required |
for smoothing surfaces (e.g. raw chipboards), which afterwards
are to be coated with coloured varnishes; only seldom applied by hand with putty
knife, mostly with special machines; filled surfaces are to be ground after
drying |
Coating compositions
|
Name |
Components |
Properties |
|
oil varnishes |
drying oils and resins; an oil-to-resin ratio of 1:1 to 1:3
yields short-oil varnishes, a ratio of 3:1 to 5:1 yields long-oil varnishes
|
good adherence of the varnish coating, resistant to climatic
influences and moisture as well as chemicals, low hardness of the varnish
coating, but high elasticity, slow drying; dyestuffs can be added |
|
cellulose nitrate lacquers (NC lacquers) |
collodion cotton, solvents such as toluene, ethyl acetate, butyl
acetate and other organic compounds as well as fillers and softeners |
combinable with other coating compositions, quick-drying,
various levels of gloss possible, lacquer coating is elastic; not
moisture-resistant, temperature-sensitive, not resistant to solvents, to oils,
acids, lyes and alcohols |
|
alkyd varnishes |
alkyd resins, oils and solvents |
approximately like oil varnishes, extraordinarily elastic films,
high resistance to mechanical influences and climatic influences, water-proof
|
|
acid-hardening varnishs (SH-varnishes) |
synthetic resins, (urea resin, phenolic resin); solvent, filler
and softener, acids as hardener |
high adherence, elastic and hard varnish coating, resistant to
water, alcohol, spirit and a great number of solvents, temperature-resistant and
non-ageing, resistant to mechanical load |
|
polyurethane lacquers (PUR lacquers) |
polyacrylate or polyester resins as well as solvents, pigments
and fillers, in addition to this isocyanate as secondary component |
incompatible with oil and alkyd varnishes, good adherence, hard
and abrasion-resistant coatings, resistant to water, alcohol, solvents,
variations of temperature |
|
polyester lacquers (UP lacquers) |
unsaturated polyester resin (hence UP lacquers), styrene and as
hardener of organic peroxides in solvents |
mainly for industrial processing, wood components may cause poor
adherence (e.g. with the wood species Jacaranda, Iroko, B�t�), combination with
other kinds of lacquer possible; resistant to water, alcohol and many other
substances, resistant to mechanical load and variations of temperature, brittle,
cracking under impact load |
|
polyvinyl acetate coating (PVA coating) |
polymerized vinyl acetate, softener, fillers, pigments |
water-dilutable, therefore not inflammable, not dangerous to
health; good opacity, air-permeable, “breathing” of the undersurface
possible |
Solvents (selection)
|
Name |
Properties |
|
ethyl alcohol |
colourless, boiling point 78 °C, inflammable, miscible with
water and all usual organic solvents, highly toxic |
|
ethyl acetate |
colourless, inflammable, boiling point 77.1 °C,
non-miscible with water |
|
acetone |
colourless, inflammable, boiling point 56.3 °C, highly
volatile, miscible with water and most of the organic solvents |
|
benzene |
colourless, very inflammable, boiling point 80.1 “C,
non-miscible with water, but miscible with organic solvents, vapours highly
toxic |
|
butyl acetate |
colourless, inflammable, boiling point 118 °C, non-miscible
with water, but miscible with organic solvents |
|
methanol |
colourless, inflammable, boiling point 64.7 °C, miscible
with water, highly toxic |
|
methylene chloride |
colourless, non-miscible with water, boiling point 41.6 °C
|
|
toluene |
colourless, inflammable, boiling point 110.8 °C,
non-miscible with water |
|
xylene |
colourless, inflammable, boiling point 139...140 °C, little
soluble in water, easily soluble in some organic solvents |
12.2. Use of the Coating Compositions
|
Name |
Mode of application |
Range of application |
|
oil varnishes |
multilayer application by brushing, spraying, rolling or
dipping, spread per application:
linseed oil-priming oil 80...120
g/m2
priming paint 120...300 g/m2
coating varnish
100...250 g/m2 |
fats, slowly drying varnishes for exterior coatings (e.g.
windows), short-oil, quicker drying varnishes for interior coatings (e.g.
floors) |
|
NC lacquers |
multilayer application by brushing, spraying, rolling, casting
or dipping 1st spread:
lacquer-to-thinner ratio 3:1
intermediate
sanding
2nd spread: ratio 1:1
3rd spread: heavily thinned, rub with
polishing cloth
spread - 400 g/m |
for furniture and interior varnishing, for toys, arts and
crafts, musical instruments |
|
alkyd varnishes |
like oil varnishes |
coatings with high stability like floors as interior coating and
windows and doors as exterior coating; but also as boat varnish (water and
weather resistance) |
|
acid-hardening varnishes (SH varnishes) |
mixing of the components in the specified ratio in non-metallic
vessels; 1 to 3 spreads by brushing, spraying, casting, rolling;
spread
£ 140 g/m |
for interior coatings which are under stress, but also for
exterior coatings; for furniture, sports equipment, windows, doors, parquet and
in vehicle construction |
|
polyurethane lacquers (PUR lacquers) |
mixing of the two components in the specified ratio; spreading
in 1...2 applications by brushing, spraying, casting or rolling;
spread
£ 250 g/m2 |
for interior furnishings, for sports equipment, staircases,
parquet, in vehicle construction, as boat varnish and for plastic coatings |
|
polyester lacquers (UP lacquers) |
used mainly industrially; several applications according to the
kind of spreading; putty, primer and lacquer are applied separately by spraying,
casting or rolling;
lacquer spread 80...200 g/m2 |
especially for living room furniture, but also for other
purposes like ship interior work and as boat varnish |
|
polyvinyl acetate coatings (PVA coatings) |
thinning with water as much as necessary, several applications
according to the desired effect, spreading mainly by brushing;
as PVA
coatings are not glossy, a finish coat with oil or alkyd varnish is applied on
the PVA priming coat, if required;
spread (both priming coat and finish coat)
110...150g/m2 |
for all kinds of interior coatings, but also for exterior
coatings |
12.3. Examples of Wood Coating Systems
|
Coating systems |
Number of coats |
Examples of application |
|
exterior coating |
|
linseed oil-priming oil |
1 |
for doors, windows, bungalows, sheahting, |
|
oil priming paint for outside |
1...2 |
fences, window boxes |
|
oil varnish for outside |
|
|
|
linseed oil-priming oil |
1 |
shutters, bungalows, espaliers, windows and doors |
|
alkyd priming coat |
1...2 |
|
|
alkyd varnish outside |
1 |
|
|
PVA latex priming coat |
1 |
huts, fences |
|
PVA latex finish coat |
2 |
goods wagons |
|
PUR impregnating primer |
1 |
windows and |
|
PVA latex paint |
1 |
other structural |
|
PUR varnish for outside |
1 |
elements |
|
PUR adhesive filler |
1 |
coating of plastic parts |
|
SH mat varnish |
1 |
and foamed plastic parts |
|
interior coatings |
|
linseed oil-priming oil |
1 |
coloured varnishing of doors, |
|
oil priming paint for indoors |
1...2 |
banisters, small and kitchen |
|
oil varnished for indoors |
1 |
furniture (inside) |
|
PVA latex priming coat |
1...2 |
sheathings, floors, |
|
PVA latex finish coat |
1 |
kitchen furniture (inside) |
|
linseed-oil-priming-oil |
1 |
glossy outside coating |
|
PVA latex priming coat |
1...2 |
of kitchen furniture |
|
alkyd priming coat |
1 |
|
|
alkyd varnish |
1 |
|
|
NC dipping varnished, colourless or NC quick sanding primer
|
1...2 |
frame furniture |
|
SH finishing varnish, colourless |
1...2 |
|
|
PUR impregnating primer |
1 |
doors, banisters |
|
PUR adhesive filler |
1 |
and similar |
|
PUR varnish for indoors |
1 |
|
| | | Formulae and Tables - Wood / textbooks for vocational training (GTZ, 122 p.) | | | (introduction...) | | | Preface | | | 1. Wood | | | 2. Materials Made of Wood | | | 3. Plastic materials | | | 4. Glass Materials | | | 5. Steel | | | 6. Basic Terms of Cutting | | | 7. Hand Tools | | | 8. Wood Working Machines | | | 9. Tools | | | 10. Setting-up of Tools | | | 11. Gluing of Wood | | | 12. Surface Treatment of Wood | | | List of Symbols Used |
|
List of Symbols Used
|
Symbol |
Designation |
Unit |
|
a |
setting width |
mm |
|
B |
wear-land width |
mm |
|
b |
width |
mm |
|
C |
sound velocity |
m · s-1 |
|
D |
ball diameter |
mm |
|
d |
diameter |
mm |
|
FN |
normal force |
kp |
|
FR |
force of sliding friction |
kp |
|
FRmax |
force of static friction |
kp |
|
f |
coefficient of sliding friction |
- |
|
fo |
coefficient of static friction |
- |
|
H |
hardness |
MPa |
|
H |
calorific value |
KJ · kg-1 |
|
HB |
Brinell hardness |
MPa |
|
h |
tooth height |
mm |
|
1 |
length |
mm |
|
Mbmax |
bending moment |
N · m |
|
Mt |
torque |
N · m |
|
m |
weight |
g or kg |
|
mo |
weight at a moisture of 0 % |
g or kg |
|
mu |
weight at the moisture content u |
g or kg |
|
n |
speed |
rpm |
|
S |
sound absorption |
% |
|
S |
tool path |
m |
|
s |
thickness |
mm |
|
T |
tool life |
h |
|
t |
pitch |
mm |
|
tF |
flash point |
°C |
|
u |
moisture content of wood |
% |
|
u |
feed rate |
min-1 |
|
V |
volume |
cm3 or m3 |
|
Vo |
volume at a moisture of 0 % |
cm3 or m3 |
|
Vu |
volume at the moisture content u |
cm3 or m3 |
|
v |
cutting speed |
m · s-1 |
|
W |
moment of resistance |
cm3 |
|
wt |
cutting path |
m · h-1 |
|
x |
cutting edge reset |
mm |
|
a |
coefficient of heat transfer |
kJ · m-2 · h-1 ·
K-1 |
|
a |
tool orthogonal clearance |
º |
|
a1 |
longitudinal swelling |
% |
|
ar |
radial swelling |
% |
|
at |
tangential swelling |
% |
|
b |
sound absorption |
phon or decibel |
|
b |
tool-orthogonal wedge angle |
º |
|
b1 |
longitudinal shrinkage |
% |
|
br |
radial shrinkage |
% |
|
bt |
tangential shrinkage |
% |
|
g |
tool orthogonal rake |
º |
|
d |
cutting angle |
º |
|
e |
angle of point |
º |
|
eB |
drill point angle |
º |
|
h |
thermal resistance |
m2 · h · k · kI-1 |
|
c |
setting angle |
º |
|
l |
tool cutting edge inclination |
º |
|
r |
density |
g · cm-3 or kg · m-3 |
|
r |
specific electrical resistance |
W cm |
|
ro |
oven-dry density |
g · cm-3 or kg · m-3 |
|
ru |
density at the moisture content u |
g · cm-3 or kg · m-3 |
|
sbB |
bending strength |
MPa |
|
sdB |
compressive strength |
MPa |
|
SzB |
tensile strength |
MPa |
|
taB |
shear strength |
MPa |
|
ttb |
torsional strength |
MPa |
|
(||) |
resistance to tensile strengths parallel to the grain direction
|
|
|
(^) |
resistance to tensile strengths vertically to the grain
direction |
|