 |
| ||||||||||||||||||||||||||||||||
|
| ||||||||||||||||||||||||||||||||
Institut f�r berufliche Entwicklung e.V.
Berlin
Original title:
Arbeitsmaterial f�r den
Lernenden
“Anrei�en und K�rnen”
Author: Frank Wengh�fer
First edition © IBE
Institut f�r berufliche Entwicklung e.V.
Parkstra�e
23
13187 Berlin
Order No.: 90-35-3102/2
|
| ||||||||||||||||||||||||||||||||
1. Purpose of marking and punch marking
Marking means laying off the shape and size of a workpiece from data in the manufacturing drawing onto the blank.

Figure 1 Marking
This is done by scribing, with special scribing tools, lines on the workpiece which must remain visible during the period of manufacture.
Punch marking means impressing conical marks for permanent marking of the scribed lines by means of a special tool - the prick punch. Punch marks are also applied as a guide for dividers points or drills.
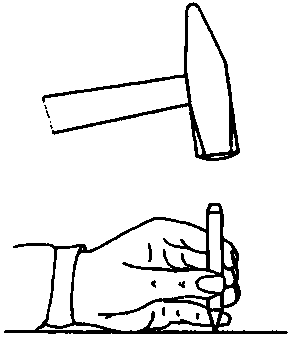
Figure 2 Punch marking
Marking and punch marking are necessary preparatory operations for subsequent working operations, such as cutting, forming and joining in single-piece production.
Careful and accurate scribing, easily visible during the entire manufacturing process is essential for the dimensional accuracy of the finished product.
In batch and mass production, scribing is of minor importance since tools and workpieces are guided so that the required dimensions are necessarily maintained during the working process.
|
| ||||||||||||||||||||||||||||||||
2. Marking tools
Scribed lines are produced by tools which are either slightly notching the surface of the workpiece or leaving a thin line by wearing themselves,
Steel scriber
Widely used scribing tool with hardened or carbide points which are straight or angular. It is used for rough or rough-machined steel parts and leaves a fine notch.
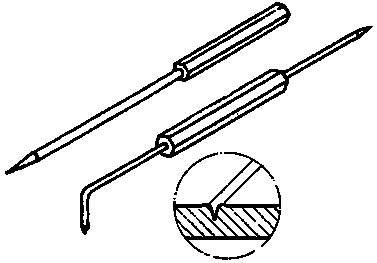
Figure 3 Steel scriber
Notch-sensitive materials and borders of thin sheet metal to be bent must not be scribed with steel scribers.
Risk of breakage!
Brass scriber
Scribing tool of brass wire with filed point. It is used for scribing on finished surfaces only and applied a thin yellow line - no notching effect I
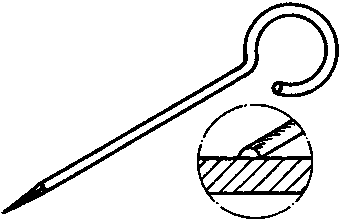
Figure 4 Brass scriber
Soft pencil
Scribing tool for thin, notch-sensitive as well as surface-refined or very soft workpieces. It applies a black line - no notching effect!
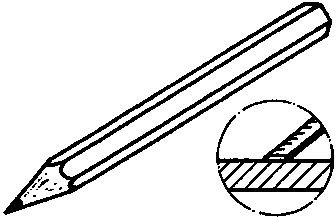
Figure 5 Pencil
Dividers
Scribing tool for scribing circular arcs and curvatures. The use of dividers always necessitates a punch mark for the guiding point. It leaves a fine notch!
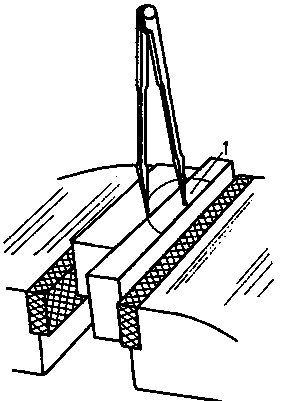
Figure 6 Scribing with
toolmakers’ dividers using an insert (1)
Customary dividers are toolmakers’ dividers with or without lockable legs, tool-makers’ dividers with adjustable points for scribing on stepped faces and beam trammels for very big curvatures.
For the use of dividers an insert may be required, if the supporting point is outside the workpiece,
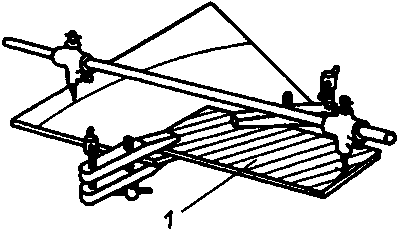
Figure 7 Scribing with beam trammels
using an insert (1)
Scribing blocks
Adjustable scribing tools used for scribing of parallel lines along datum faces or edges.
Customary scribing blocks are caliper gauges for quick scribing in the hand and height gauges for extensive or very accurace scribing (0.1 mm measuring accuracy) from a datum plane - the surface plate.
Scribing blocks may have graduations or not.

Figure 8 Caliper gauge scriber and
height gauge scriber
Scribing of parallel lines necessitates accurately machined datum faces or edges!
Prick punches
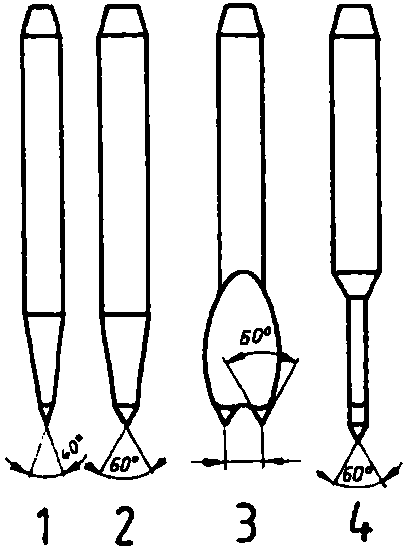
Figure 9 Prick punch types
Tools of various types producing punch marks:
|
Marking-out punch (1) |
- Angle of taper 40°, for prick-punching of scribed lines, |
|
Centre punch (2) |
- Angle of taper 60°, to produce punch marks for holes to be drilled. |
|
Double-point punch (3) |
- Punch with two points, for symmetric prick-punching of marks for bore lines. |
|
Stencil punch (4) |
- Angle of taper 60° with very slender point, for prick-punching of holes to be drilled through stencils. |
Which requirements must be met by scribed lines?
______________________________________
Which effects must be produced by scribing tools?
______________________________________
What makes the difference in the use of steel scribers and brass scribers?
______________________________________
Which requirements must be met by workpieces for which scribing blocks shall be used?
______________________________________
|
| ||||||||||||||||||||||||||||||||
3. Accessories
Scribing should be done at a clean and well-lighted place. The support must be flat and big enough to permit storing of the workpiece and accessories and scribing without hindrance.
Surface plate
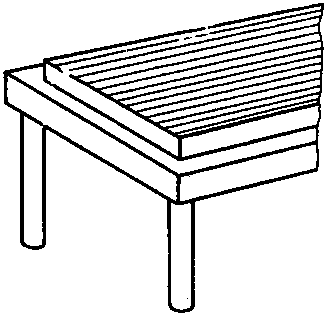
Figure 10 Surface plate
Flat, usually planed cast-steel plate or granite plate used as support for scribing work, preferably with height gauges.
Note: Surface plates must not be damaged by hammering, chipping or straightening of workpieces.
Angle plate:
Steel angle with flat base and vertical locating face provided with T-slots for clamping of parts by means of locking screws (particularly of parts which don’t have datum faces or edges).

Figure 11 Angle plate
Big steel-parallels
Equally flat testing tools of different sizes used here as support for flat workpieces for scribing with height gauges.

Figure 12 Steel parallels
Vees
Supports for cylindrical workpieces to prevent them from slipping or rolling away.

Figure 13 Vees
Stencils

Figure 14 Stencils
Accessories for scribing and prick-punching of larger batches or intricate shapes which eliminate the need for measuring the workpieces shape. Prick-punching is made by means of the stencil punch applied through hardened bushings. Further accessories are measuring and testing tools the design of which permits the scriber to be located and guided, such as: steel gauge, steel straight edge, try square.
T-square and centre square
Special squares for locating cylindrical workpieces to permit scribing of centres or lines on end faces.
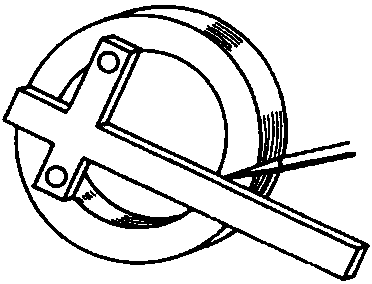
Figure 15 Use of the T-square

Figure 16 Use of the centre square
Scratch gauges
Adjustable stops permitting the scriber to be guided along flat datum edges or faces. The size is set by means of a steel gauge.

Figure 17 Setting of the scratch
gauge
Which requirements must be met by the scribing place?
______________________________________
What makes the difference between the use of centre squares and try squares?
______________________________________
|
| ||||||||||||||||||||||||||||||||
4. Preparation of the workpiece surface
The condition of some workpiece surfaces does not permit easily visible scribed lines.
Such surfaces must be coated with special paint.
|
Workpiece surface |
Paint coat |
|
Rough, big-pore surfaces of castings and forgings |
To be coated with whiting mixed in water adding a bit of linseed oil. |
|
Hard and scaled steel parts |
To be coated with copper sulphate solution (CuSO4) -danger - toxical! |
|
Big pre-machined surfaces and light metal |
To be coated with shellac or scribing varnish. |
The workpiece must have pre-scribed lines, pre-machined edges and faces from where further layout out of dimensions can be done with various possibilities of datum:
Datum faces and datum edges
Usually pre-machined faces or edges which are flat and partly perpendicular to other faces or edges. They are used as location for measuring tools or as supporting face on surface plates. When datum faces or edges are used, scribing is mostly done by means of scribing blocks.

Figure 18 Scribing based on two datum
faces or edges
1 datum faces or edges
Datum lines
On symmetrical parts or parts with indefinite shape, lines or centre lines are marked which are used as datum for further scribing.

Figure 19 Scribing based on one datum
line (centre line) and one datum edge
1 datum line
2 datum edge
Why must certain workpiece surfaces be coated prior to scribing?
______________________________________
Which possibilities of datum for scribing are there?
______________________________________
|
| ||||||||||||||||||||||||||||||||
5. Selected working techniques of marking and punch marking
5.1. Marking with steel scriber and steel straight edge
1. Prepare the surface to be scribed and a datum face.
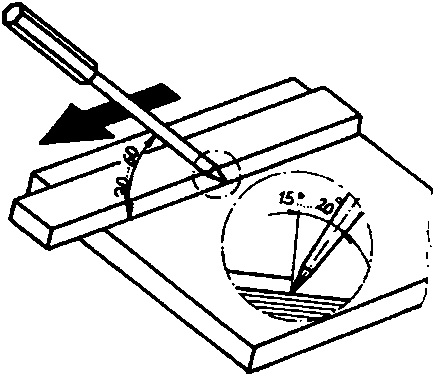
Figure 20 Scribing with steel scriber
and steel straight edge
2. Mark the parallel measures by dashes by means of steel gauge and scriber.
3. Put the steel straight edge to the dashes and connect the dashes by drawing the scriber directly along the edge of the steel straight edge (Draw the scriber to your body slightly inclined and with the scriber point trailing).
5.2. Marking with steel scriber and try square
1. Prepare the surface to be scribed and one or two datum faces.

Figure 21 Scribing with steel scriber
and try square
2. Mark the measure by dashes from one datum face by means of steel gauge and steel scriber.
3. Put the try square to the other perpendicular datum face and draw the scriber directly along the edge of the long leg.
5.3. Marking with dividers
Prepare the surface to be scribed and:
1. Mark and prick-punch the centre as supporting point for the dividers.
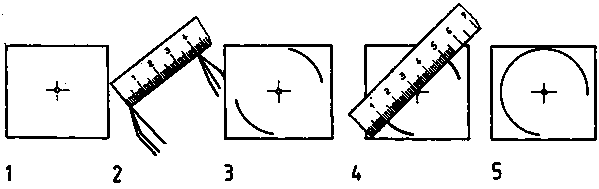
Figure 22 Steps when scribing with
dividers
2. Set the measure at the dividers by means of steel gauge.
3. Scribe check curvatures.
4. Check the radius or diameter.
5. Correct or finish-scribe the circular arc.
If straight connection lines between circular arcs are required, the arcs are to be scribed first and then the lines!
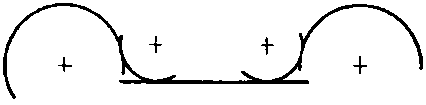
Figure 23 Correct connections between
straight lines and circular arcs
5.4. Marking with height gauge scriber
1. Prepare the surface to be scribed and a datum face.

Figure 24 Scribing with height gauge
scriber
2. Put the workpiece with the datum face onto the surface plate.
3. Set the scriber of the height gauge to the measure at the height scale.
4. Grip the height gauge at the base plate and draw it along towards your body with massive workplaces held directly and smaller workpieces pressed against the angle plate,
Notes
- Parallel scribing necessitates exactly machined datum faces or datum edges!- For height gauge scribers without scale, the measure is to be set by means of special height scales or gauge blocks.
- For height gauge scribers which are not starting from the zero position of the scriber on the surface plate plane, a steel parallel is to be used as support for the workpiece. The height of the steel parallel is to be taken into account when setting the measure.

Figure 25
1 height of the steel parallel
2 measure to be marked on the workpiece
3 measure to be set at the height gauge
How is the scriber to be drawn along the steel straight edge or try square?
______________________________________
What intermediate step is necessary for scribing with dividers?
______________________________________
Which accessories are required for scribing with the height gauge scriber?
______________________________________
5.5. Punch marking after scribing
Check punch marks are necessary after scribing if the scribed lines may be wiped out in the subsequent working process or would not be easily visible because of poor conditions of visibility during the manufacture or of bad workpiece surface.
Placing
The prick punch is placed onto the point in inclined position, then set to vertical position with a hand on it and blown!
Guidelines for check punch marks
- Spacing on straight sections: 7 - 10 mm
- Spacing on curved sections: 3 - 4 mm.
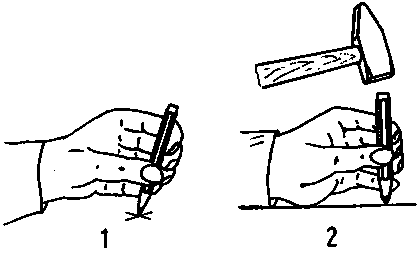
Figure 26 Placing of the prick punch
1 placing
2 setting to vertical position
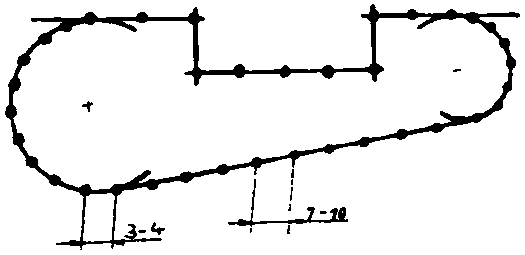
Figure 27 Correct spacings for check
punch marks

Figure 28 Producing a bore line
1 bore (D), 2 punch mark, 3 bore line,
4 scribed line - working line,
5 double-point punch width (y).
6 distance between bore line and scribed line (x)
The use of the double-point punch is necessary for prick-punching of bore lines to have a minimum of reworking for workpieces drilled. Scribing of the bore lines is to be done after scribing of working lines with the following requirements to be met:
D = y - 0.2 mm
x = D/2 + 0.5 mm
D = drill diameter
y = double-point punch width
x =
distance between bore line and scribed line
Note
After the first blow, one point of the double-point punch is to be put into the last preceding punch mark, then the punch is set into vertical position and blown - a new punch mark is produced!
This will result in symmetrical punch mark spacing.
Then the punch marks are repunched with a powerful blow on the centre punch I

Figure 29 Correct placing of a
double-point punch
What makes punch marking of scribed lines necessary?
______________________________________
What size is of prime importance for bore line marks?
______________________________________
|
| ||||||||||||||||||||||||||||||||
6. Labour safety recommendations
- Points of scribers, dividers and prick punches are to be protected by putting on cork or plastic caps!
- Do not put scribing tools with protruding points into pockets of clothing!
- Store height gauge scribers with the point showing to the rear!
- Do not use damaged or dull scribing tools!
- Copper sulphate solution is toxical!
It should be stored in properly marked containers only and kept closed! Skin contact is to be avoided!