 |
| ||||||||||||||||||||||||||||||||||||||||||||||||||||||||||||||||||||||||||||||||||||||||||||||||||||||||||||||||||||||||||||||||||
|
| ||||||||||||||||||||||||||||||||||||||||
FOOD AND AGRICULTURE ORGANIZATION OF THE UNITED NATIONS
Rome
1981
First published 1981
Reprinted 1984, 1989
P-69
ISBN 92-5-101200-8
© FAO 1981
|
| ||||||||||||||||||||||||||||||||||||||||
Preface
The first twenty- six volumes in FAO's Better Farming Series were based on the Cours d'apprentissage agricole prepared- in the Ivory Coast by the Institut africain de d�veloppement �conomique et social for use by extension workers. Later volumes, beginning with No. 27, have been prepared by FAO for use in agricultural development at the farm and family level. The approach has deliberately been a general one, the intention being to constitute basic prototype outlines to be modified or expanded in each area according to local conditions of agriculture.
Many of the booklets deal with specific crops and techniques, while others are intended to give the farmer more general information which can help him to understand why he does what he does, so that he will be able to do it better.
Adaptations of the series, or of individual volumes in it, have been published in Amharic, Arabic, Bengali, Creole, Hindi, Igala, Indonesian, Kiswahili, Malagasy, SiSwati and Turkish, an indication of the success and usefulness of this series.
Requests for permission to issue this manual in other languages and to adapt it according to local climatic and ecological conditions are welcomed. They should be addressed to the Director, Publications Division, Food and Agriculture Organization of the United Nations, Via delle Terme di Caracalla, 00100 Rome, Italy.
|
| ||||||||||||||||||||||||||||||||||||||||
Better Farming Series 30 - Better Freshwater Fish Farming: the Fish (FAO, 1981, 48 p.)
Introduction
1. You have built the new bigger pond described in Booklet No. 29, Better freshwater fish farming: the pond.
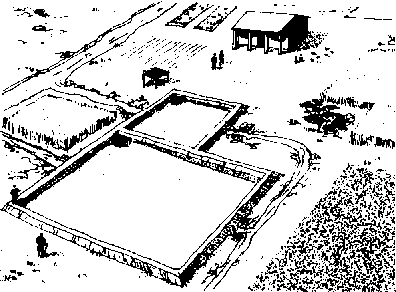
The pond
2. Before you let the water into your new pond, there are a few things that you must do.
3. Make sure that the screens on the inlet, outlet and overflow are in place and tight.
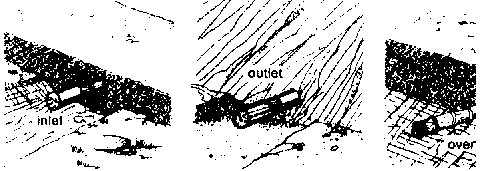
Screens
4. Make sure that the outlet is tightly closed. To do this, wrap a wood plug with old cloth, put it in the outlet pipe on the outside of the pond and tap it lightly with a hammer so that it will stay in the pipe when the pond fills with water.
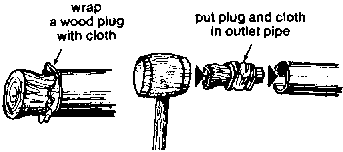
Wrap a wood plug with cloth
5. If you have built a better outlet with a T or an L piece (see Booklet No. 29, Items 97 to 101), turn it to the upright position.
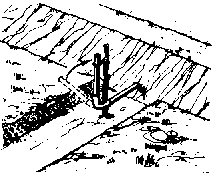
Figure Turn the L or T piece in
the upright position
6. Put rocks on the bottom of your pond under the inlet where the water will fall when it begins to come into the pond.
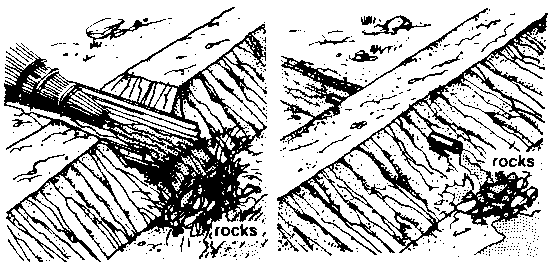
Rocks
7. This will keep the bottom from washing away. It will keep the water from getting too muddy. It will make the water splash when it first comes into the pond and bring air for the fish to breathe.
8. Now you are ready to fill your pond.
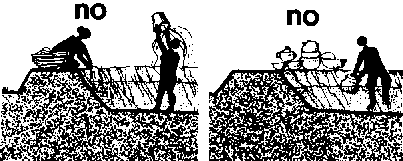
Filling your pond with water
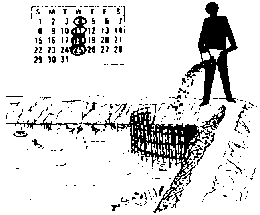
9. Dig a small ditch from the water source to the inlet to bring the water to your new pond.
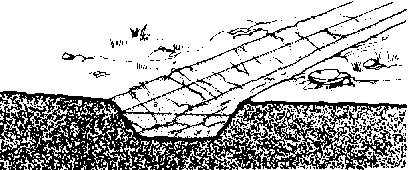
Dig a small ditch
10. Let the water run into the pond until it reaches the level of the overflow pipe on the inside of the pond.
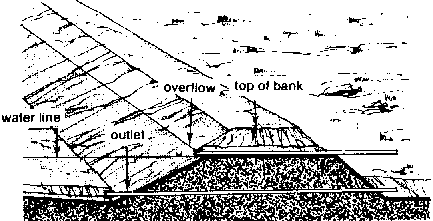
Overflow level
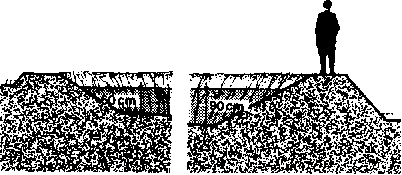
11. If your inlet pipe is about 10 centimetres in diameter, you will need about half a day to fill your pond.
12. When the water reaches the level of the overflow pipe it will be about 60 centimetres deep at the shallow upper part of the pond and about 90 centimetres deep at the deepest part.
Overflow pipe level
13. Now you are ready to fertilize the water in your pond.
14. Build a crib from bamboo or wood to held the fertilizer as you did with your first small pond. Build it in one corner in the shallow part of the pond. The drawing below will show you how.
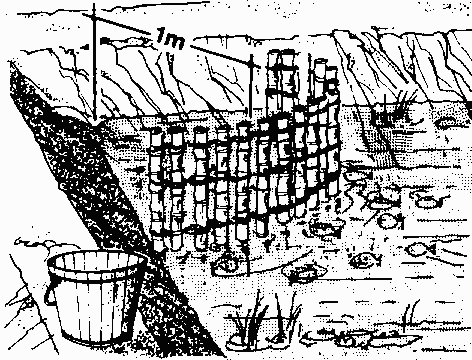
Build a crib from
bamboo
Fertilizing the water In your pond
15. You can fertilize the water in your new pond with
· compost made with animal manure
· compost made with plant material e animal manure
· plant material.
16. You can fertilize your new pond with animal or plant compost in the same way as you did with your old small pond.
17. Items 56 to 66, in Booklet No. 27, tell you how to make animal compost. If you do not have animal manure, you can fertilize your pond with compost made with plant material.
18. To make compost with plant material make a compost pile using layers of grass, chopped leaves or other plant material mixed with a little topsoil and damp it with water to make it rot faster.
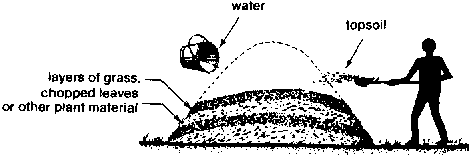
Make a compost pile
19. But to make compost takes a lot of time and work. It takes about a month to make it.
20. If you want to save time and work and you have plenty of animal manure, instead of fertilizing with compost fertilize with fresh animal manure mixed with fresh plant material. This is easier and quicker.
21. You can use the manure of chickens, pigs and cows to fertilize your pond or you can make a mixture of two or more kinds of manure.
Use manure
22. Your fish will grow better if you fertilize your pond with compost made with animal manure or with fresh animal manure mixed with fresh plant material.
23. If you do not want to take time to make compost with plant material, you can also put fresh plant material in the crib to fertilize your pond. But if you do this, it will take longer for your pond to be ready.
Putting fertilizer Into the crib
24. When you first put fertilizer into your crib, pack it down well and fill the crib to the water line. This will be about 60 centimetres deep in the shallow part of the pond.
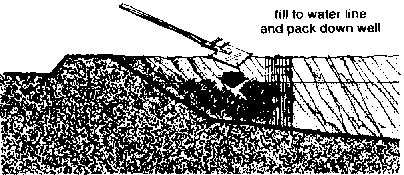
Fill to water line and pack down
well
25. If you are going to use compost, you will need enough to till your crib at the beginning and later you will need enough compost to add about a bucket each week.
26. If you are going to use animal manure, you will need about two buckets to put in your crib at the beginning. Mix the two buckets of animal manure with enough fresh plant material to fill your crib to the water line. Later, you will need enough animal manure to add about a bucket each week.
27. If you are going to use plant material or compost made with plant material, you will need enough to fill your crib at the beginning and later you will need enough to keep the crib full to the water line.
When is your pond ready?
23. If you fertilize your pond with animal compost or animal manure, the water will start to turn green in two or three days. If you fertilize your pond with plant compost or plant material, it will take one week or longer.
29. When the water begins to turn green, you will know that natural food is growing in your pond. It will take about a week to become green enough.
30. You can make a simple test to be sure that the water is green enough. Put your arm in the water up to your elbow. If you are just able to see the ends of your fingers, the water is green enough.
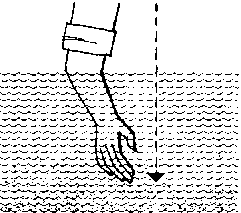
Test the green water
31. To keep the water green, put fertilizer In the crib every week. It you see mat the water Is losing its green colour, put a little more fertilizer in and stir it to break it up.
Keep the water
green
Taking care of your pond
32. You must take very good care of your pond. Items 84 to 90, in Booklet No. 27, will tell you some important ways to care for your pond.
33. Here are some more ways to take care of your pond.
34. Do not let large animals such as cows, buffalo, horses or donkeys graze on the banks of your pond. They are too heavy and may break the banks down.
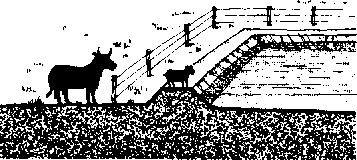
Not let large animals on the
banks
35. You may let small animals such as goats and sheep graze on the banks.
36. Do not use your pond, your pond water source or your water supply ditch for bathing, or washing clothes, dishes or cooking pots.
Not use the pond for bathing
37. Do not plant big trees near your pond. If there are already big trees there, cut any branches that hang over the pond. The water in your pond may not turn green enough if your pond is in the shade.
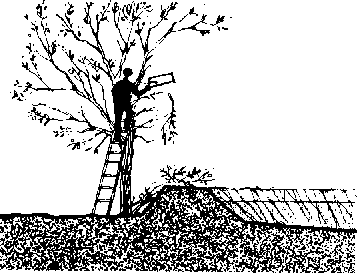
Not plant big trees near the
pond
|
| ||||||||||||||||||||||||||||||||||||||||
Better Farming Series 30 - Better Freshwater Fish Farming: the Fish (FAO, 1981, 48 p.)
The fish
Growing your own baby fish
47. A new nursery pond of about 7 by 7 metres, or about 50 square metres, will be large enough to grow the baby fish you will need.

New nursery pond
48. A nursery pond can be built just like a big pond but since the nursery pond is smaller the banks need not be as high or as wide.
49. You can build your nursery pond with an inlet, outlet and
overflow like these you used in your big pond.
50. You can also use a shallow
trench to let water into your nursery pond (see Booklet No. 29, Items 84 and
85), and use a siphon to drain the water out (see Booklet No. 29, Items 114 to
123), but you will still need an overflow to control the water level in the
nursery pond.
51. You will also need a crib to held the fertilizer in your new nursery pond.
52. If you build your new nursery pond next to your big pond so that they share a bank, you will only need to build three new banks for it.
53. If you grow baby fish near your pond, you will not have to carry them far and they will not be hurt when you are carrying them.

Grow baby fish near the pond
54. Fill your nursery pond with water and fertilize it with compost, animal manure or plant material as you did with your big pond. Wait for the water to turn green.
55. Now you are ready to put fully grown male and female fish into your nursery pond. A fully grown Tilapia nilotica is about 20 centimetres long.
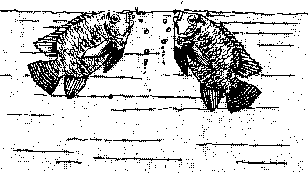
56. Be careful to put the right number of male fish and female fish into your nursery pond. The drawing shows you how to see the difference between male fish and female fish.

Difference between male and
female fish
57. If you are using your old smaller pond of 10 by 10 metres as a nursery pond and you are using Tilapia nilotica, you will need to put 20 fully grown male fish and 80 fully grown female fish into the pond.

Use Tilapia nilotica in the old
smaller pond
58. If you have built a new nursery pond of 7 by 7 metres and you are using Tilapia nilotica, you will need to put 10 fully grown male fish and 40 fully grown female fish into the pond.

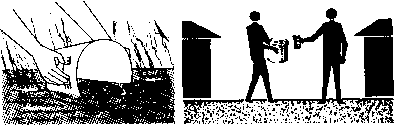
Use Tilapia nilotica in a new
nursery
pond
Feeding the fish In your nursery pond
59. The fully grown fish in your nursery pond will get much of their food from small plants and animals which grow in the green water.
60. When the baby fish are born they will be very, very small and at first they will get all of their food from small plants and animals which grow in the green water.
61. These plants and animals are so small that they can hardly be seen or they cannot be seen at all. But if the water is green in your nursery pond, you can be sure that they are there.
62. So in your nursery pond you must always be very careful that the water stays green so that your baby fish will have enough to eat.
63. To keep the water green, do not forget to put a bucket of fertilizer In the crib In your nursery pond each week. It you are using plant compost or pant material, keep the crib filled to the water line.
64. To keep the full- grown fish in your nursery pond healthy, you must also feed them other kinds of food.

Other kinds of food
65. When the baby fish begin to grow, they, too, will eat the other kinds of food.
66. You can give the fish in your nursery pond many things to eat. But you must be sure that this food is ground or cut very small so that the baby fish can swallow it.
67. You can give the fish in your nursery pond termites or finely ground or cut
· grain mill sweepings
· rice bran
· beer wastes
· cottonseed or groundnut cake.

Food for fish
68. The bigger your baby fish grow, the more food they will need. Feed the fish in your nursery pond
· 500 grams of food every day during the first month
· 1 000 grams of food every day during the second month
· 1 500 grams of food every day during the next months.
69. If you see that the fish do not eat all of their food, give them a little less the next day.
70. If you see that the fish eat all of their food very quickly, give them a little more the next day.
Moving your baby fish
71. After about three months, there will be many baby fish of different sizes in your pond. Then you can begin to take baby fish out of your nursery pond to put into your big pond.
72. Use baby fish which are 5 centimetres or longer to put into your big pond. If there are many baby fish which are 5 centimetres or longer, choose the biggest ones to put into your big pond.
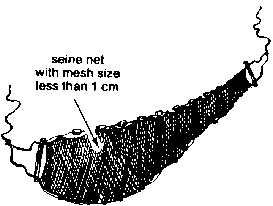
73. The easiest way to take out your baby fish is to use a seine net. If you use a seine net with a mesh size of about 1 centimetre the smaller fish will swim through and you will catch the fish of 5 centimetres or longer. But be sure to put me fully grown fish back In your nursery pond.

Seine net with mesh size of about
1 cm
74. From now on, you can take baby fish out of your nursery pond each month for your own use or to sell.
75. Be careful that your nursery pond does not become too full of fish. If there are too many fish, they will not grow well and your baby fish will not be strong and healthy.
76. To keep your nursery pond from becoming too full of fish, drain all of the water out of the pond each year and collect all of the fish.

Drain the water out each year
77. You can eat the big fish that were in the nursery pond. Item 144 in this booklet will tell you what to do with the baby fish.
78. Wait until the bottom of the nursery pond is dry, then clean and repair the bottom and the banks. Items 145 to 148 in this booklet will tell you how.
79. Now fill the nursery pond with water and fertilize it as you did before. When the water is green, put in the right number of fully grown female fish and male fish. Items 56 to 58 in this booklet will tell you how many fully grown fish to use.

Fill the nursery pond with water
and fertilize it
80. In about three months, you will be able to take more baby fish out of your nursery pond.
Carrying your baby fish
81. You must be very careful when you carry your baby fish from one place to another. Baby fish can be hurt easily.
82. When you take the baby fish out of your nursery pond using a seine net, do not carry them in the seine net. Carry them in a container such as
· a clay pot with a cover
· a bucket with a lid
· a plastic bag.

Container
83. When you carry baby fish, you must be careful to
· use only clean water
· keep the fish out of the sun or cover the container with a wet cloth to keep it cool.

Keep the fish out of water
84. If you carry your baby fish in plastic bags, carry the bags in a box so that they will not break. Cover the box and the plastic bags with a wet cloth to keep them cool.

Keep the box cool
85. If you see that the baby fish are gasping for air, put some air into the water from time to time by
· splashing the water gently with your hand
· forcing air into the water with a bicycle tire pump.

Forcing air into the water
Putting baby fish Into your big pond
86. When your new big pond is full of water, you have fertilized it and the water has become green enough, you are ready to put in the baby fish.
87. You already know that if you use Tilapia nilotica in a pond 15 by 15 metres, you will need 450 baby fish which are 5 centimetres or longer.
88. Put the baby fish gently into your big pond as you did with your first small pond. Items 70 to 76, in Booklet No. 27, will tell you how.

Put the baby fish into the big
pond
Feeding your big fish
89. You already have learned that the big fish in your pond will get much of their food from small plants and animals which grow in the green water.
90. To keep the water green, do not forget to put a bucket of fertilizer In the crib In your pond each week. It you are using plant compost or plant material, keep the crib tilled to the water line.
91. To make your big fish grow more quickly, you must also feed them other kinds of food. You can feed them
· termites
· tender leaves and waste of banana and cassava
· grain mill sweepings
· rice bran
· beer wastes
· cottonseed or groundnut cake
· slaughterhouse wastes
· animal wastes
· kitchen wastes
· spoiled fruit and vegetables
· left- over food
· chopped grass.

Food for fish
92. With your old small pond, you fed your fish only once a day. But your fish will eat better and grow faster if you feed them two or three times during the day.
93. Prepare all the food for one day's feeding at the same time and give the fish part of the food at two or three different times during the day.
94. Always try 10 feed your fish at the same times every day.

Feed the fish at the same time
95. The bigger your fish grow, the more food they will need. If your pond has 450 fish in it, feed them
· 500 to 900 grams of food every day during the first month
· 900 to 1 200 grams of food every day during the second month
· 1 200 to 1 600 grams of food every day during the third month
· 1 600 to 2 000 grams of food every day during the fourth month
· 2 000 to 2 700 grams of food every day during the fifth month
· 2 700 to 3 500 grams of food every day during the sixth month and until the time that you harvest your fish.
96. It is not easy to know exactly how much food to feed your fish. You must watch them when they eat to learn how much food they need.
97. Feed your fish in the shallow part of the pond so that you can see them eat.
98. If you see that the fish do not eat all of their food, give them a little less the next day.
99. If you see that the fish eat all of their food quickly, give them a little more the next day.
100. If you feed your fish at the same place every day, you will see whether the fish are eating well. If you give them too much, the food which is not eaten will stay on the bottom.
101. Too much uneaten food on the bottom of the pond will take the air out of the water.
102. To make it easier to see if your fish are eating well, mark several places in your pond to feed them.
103. Mark each place by making a square or a ring of light wood or bamboo. Drive a pole into the pond bottom and attach the square or ring, as shown in the drawing.

Attach the square
104. When you feed the fish, put the food inside the square or ring. You may be able to see any uneaten food on the bottom under the square or ring. If you cannot see the bottom, feel with your hands to find any uneaten food that may be there.

Uneaten
food
|
| ||||||||||||||||||||||||||||||||||||||||
Taking care of your fish
105. You must take very good care of your fish. Watch them carefully to see that they are healthy and swimming strongly.
106. If you find any dead fish floating in your pond, take them out right away and change some of the water in your pond.

Dead fish
107. To do this, open the inlet and let in some new clean water. The old water will drain out of the pond at the overflow. Do this for 2 or 3 hours each day for several days until you see that your fish are well.
108. If the weather is too hot, it you feed your fish too much, or if you put too much fertilizer into the pond, there may be too little air in the water for your fish to breathe.
109. If you see your fish coming to the surface gasping for air, give them less food and do not put any fertilizer into your pond for several weeks.
Fish gasping for air
110. Put more air into the water of your pond by changing some of the water for several days, as you did in Item 107 in this booklet.
111. When you let new water into the pond, let it in quickly so that it will come with a splash and bring more air into the water. This will help your fish to breathe easily.

Let water in with a splash
112. If you see any other things wrong with your fish that you do not understand, stop feeding them and stop putting fertilizer into the pond. Then change some of the water in your pond every day for several days, as you did in Item 107 in this booklet.
113. After several days if your fish are still not well, if they are not eating well or gasping for air or are not swimming strongly, ask your extension agent or your fish culture station for help.
|
| ||||||||||||||||||||||||||||||||||||||||
Better Farming Series 30 - Better Freshwater Fish Farming: the Fish (FAO, 1981, 48 p.)
Harvesting your fish
114. When you harvested the fish in your first small pond, you first drained all of the water out of the pond. Then you collected the fish. Items 91 to 98, in Booklet No. 27, tell you when and how to do this.
115. But there are several ways to harvest your fish. You can harvest them
· without draining the water
· by draining all of the water
· by draining part of the water.
116. Here are some things that you should know about these different ways of harvesting your fish.
Harvest without draining the water
117. If you do not have enough water to fill your pond again and you want to harvest only part of your fish, you can use a seine net to gather them without draining the water.
118. A seine net with a mesh of 3 to 3.5 centimetres will catch the biggest fish and allow the small fish to escape through the net.

Seine net with mesh size of 3 to
3.5 cm
119. You will need several people to harvest with a seine net. Perhaps your family can help you. Perhaps you can ask your neighbours for help, and later help them with their work or give them some fish to pay them for their help.

Harvest with a seine ret
120. Start at the deep end of the pond and pull the seine net slowly toward the shallow end. The drawing shows you how.

Shallow and deep end
121. You can also use a cast net or a lift net to harvest some of the fish from your pond without draining the water.

Cast net
122. With a cast net or a lift net, it is easier to catch the fish while they are eating and they are all together. Keep the biggest fish and put the smaller fish back into the pond.
Harvest by draining all of the water
123. If you have enough good water to fill the pond again, it is best to drain all of the water. If you drain all of the water, you will be sure to catch all of the fish and you can clean the bottom of your pond.
124. While the pond is being drained, use baskets or hand- nets to take the fish out of the water. After all of the water has been drained from the pond, you may still find small pools here and there on the bottom. Be careful to gather all of the fish in the pools.
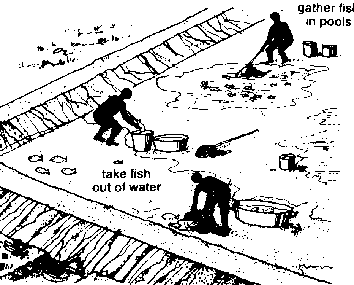
Take fish out of
water
Harvest by draining part of the water
125. If you have only enough water to fill part of your pond, do not drain out all of the water. Drain only part of it out.
126. Pull the wood plug closing the outlet, or, if you are using a siphon, put the siphon in place and begin to let the water out.
127. Let half the water flow out through the outlet or siphon. Then put the plug back in the outlet or remove the siphon.
128. Now you can begin to harvest your fish with a seine net. Do it the same way as you did in Item 119 in this booklet. If you have a seine net with a mesh size of less than 1 centimetre, you will be able to catch all of your fish.
Harvest the fish with a seine ret
129. Take all the big fish and put the small fish back. If you have too many baby fish, Item 144 in this booklet will tell you what to do with them.
130. When you are finished harvesting, let water flow back into the pond until it reaches the level of the overflow pipe.
What to do with your big fish
131. You will harvest more than twice as many big fish from your new big pond as you did from your old smaller pond.
132. When you harvest your big fish, you must be ready to eat them or sell them or preserve them the same day. Items 105 to 112, in Booklet No. 27, will tell you what to do.
What to do with your baby fish
133. When you harvest your pond, you will also catch many fish that are too small to eat or to be sold at the market.
134. If you have not built a nursery pond, you may need some of these baby fish to put back into the big pond you are harvesting. You may also be able to sell some to another fish farmer. But you must take good care of the baby fish until you are ready to use them or sell them.
Take good care of the baby fish
135. It you have another pond that is full of water, you can put these baby fish in a pen of split bamboo or net in the corner of the other pond. You can also keep these baby fish in a net pen or in a floating cage of split bamboo.
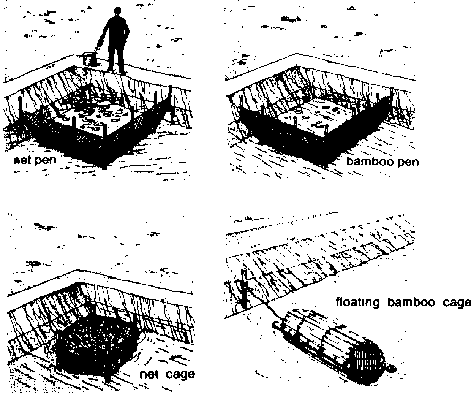
Keep the baby fish
136. If you do not have another pond, you should keep the baby fish alive in a special small pond nearby, until you are ready to use them, as you did when you harvested your first small pond (see Booklet No. 27).
137. The small pond can be a simple hole in the ground about 3 by 3 metres and about 40 centimetres deep. You should have it ready before you begin to harvest.
138. Your baby fish will stay alive longer if they are out of the sun. Build the small pond in the shade, under a tree or put a shelter over it. You can build a simple shelter using bamboo or wood.

Bamboo shetler
139. Your baby fish will stay alive longer if they have fresh water. Build the small pond with an overflow and put the small pond near the ditch which brings water to your big pond. That way you can have fresh water running through your small pond.
140. You can also let fresh water into your small pond with a small ditch or a siphon.
141. Your baby fish will stay alive longer it you feed them a little food each day. Feed your baby fish termites or finely ground rice bran, cottonseed cake or groundnut cake when they are in the small pond.
Feed the baby fish
142. If you keep your baby fish in a small pond out of the sun in fresh water and if you feed them each day, they will stay alive for about 5 days. This is enough time to dry and clean and repair the bottom of your big pond, to fill it with water and begin to fertilize it, and to put the baby fish back into your big pond.
143. If you have built your own nursery pond, you will not need these baby fish.
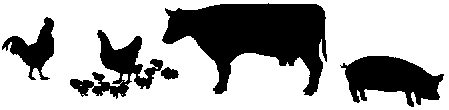
144. if you have more baby fish then you can use or sell, you can dry them in the sun. After you have dried the baby fish, grind or pound them and mix them with crushed cottonseed or groundnut cake or with rice bran to feed your big fish, your poultry or your pigs. You can also use the baby fish to fertilize your farm garden.

Fertilize the farm
garden
|
| ||||||||||||||||||||||||||||||||||||||||
Now you must begin again
145. If you have drained all of the water from your pond, you can clean the bottom of the pond.
146. But do not let your pond bottom become too dry. If the bottom of your pond becomes too dry, it may crack and will not held water well when you are ready to fill the pond with water again.
147. Repair the banks and cut the weeds and grass on the banks around the pond.
148. If there are any water leaks in the banks or around the inlet, outlet or overflow, stop them by packing them with good clay soil.

Water leaks
149. When you are finished, let water into the pond and fertilize the water with animal compost, plant compost, animal manure or plant material, as you did before.

Let water into the pond
150. When the pond is green again, put 450 baby fish into the pond. Use only healthy fish which are 5 centimetres or longer.

Put baby fish into the pond
151. In about 6 months you will be able to harvest another crop of fish.
152. This booklet has told you how to grow more fish and how to grow them better.
153. Now that you have built your first big pond and you have used it to grow more fish better, you may decide that you would like to improve your fish farming even more.
154. Booklet No. 29 has told you how to build a bigger pond and how to build it better.
155. But there are still more ways to improve your fish farming. You can
· build still bigger ponds
· build more than one pond
· build new and better kinds of inlets and outlets grow fish in several ponds in such a way that you can harvest fish all year round
· grow fish in pens and cages manage your fish farming together with your farm animals and gardens and fields so that they will be better and produce more.
156. You will learn more about these ways in a later booklet.